PURPOSE OF THIS MANUAL:
This manual guides you through the process of registering a vehicle and device on the MyToyota system.
Whether you are new to the workflow or need a quick refresher, this guide will take you step-by-step through the system operations.
WHAT YOU NEED TO GET STARTED:
Before beginning the registration process, you must have a login account.
Your username and password must be requested from your supervisor before you can proceed.
When you need to create a new scanning tool account, please prepare and share the following details with your manager:
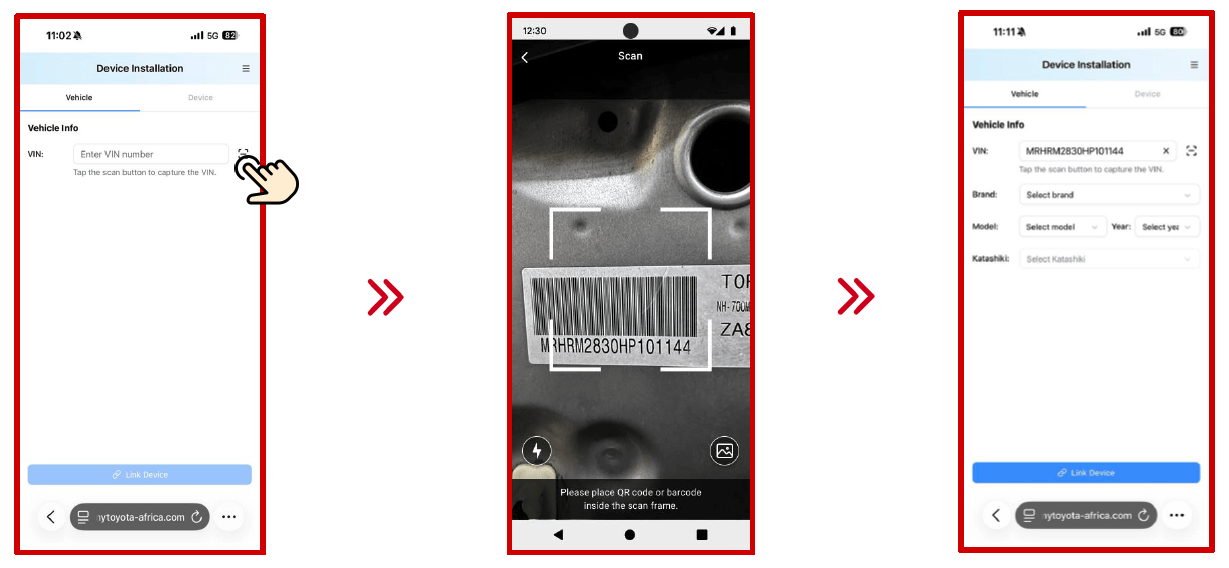
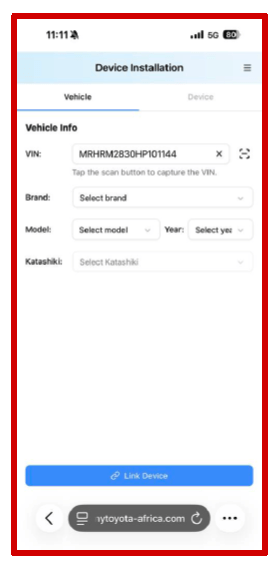
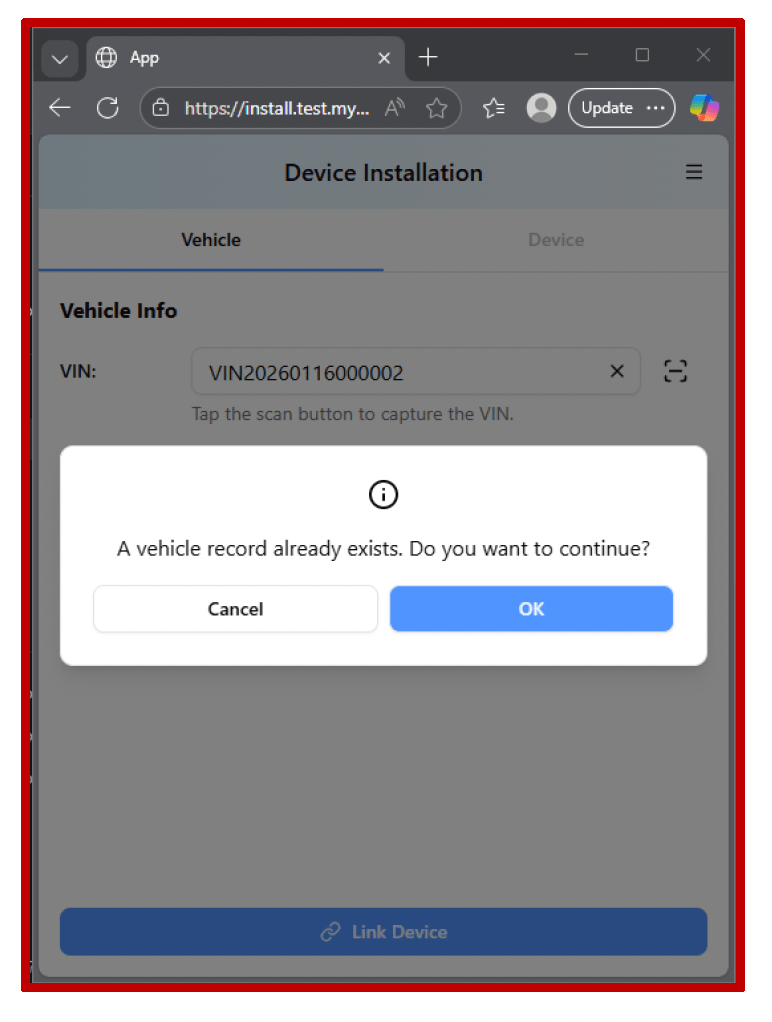
To register a vehicle in MyToyota, start by entering its 17-digit VIN using one of these methods:
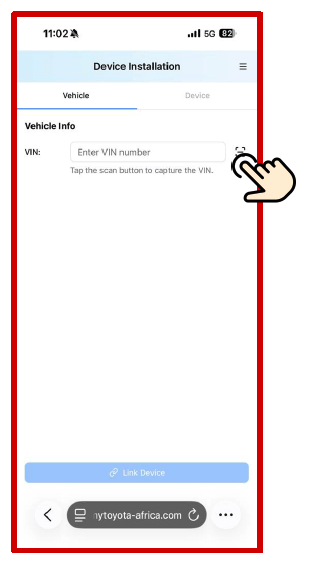
1. Scan Barcode: Tap the camera icon to open your device’s camera and scan the VIN automatically.
2. Manual Entry: Type the full 17-digit VIN into the field.
3. Note: Once all 17 digits are entered or scanned, the system will automatically display the vehicle details.
VEHICLE INFO FEATURES:
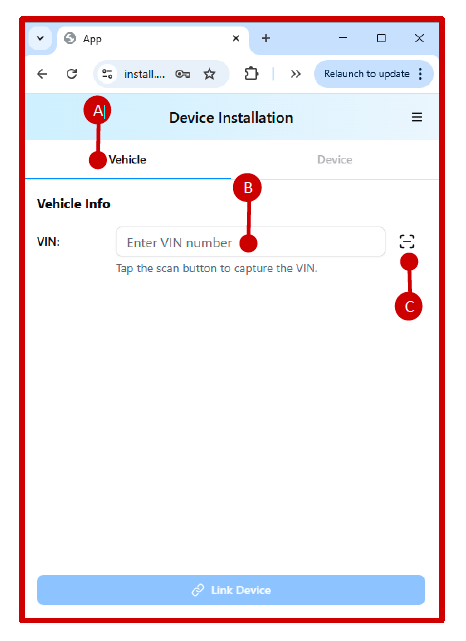
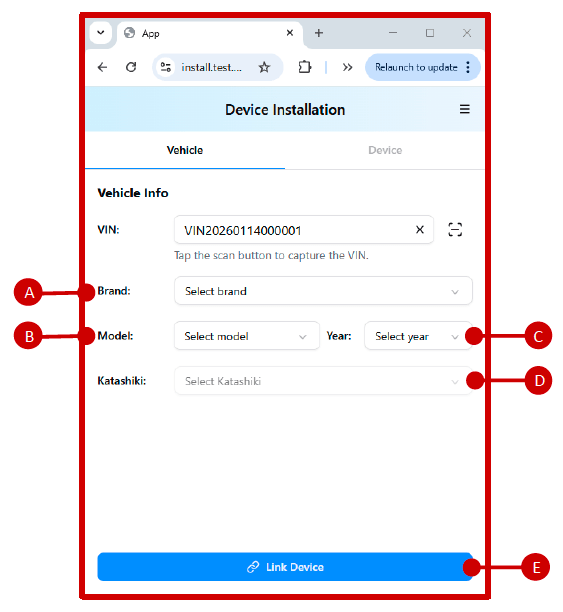
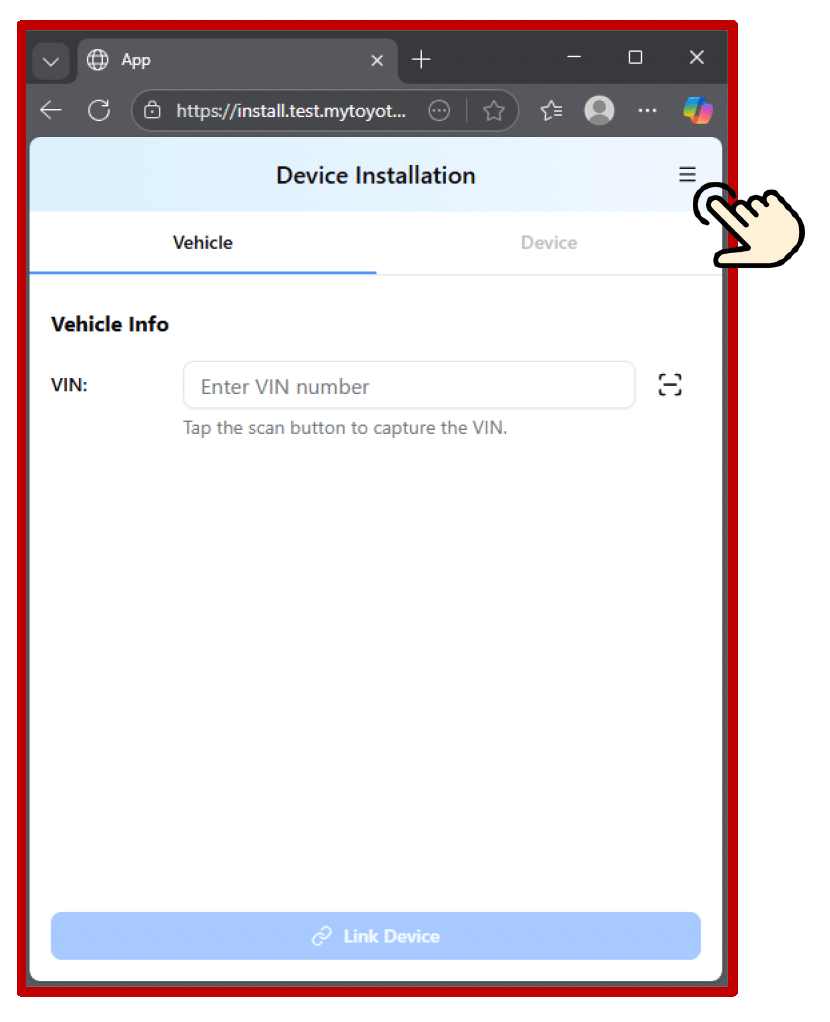
A. Vehicle Tab: The installation tool opens on the Vehicle tab by default.
B. Enter VIN Number: Type the 17-digit VIN manually if preferred.
C. Scan Barcode: Opens the camera to scan the VIN.
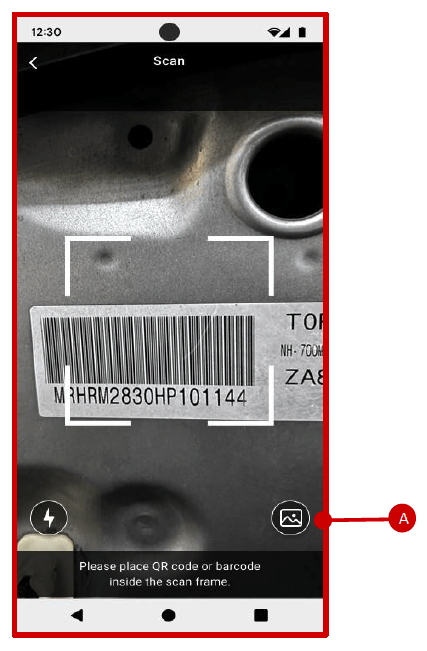
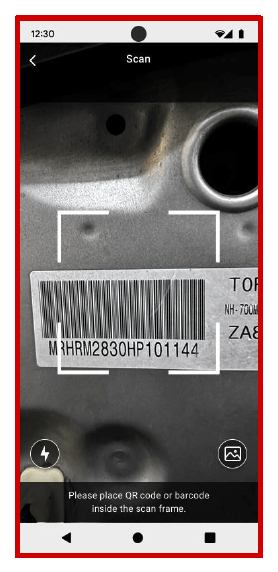
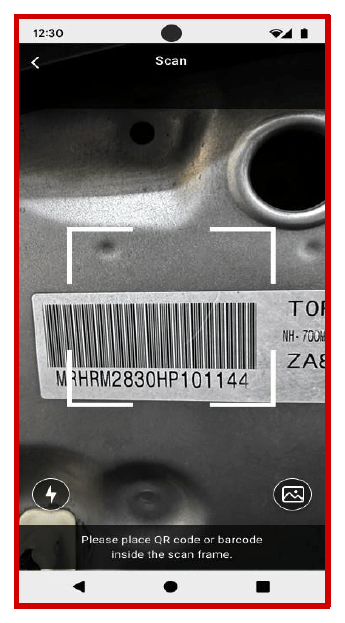
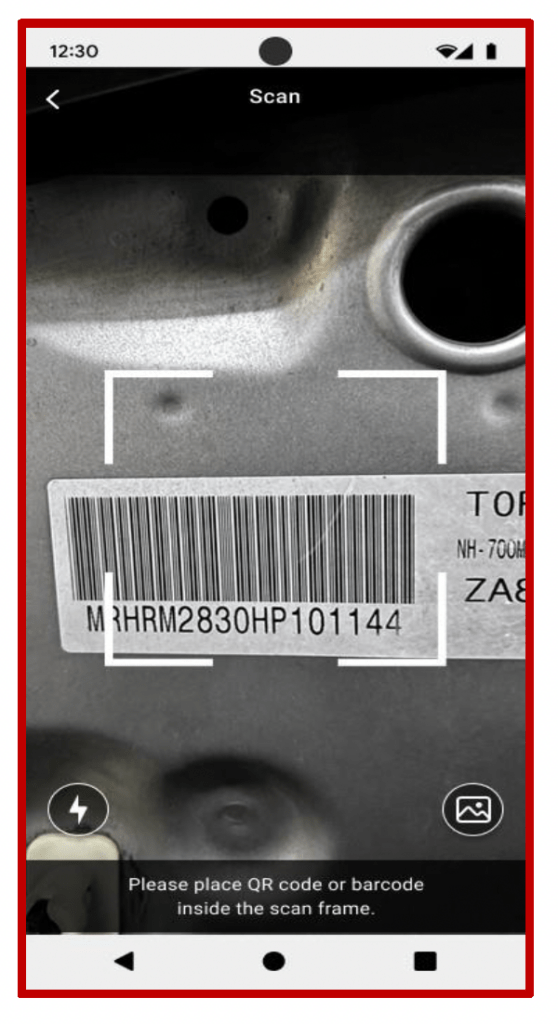
After selecting the Scan button, your device’s camera will activate. Position the camera in front of the vehicle’s VIN barcode; the system will automatically read the code and populate the VIN field.
VEHICLE INFO FEATURES:
A. Photo Album: You may also select this option to upload a VIN barcode image from your device’s photo gallery instead of scanning.
TIPS & CAUTIONS:
1. Location: If you cannot find the VIN on the vehicle, please check with your supervisor.
2. Lighting: Poor lighting, such as in a dark garage, may affect barcode scanning. Ensure the barcode is well-lit for best results.
3. Alignment: Hold your phone steady and keep the barcode within the on-screen frame until the scan completes.
Once the VIN has been entered, continue by completing the remaining vehicle details as outlined below.
ADDITIONAL VEHICLE INFORMATION:
A. Brand: Use the drop-down menu to select the vehicle’s brand.
B. Model: Select the correct vehicle model from the drop-down list.
C. Year: Choose the model year for the vehicle.
D. Katashiki: Select the appropriate Katashiki for the vehicle.
After all vehicle details have been entered, click Link Device to proceed with registration and installation.
E. Link Device button: Click the button to confirm the vehicle information entered. Then, the system will continue the process to the ‘Device Info’ page
After completing the vehicle information, continue with device registration. Provide the device details using one of the methods below:
DEVICE INFO FEATURES:
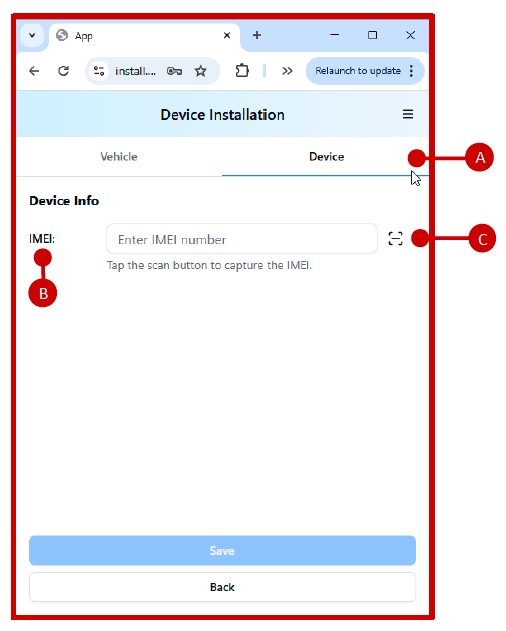
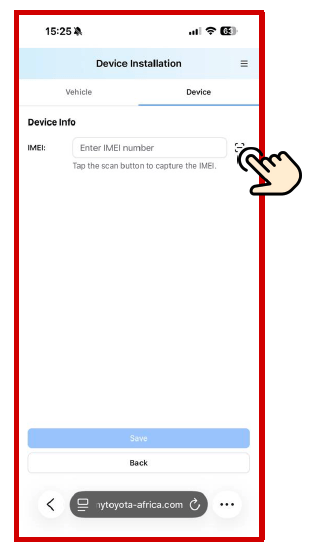
A. Device Tab: The installation tool automatically opens on the Device tab.
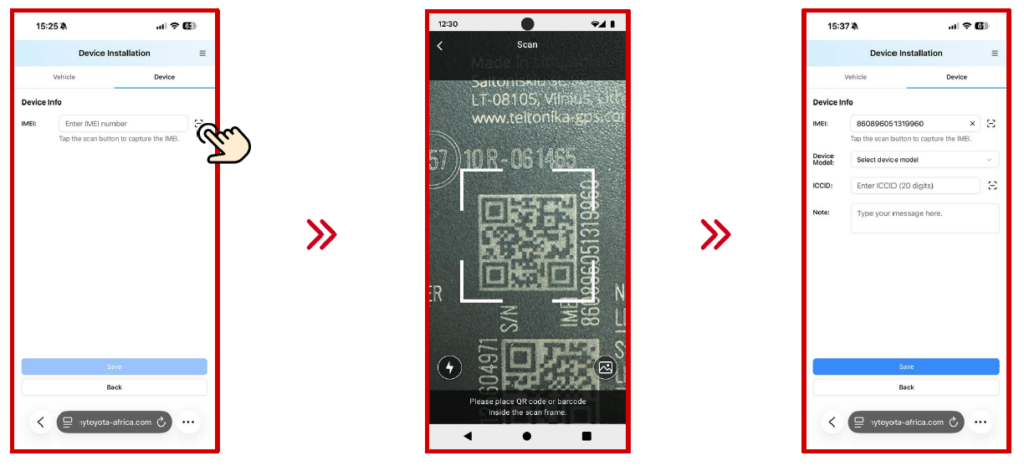
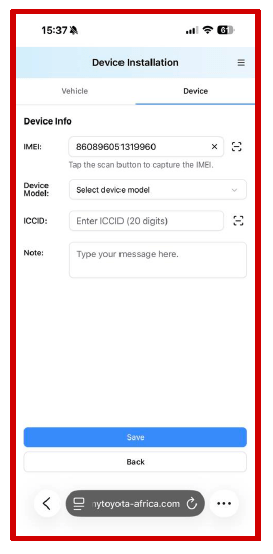
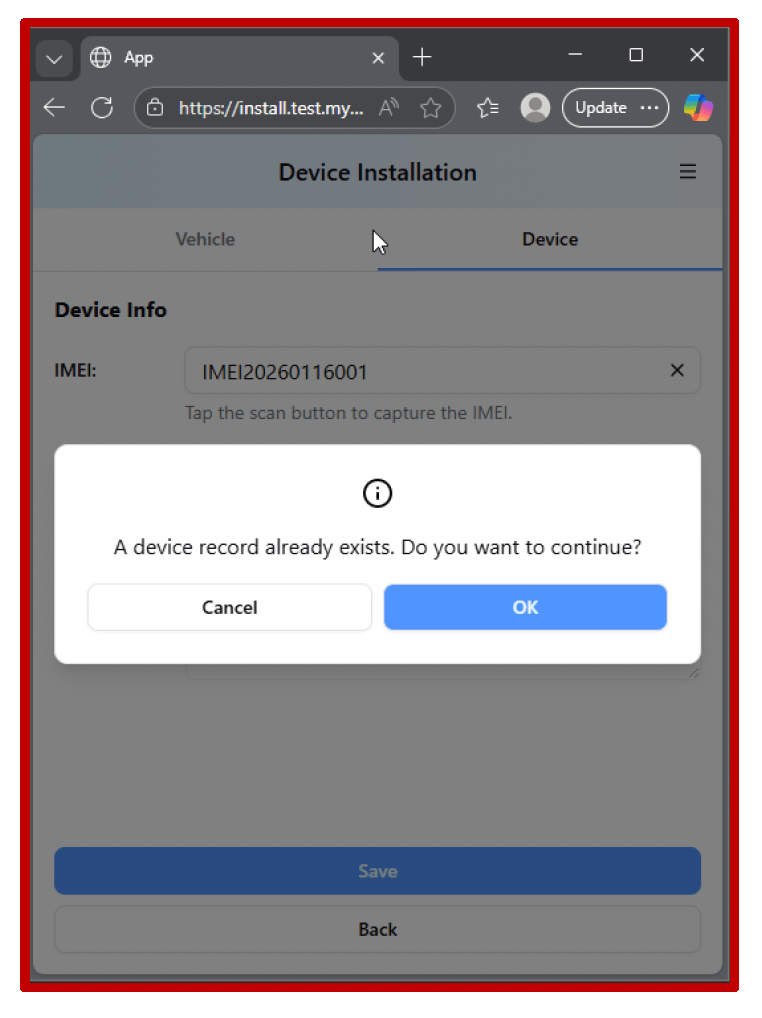
B. Enter IMEI Number: If entering the IMEI manually, type the complete 15-digit IMEI into the dialogue box.
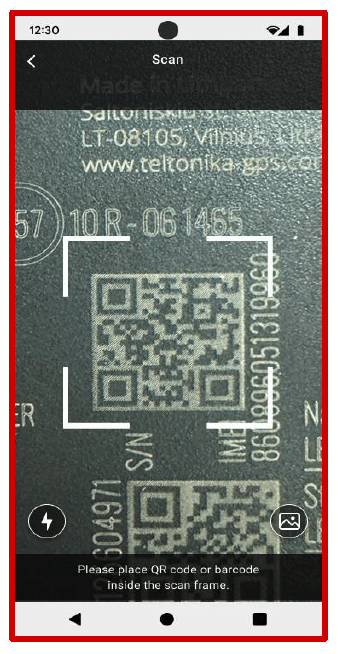
C. Scan QR Code: Tap this button to open your device’s camera and scan the IMEI QR code.
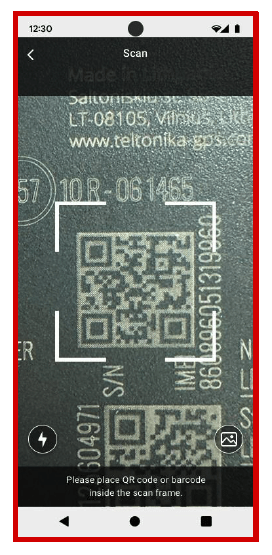
After tapping the Scan button, your device’s camera will activate. Position the camera over the GPS device’s QR code, and the system will automatically read it and fill in the IMEI field.
GPS Device QR code:
The IMEI QR code is printed on the GPS device itself.TIPS & CAUTIONS:
Once the IMEI has been entered, continue by completing the remaining device details:
ADDITIONAL DEVICE INFORMATION:
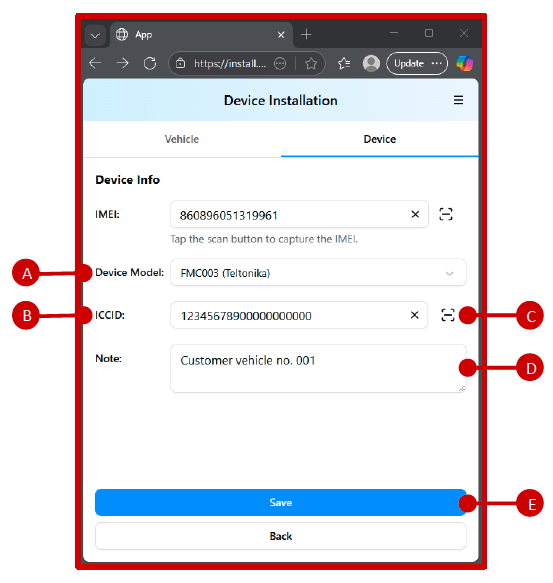
A. Device Model: Select the device model from the drop-down menu.
B. ICCID: Enter the SIM card’s ICCID that will be paired with the device.
C. Scan ICCID: Tap this button to open the camera and scan the SIM card barcode.
D. Note: Use this field to add any additional information related to the device.
After all device details have been entered, press Save to continue to the confirmation stage.
E.Save Button: Click Save to confirm the device information. The system will automatically move to the Confirm Registration page.
Just like scanning the device IMEI, you can also scan the SIM card barcode instead of typing the ICCID manually.
After tapping the Scan button (next to the ICCID field), your device’s camera will activate. Position the camera over the SIM card barcode; the system will automatically read it and populate the ICCID field.
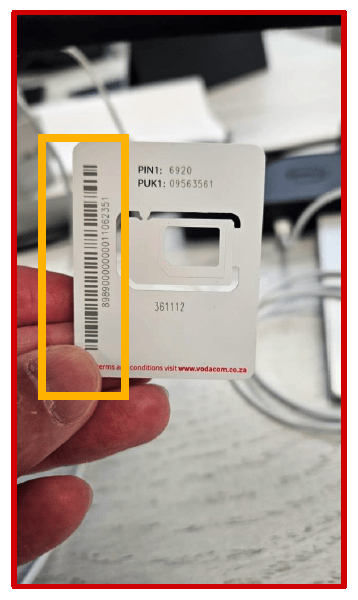
SIM card barcode:
The ICCID barcode is printed on the SIM card frame (see image for reference).TIPS & CAUTIONS:
1. Lighting: Low light, such as in a dark garage, may cause scanning issues. Ensure the SIM barcode is well-lit for best results.
2. Alignment: Hold your phone steady and keep the barcode centred within the on-screen frame until the scan completes.
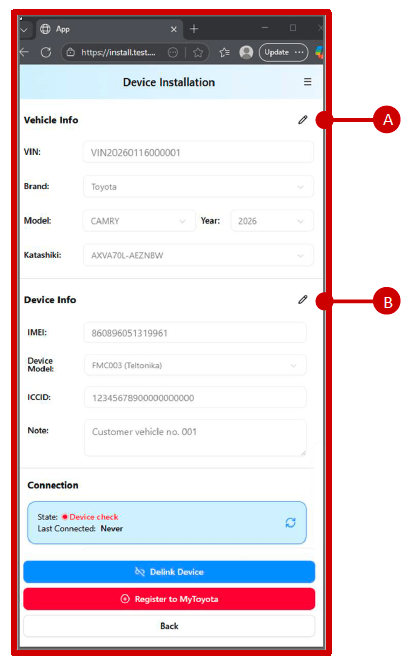
After completing the vehicle and device information, the system will display a summary screen showing all details for final review.
Please carefully review all vehicle and device information before proceeding. If anything needs to be corrected, tap the pencil icon in either the Vehicle or Device section to return and make edits.
CONFIRM REGISTRATION ACTIONS:
A. Edit Vehicle Information: Select this option to return to the Vehicle Information page and update any incorrect details.
B. Edit Device Information: Select this option to return to the Device Information page and correct any errors.
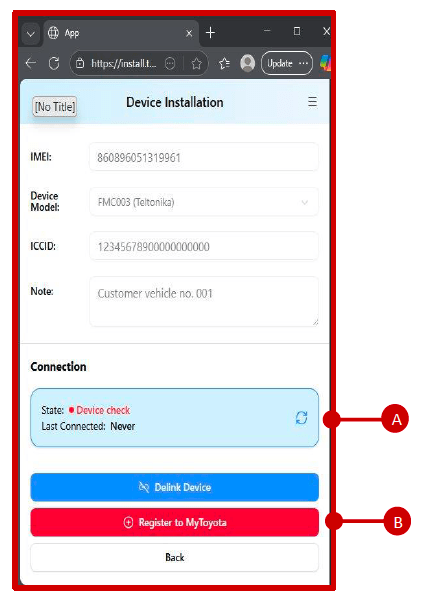
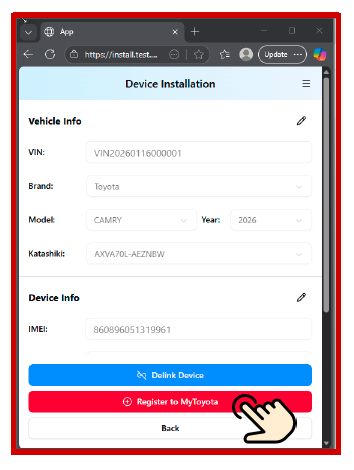
After confirming all vehicle and device information, complete the registration process by following the steps below:
CONFIRM REGISTRATION ACTIONS:
A. Connection Section: This section shows the current status of the device:oDevice check: Device information is available, but it is not yet registered to MyToyota.
• Active: Device has been successfully registered to MyToyota.
• Standby: Device has been placed in Maintenance Mode by technicians.
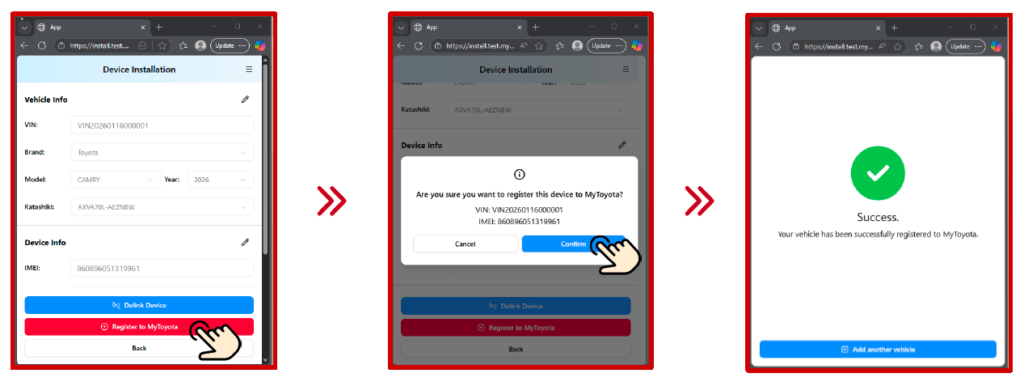
B. Register to MyToyota Button: Press this button to confirm the pairing and complete the final registration of both the vehicle and the device in the MyToyota system.
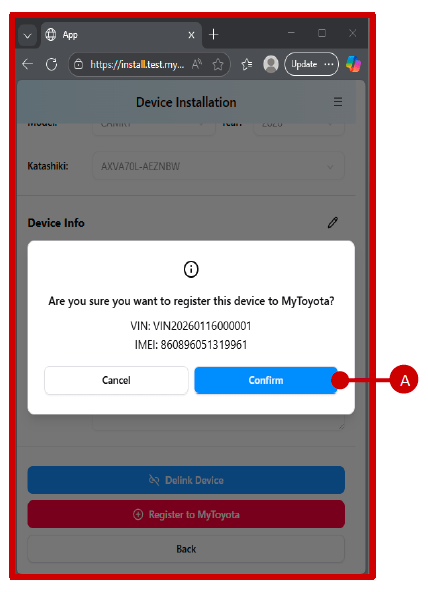
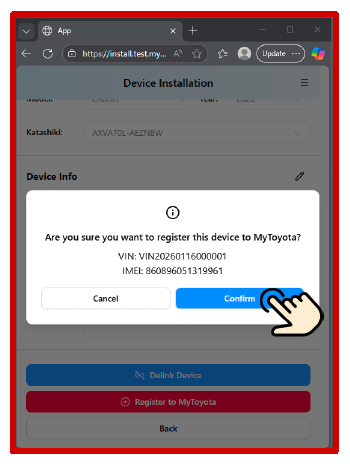
After selecting Register to MyToyota, a confirmation message will appear.
Please verify that both the VIN and IMEI are correct, then press Confirm to proceed.
Confirm Registration Action:
A. Confirm Button: Press this button to finalise the pairing of the vehicle and device.
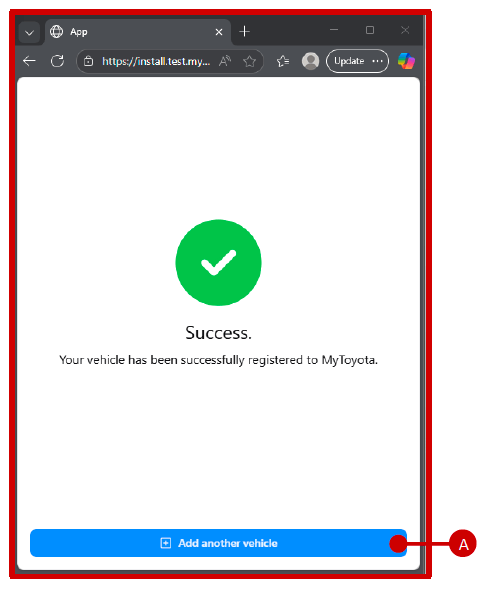
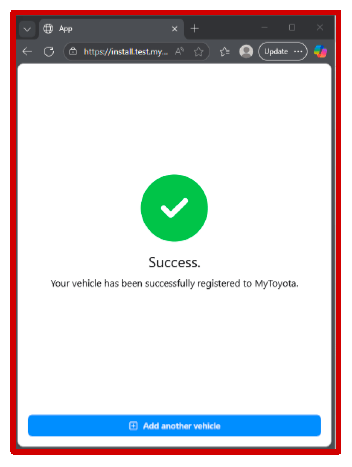
After pressing the Confirm button, the vehicle and device are successfully paired and registered to the MyToyota system.
If you need to register another vehicle, select Add Another Vehicle to return to the Vehicle Information page and begin the next registration.
Confirm Registration Action:
A. Add Another Vehicle: Tap this button to return to the Vehicle Information page and start registering a new vehicle.
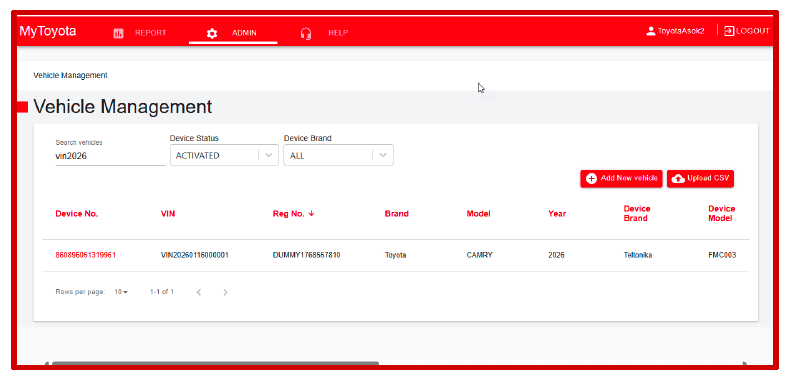
Once the vehicle and device have been successfully installed and registered, the vehicle will appear in the Distributor’s Vehicle List on the MyToyota website.
Please check with the responsible person to verify that the vehicle is visible under the Vehicle Management section of the MyToyota website.
To prevent unnecessary “Device Disconnected” notifications on the customer’s smartphone when removing or working on the device hardware during maintenance, please follow the steps below to enable Maintenance Mode.
Once the vehicle and device information have been retrieved, the details will be displayed on the screen.
Important note:
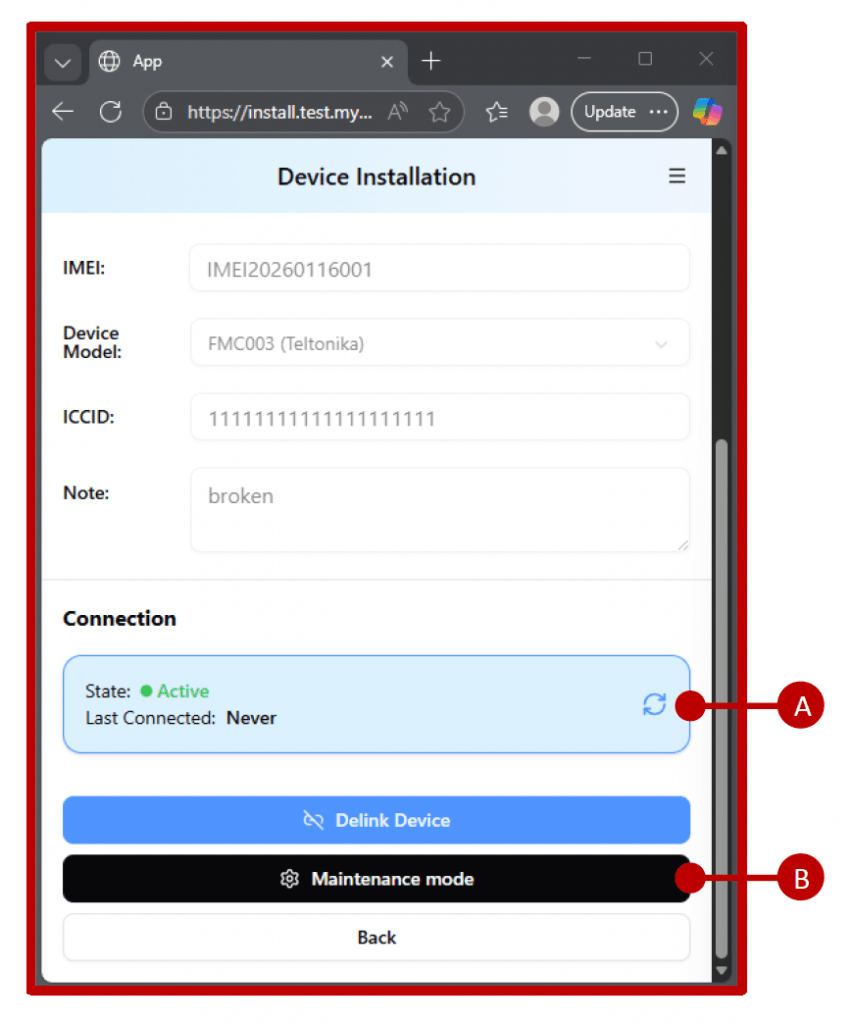
• In the Connection section, you will see the current status of the device. Active means the device is connected and actively sending data to the MyToyota system.
• To place the device into Maintenance Mode, press the Maintenance Mode button at the bottom of the screen.
Maintenance mode feature:
A. Connection State Section: Displays the current device status along with the most recent Last Connected date and time.
B. Maintenance Mode Button: Tap this button to switch the device into Maintenance Mode.
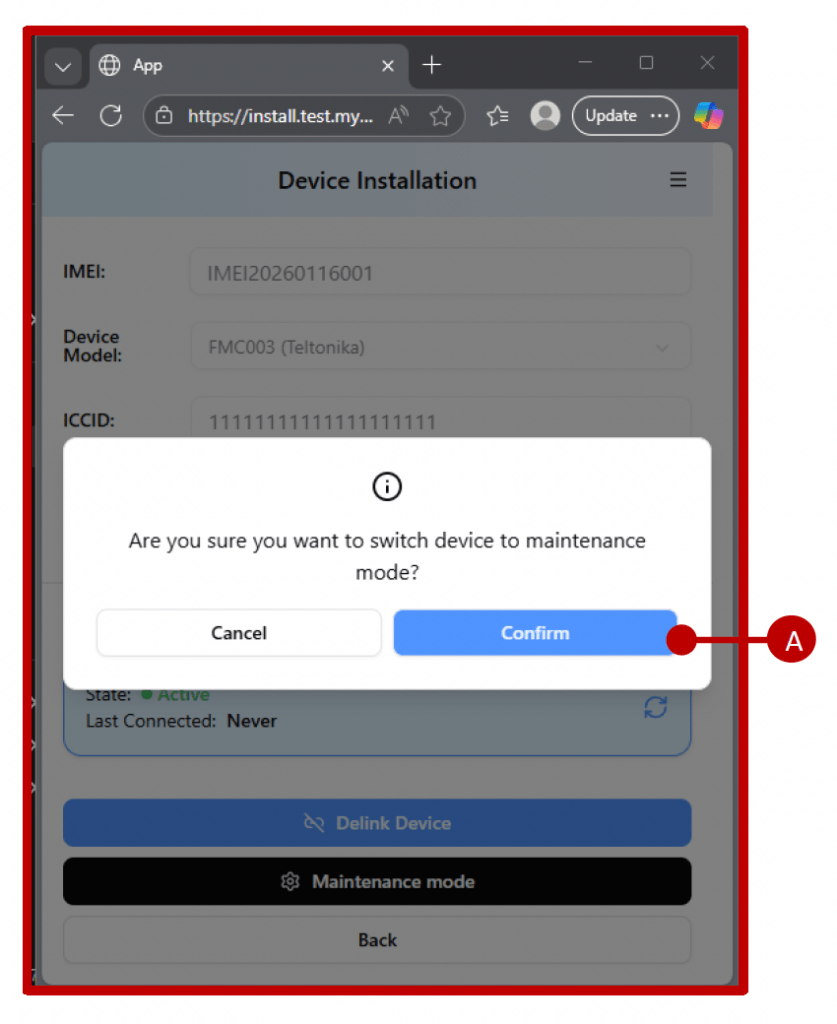
Maintenance Mode Feature:
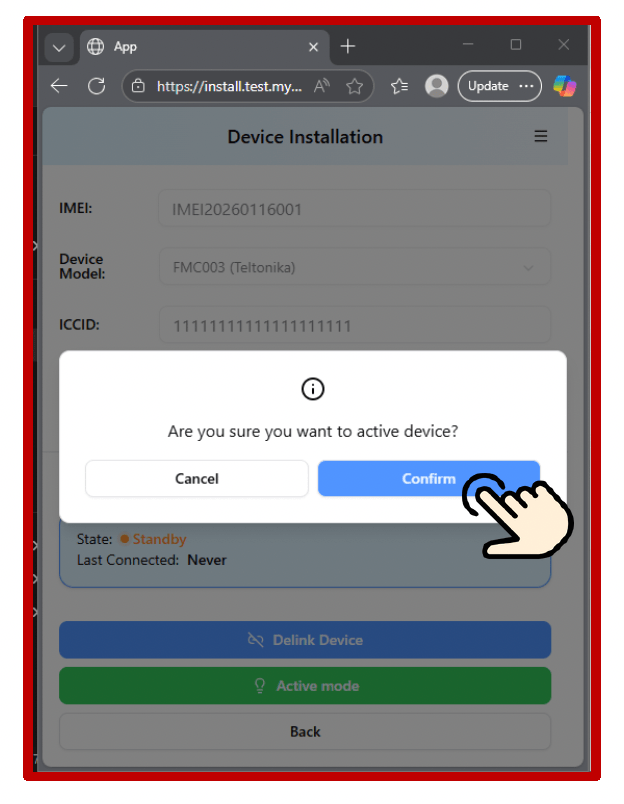
A. Confirm Maintenance Mode: Press the Confirm button to switch the device into Maintenance Mode.
Once Maintenance Mode is confirmed, the system updates the device status accordingly.
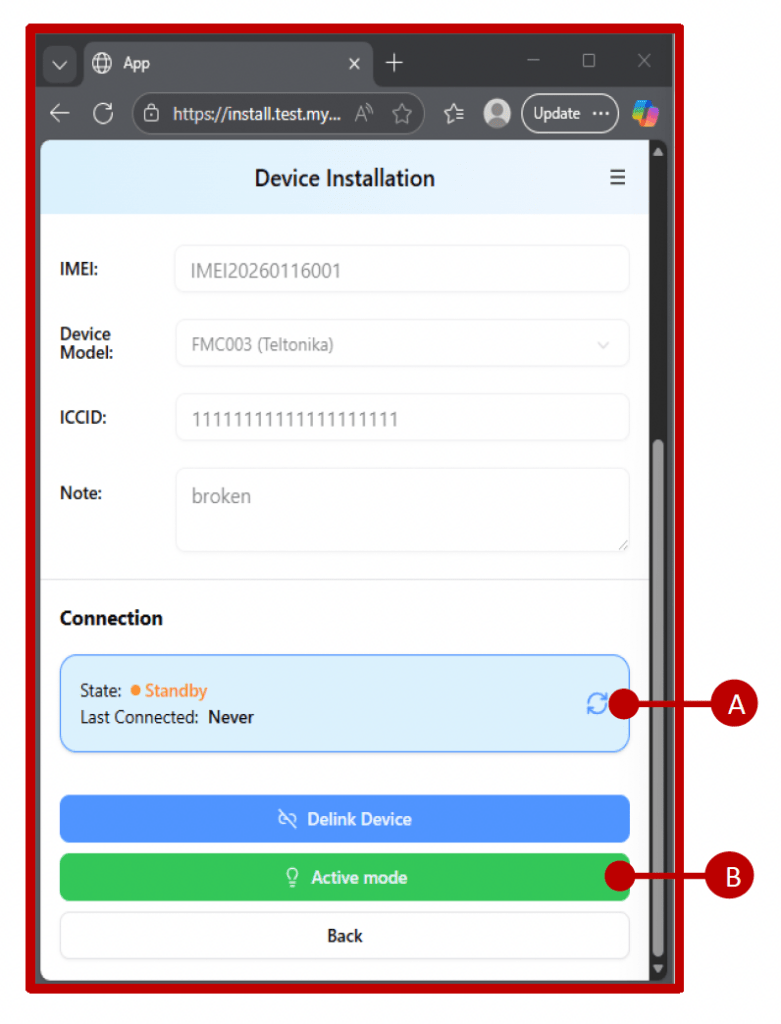
Standby State:
After activation, the Connection section will display the device status as Standby. This means:
• The device will no longer transmit data to the MyToyota system.
• No events, alerts, or “device disconnected” notifications will be triggered on the customer’s smartphone during maintenance.
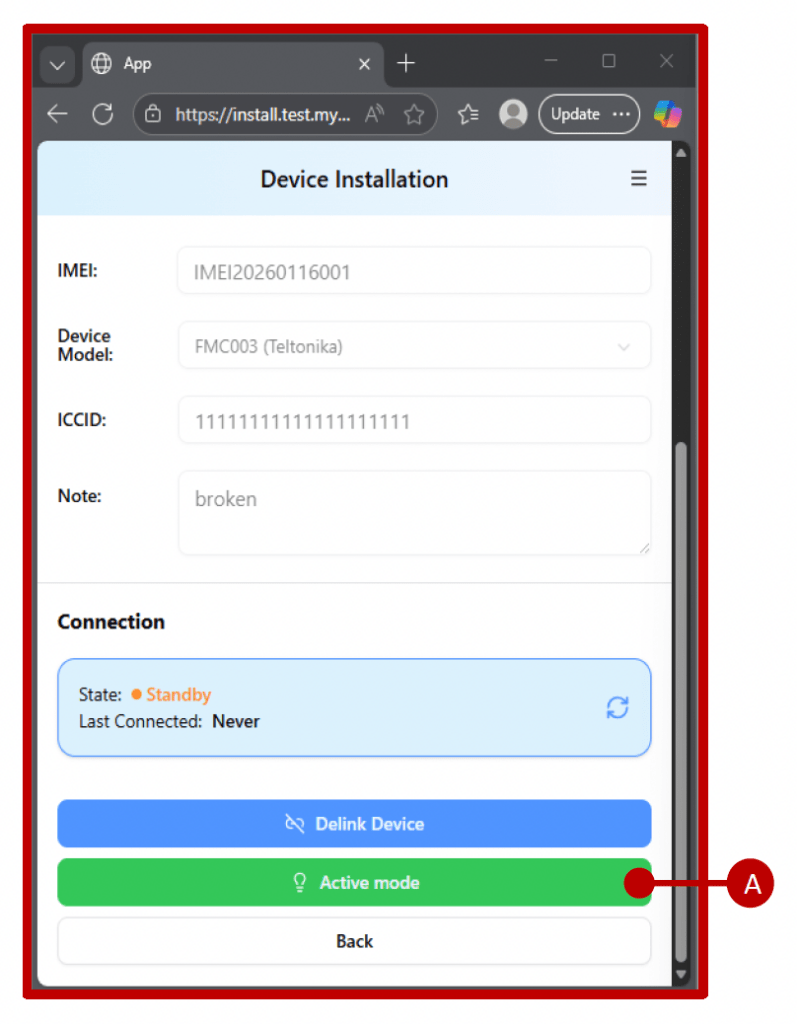
• You will also notice that the mode button changes to Active Mode, which is used to return the device to normal operation once maintenance is complete.
Maintenance Mode Features:
A. Connection State Section: Shows the device’s current status and the most recent Last Connected date and time.
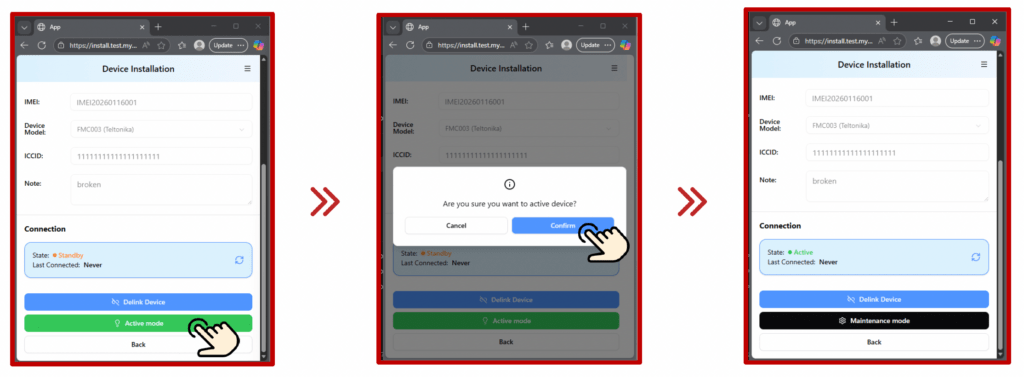
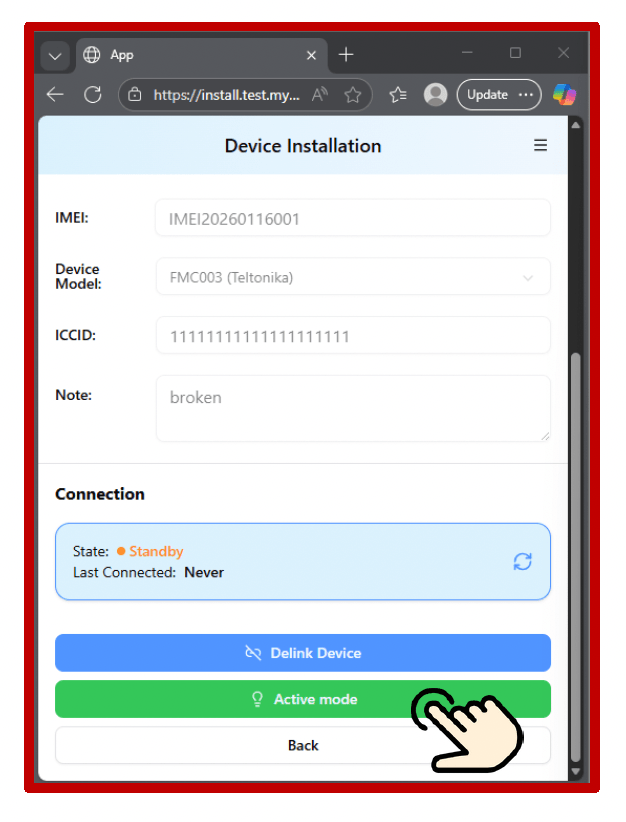
B. Active Mode Button: Press this button to switch the device back to Active Mode after maintenance is completed.

Once maintenance has been completed by the technician, you must switch the device back from Maintenance Mode to Active Mode.
This will restore normal operation and allow the device to resume sending data to the MyToyota system and updating the customer’s app.
To remove the pairing between the device and the vehicle, follow the steps below:
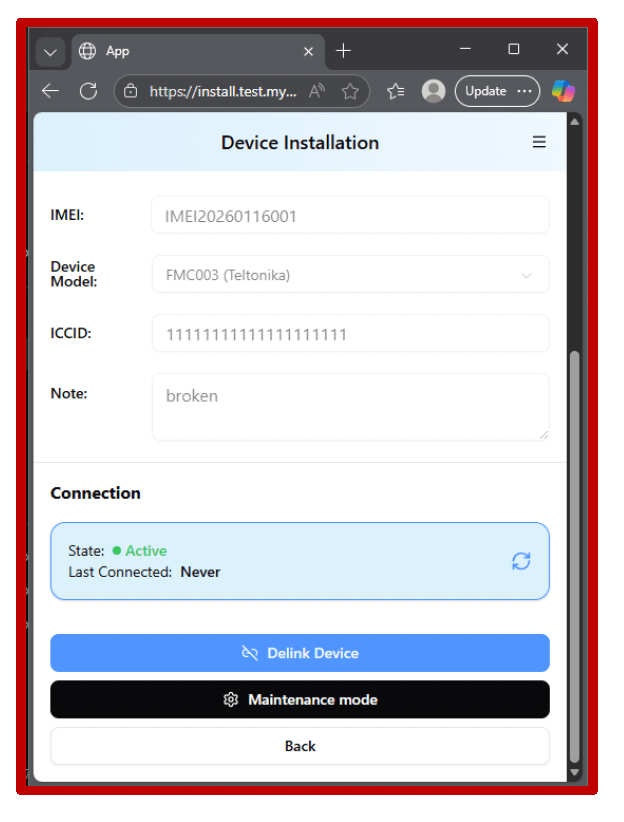
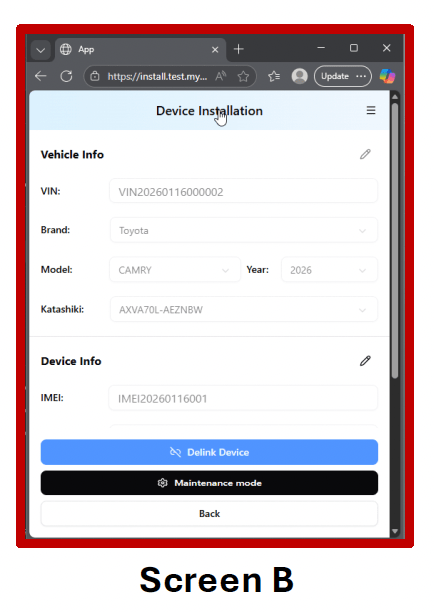
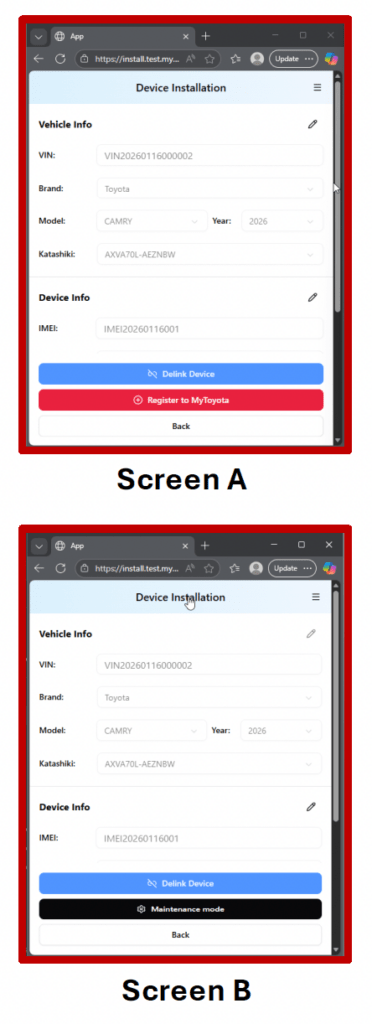
2. System Response Based on Registration Status: After scanning the VIN, the installation tool will display a screen based on the current registration status of the vehicle–device pairing:
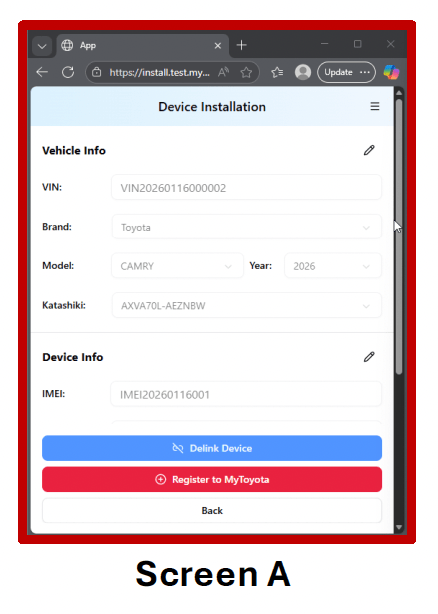
A. Not Registered to MyToyota: If the vehicle and device are not yet registered, Screen A will be shown.
B. Registered to MyToyota: If the pairing is already registered, Screen B will appear.
Note: In both cases, the Confirm Registration page will be displayed, including the Delink Device button. Press this button to continue with the delinking process.
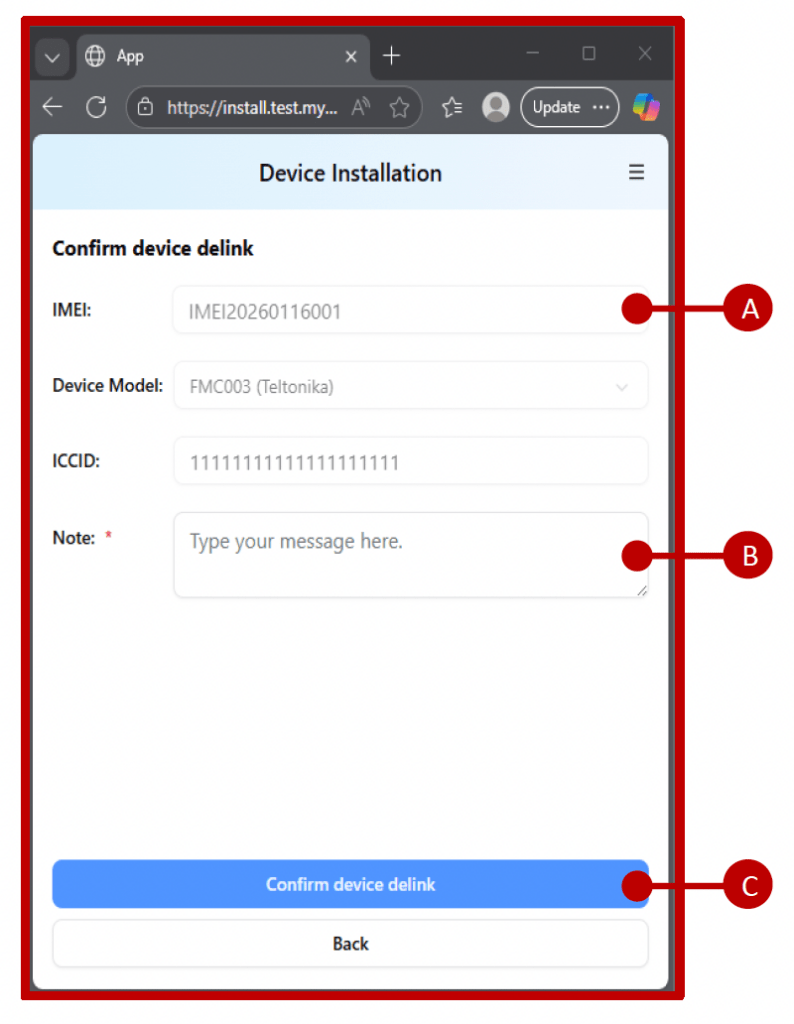
When the Confirm Device Delink page appears, follow the steps below:
Confirm Device Delink – Page Features
A. Device Information: Displays the IMEI, Device Model, and ICCID for verification before completing the delink operation.
B. Note Field: A required field where you must provide the reason(s) for delinking the device.
C. Confirm Device Delink Button: Select this button to complete the delinking process.
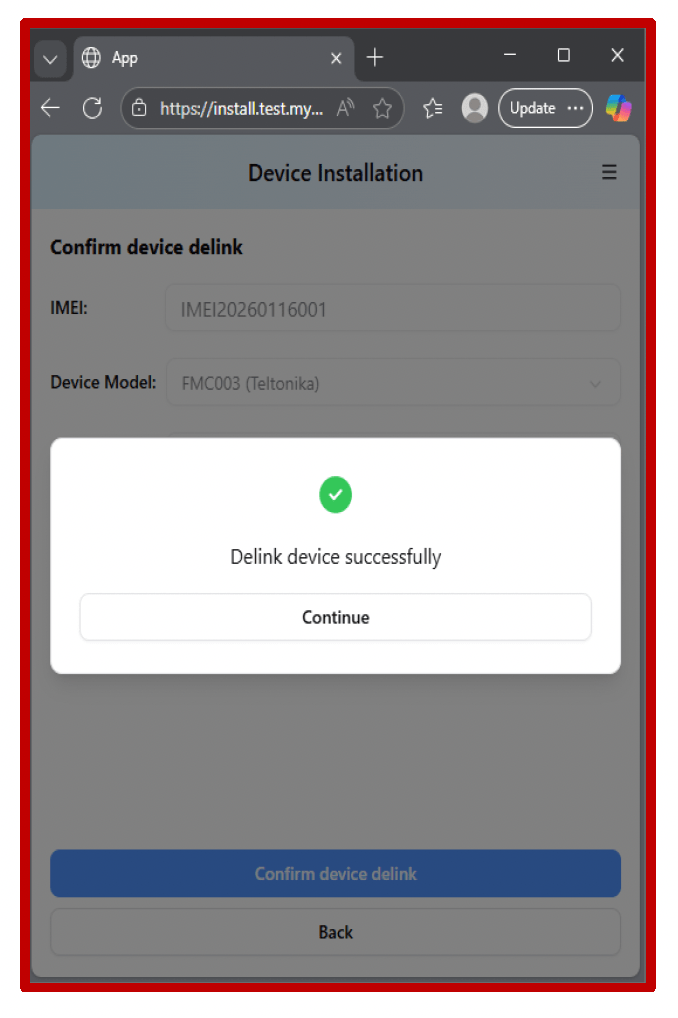
After you confirm the device delink, a message will appear stating: “Delink device successfully.”
This means the vehicle and device are now fully unpaired. You may now use the same VIN and IMEI to begin a new pairing with a different device or vehicle.
Important notes:
Technicians can register devices individually or in bulk before they are assigned to a vehicle. If vehicle-pairing details are not yet available, use the Device-Only Registration function to pre-register the device in the MyToyota system.
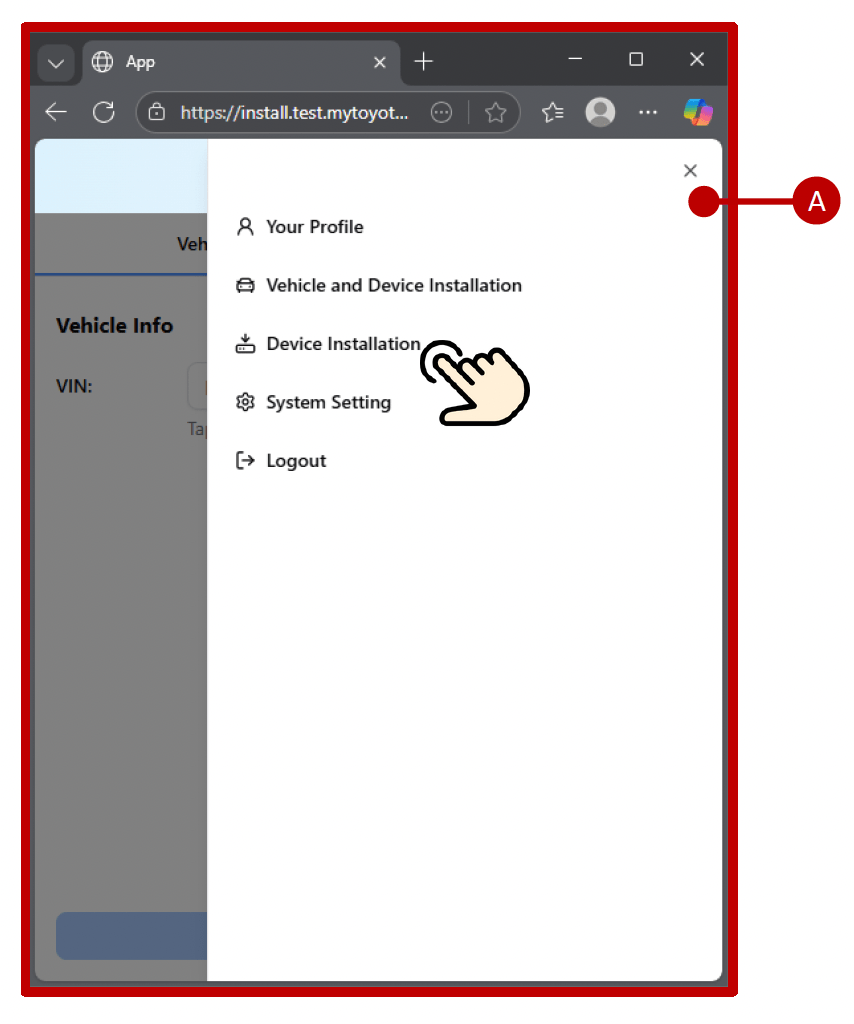
2. Select Device Installation: From the menu options, tap Device Installation to begin the device-only registration process.
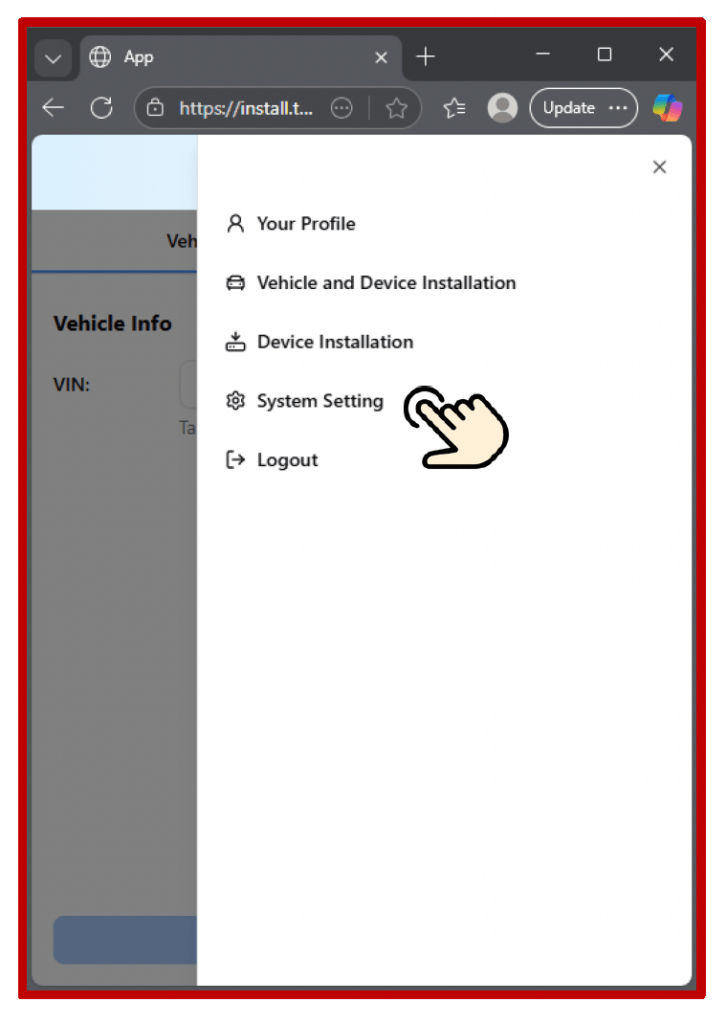
MENU INFORMATION:
A.Installation Scan Tool Menu: This menu provides access to all main functions available in the installation scanning tool. The options include:oYour Profile: Displays account details, including the Distributor Project and Fleet assigned to the user.
• Vehicle and Device Installation: Used for standard installations where both the vehicle and device are registered and paired together.
• Device Installation: Allows technicians to complete a device-only registration when vehicle details are not yet available.
• System Setting: Provides system configuration options. (In the current version, this includes language settings only.)
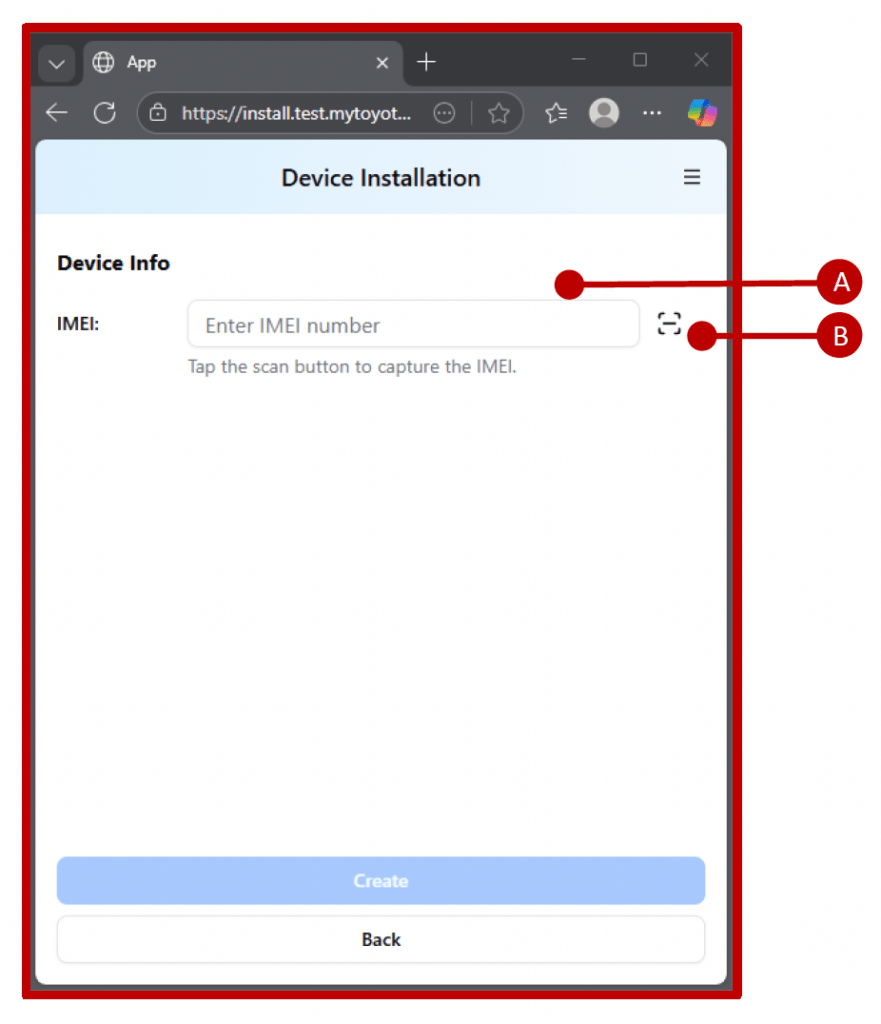
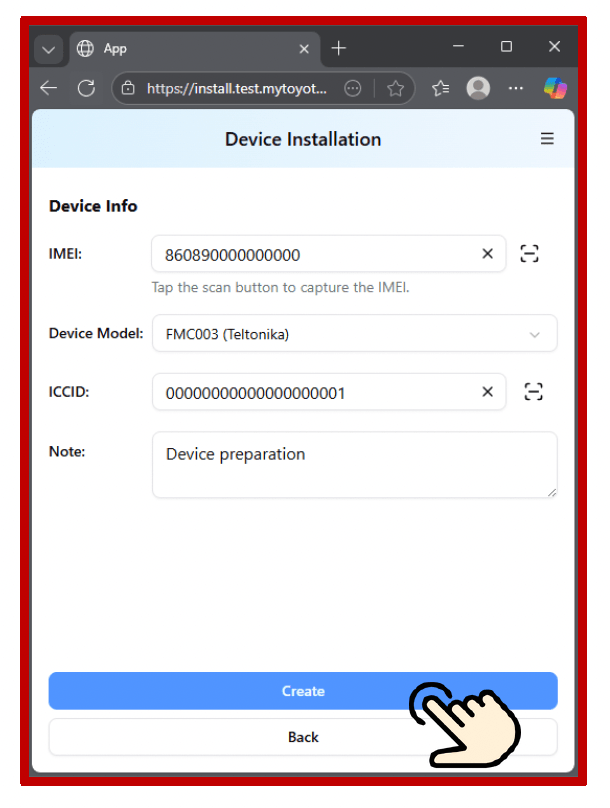
After selecting Device Installation, the device registration page will appear. You will need to enter the details of the device being registered. Choose one of the following methods:
Once all 15 digits have been entered or scanned, additional device information fields will automatically appear on the screen.
DEVICE INFO FEATURES:
A. Enter IMEI Number: If entering manually, type the complete 15-digit IMEI into the input box.
B. Scan QR Code: Tap this button to open the camera and scan the device’s IMEI QR code.
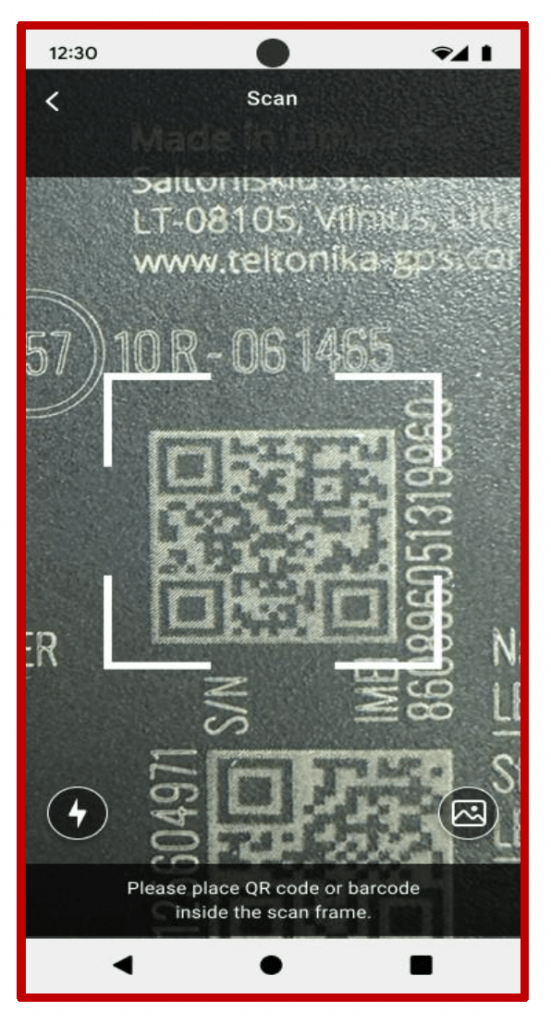
After tapping the Scan button, your device’s camera will activate. Position the camera over the GPS device’s QR code; the system will automatically read it and populate the IMEI field.
GPS Device QR code:
The QR code containing the device’s IMEI is printed directly on the GPS unit.
TIPS & CAUTIONS:
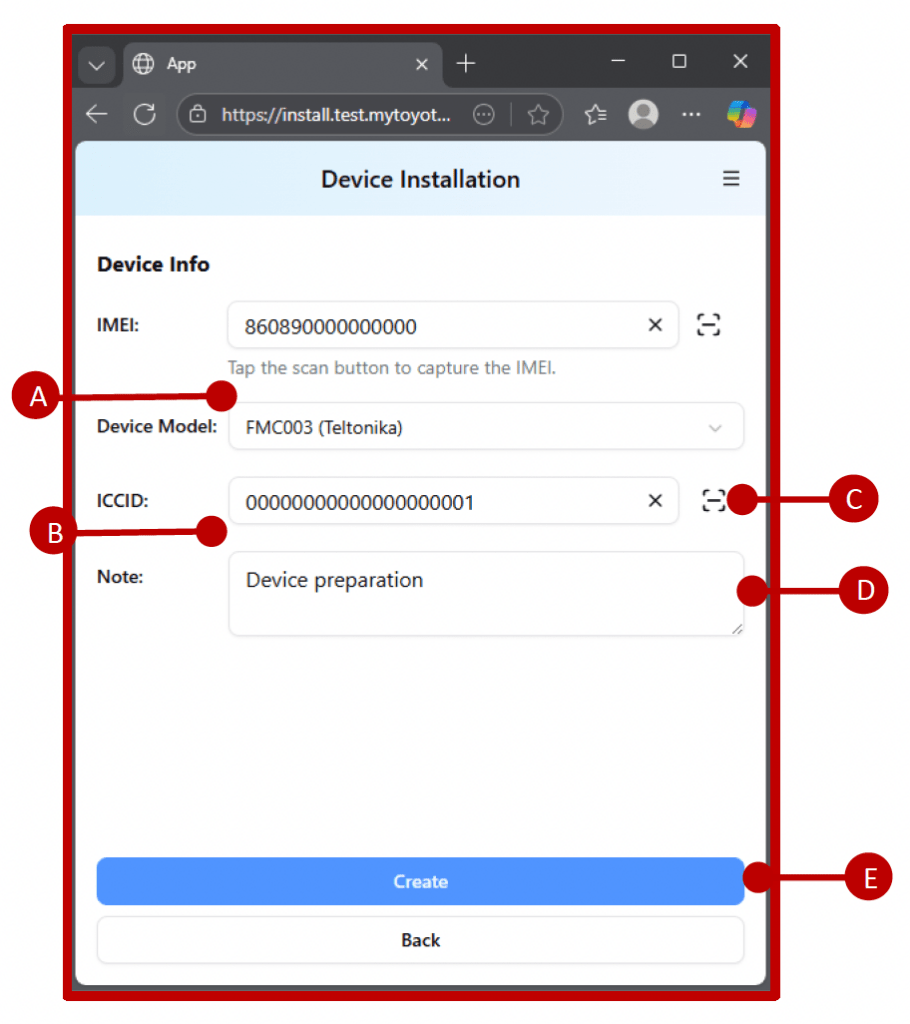
Once the IMEI has been entered, continue by completing the remaining device details as outlined below:
ADDITIONAL DEVICE INFORMATION:
A. Device Model: Select the device model from the drop-down menu.
B. ICCID: Enter the SIM card’s ICCID, which will be paired with the device.
C. Scan ICCID: Tap this button to open the camera and scan the SIM card’s barcode automatically.
D. Note: Use this field to add any additional information relevant to the device (if required).
Once all device information has been entered, press the Save button to continue to the registration confirmation page.
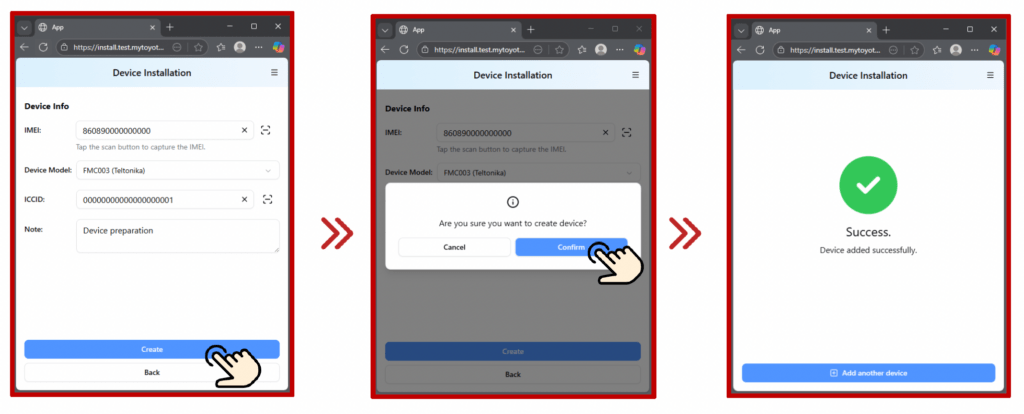
E. Create Button: Tap Create to finalise and confirm the device information.
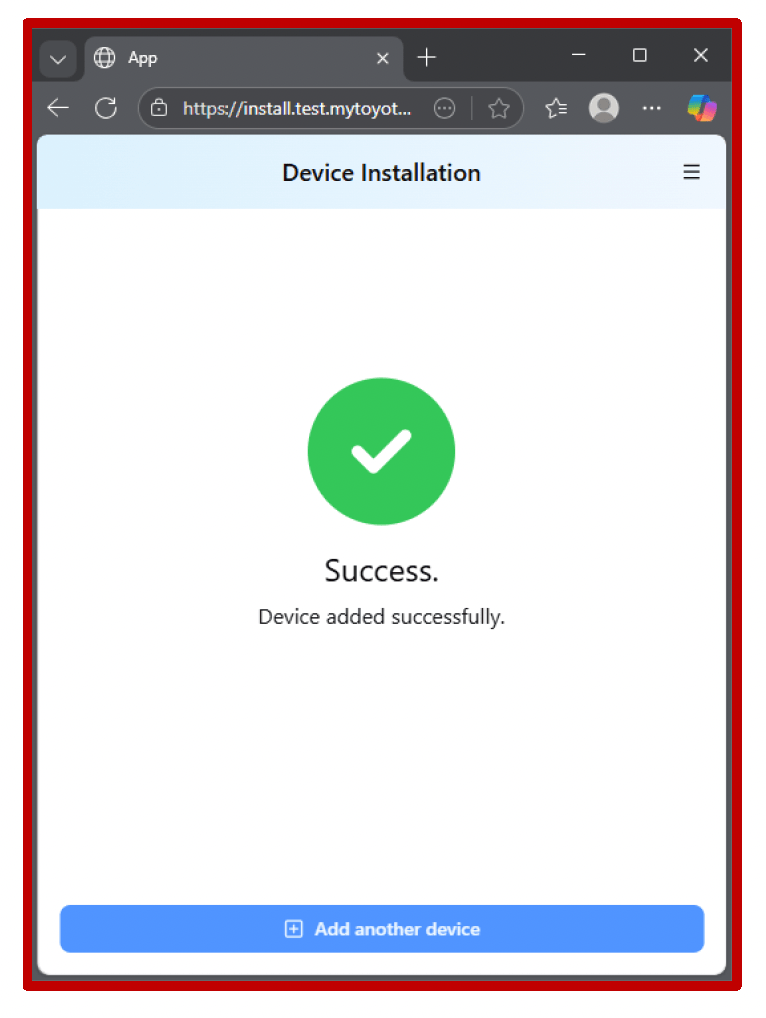
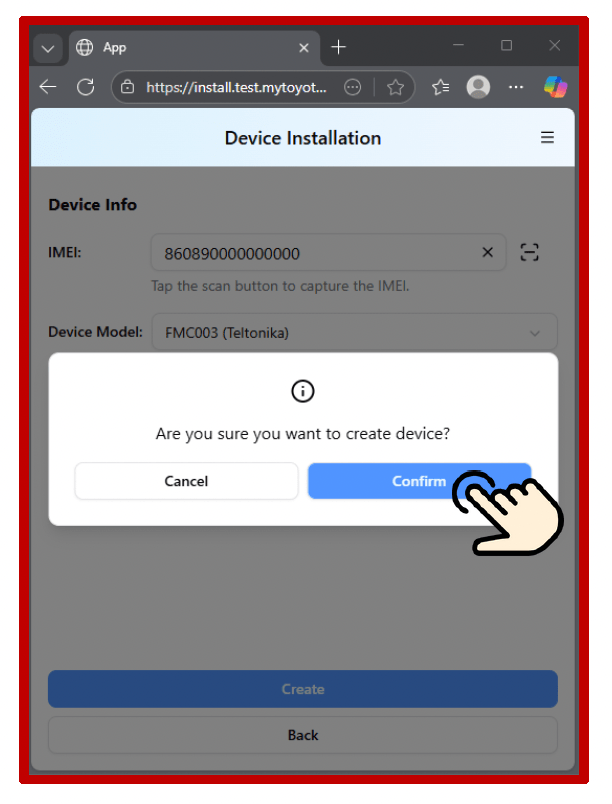
After pressing the Create button, a confirmation message will appear.
Press Confirm to complete the process.
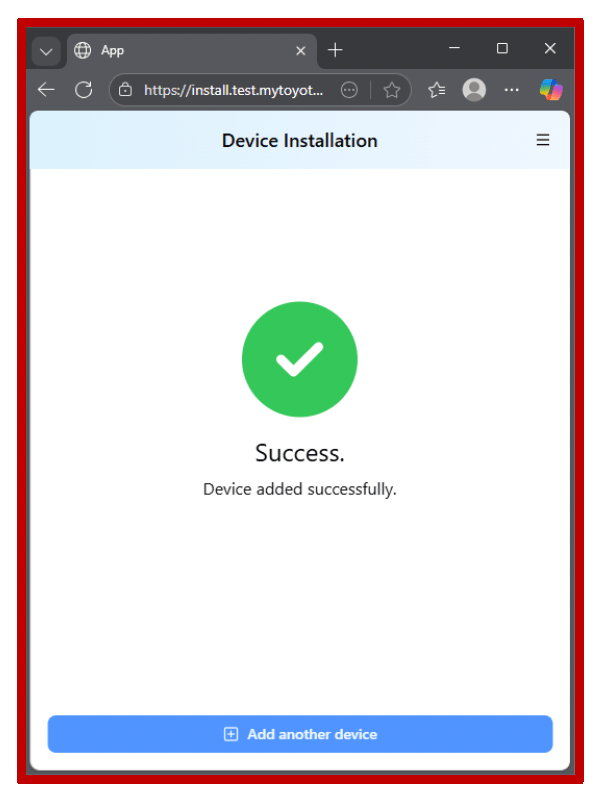
The MyToyota system will then register the device information, making the device ready for future pairing with a vehicle.
Technicians can also access their Your Profile page to view account information.
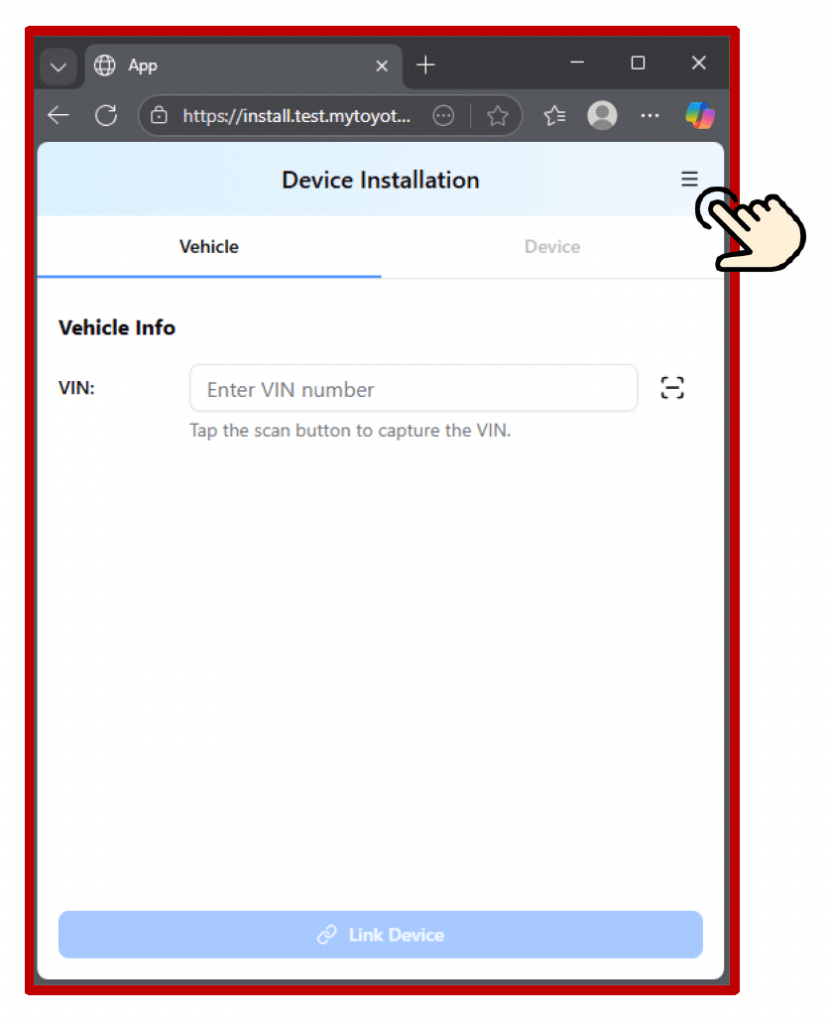
1. Open the Menu:
Tap the menu button located at the top-right corner of the screen.
2. Select Your Profile: From the menu options, tap Your Profile to open your account details.
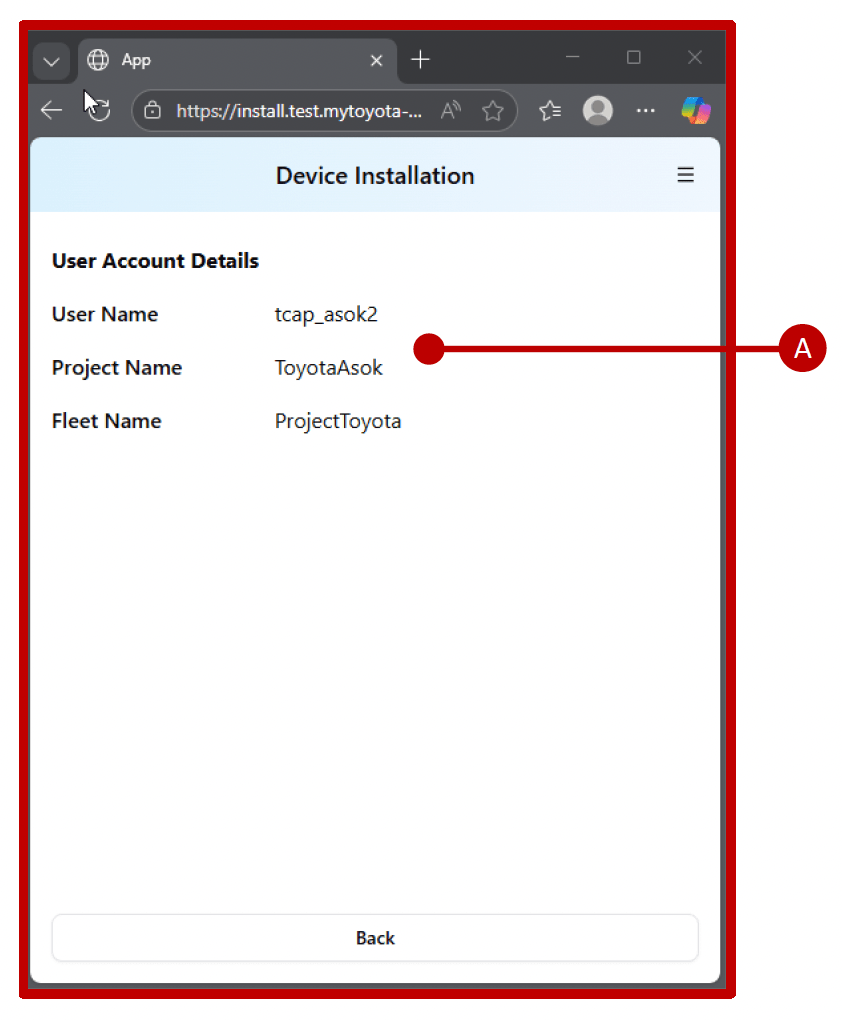
User Account Details Information: This page displays key information about the technician’s account:
A.Details:oUsername: The username linked to the technician’s account.
• Project Name: The Project ID for the Distributor account.
• Fleet Name: The Fleet assigned to the account, this is the fleet that vehicles will be registered under.
Note: Technicians can refer to the Project and Fleet names to verify correct vehicle assignment during the registration process.
You can change the language of the scanning tool by following the steps below:
1. Open the Menu:
Tap the menu button located at the top-right corner of the screen.
2. Select System Settings: From the menu options, tap System Settings.
System Setting Details:
The current system setting available in the Scan Tool is:
A. Language: You can change the language of the user interface.
The available options are:
• English
• French
B. Save: After selecting your preferred language, tap the Save button. The Scan Tool will refresh and update to the selected language.
By Clicking “Accept all cookies”, you agree to the storing of cookies on your device to enhancesite navigation, analyze site usage, and assist in our marketing efforts.