User Definition:
For B2C admin user to provide fleet accounts to fleet customers. All fleet customer accounts need to be created by dealer staff (B2C admin accounts) and added to the fleet in fleet management. This allows customers to view vehicle locations, manage vehicle functions within their fleet, and export reports to view data on their vehicles.
Prerequisite for Registration:
To register installation data, you will need:
a. Associated data from the installer.
b. Project ID or Fleet ID information provided by Dealer
Operation Steps Summary:
The system assumed user to follow these operation steps:
*Sales process is omitted.
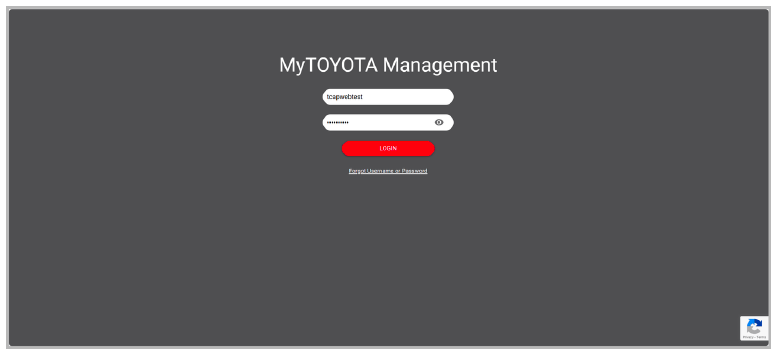
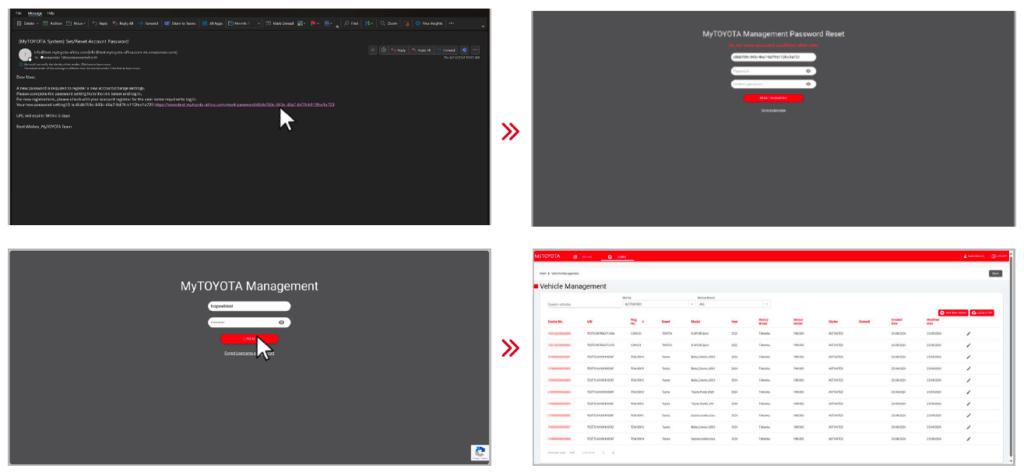
First Login: follow these instructions if it’s your first time logging in on the system.
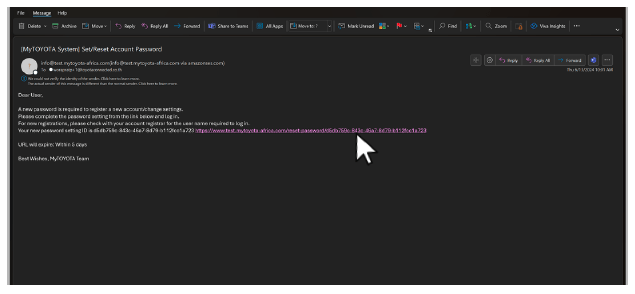
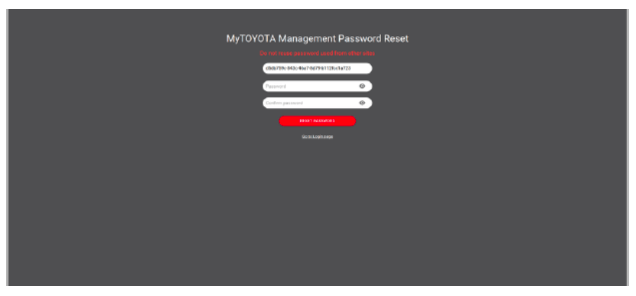
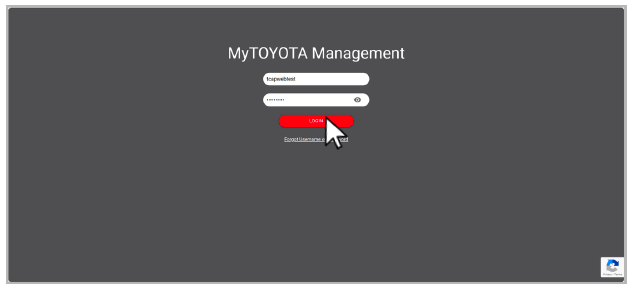
1. Click “Forgot Username or Password” link at the bottom of the screen.
2. You should receive an email guiding you on how to reset your password.
Normal Login: follow these instructions if you have your username and password setup.
1. Enter your existing username and password in the “Username” and “Password” fields.
2. Then click the “LOGIN” button to access the main page of the app.
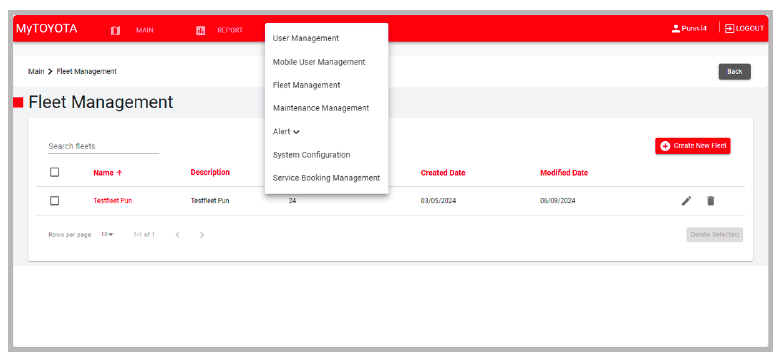
After logging in, you enter the MyToyota website. From the first page you land on you will be able to access the Admin menu with key sections, including:
1. User Management
2. Mobile User Management
3. Fleet Management
4. Maintenance Management
5. Alert
6. System Configuration
7. Service Booking management
The ‘Admin’ menu is located on the top header bar (as illustrated in the image).
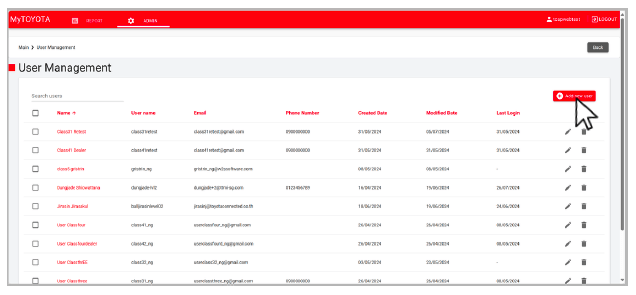
The User Management feature enables you to oversee and manage user accounts within the system. You can view details of existing user accounts, edit their information, delete them, and create new users with similar access levels and roles to your current account.
User Management Fields:
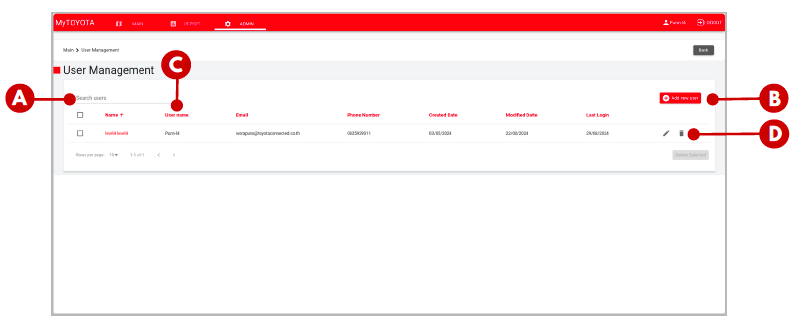
A. Search Function: Enter a keyword into the text box to find a specific user account from the list.
B. Add New User Button: Click this button to access the form to create a new user account.
C. Username: will show detailed information about the user account.
D. Action Buttons: This includes the edit button for modifying information and the bin button for deleting the account.
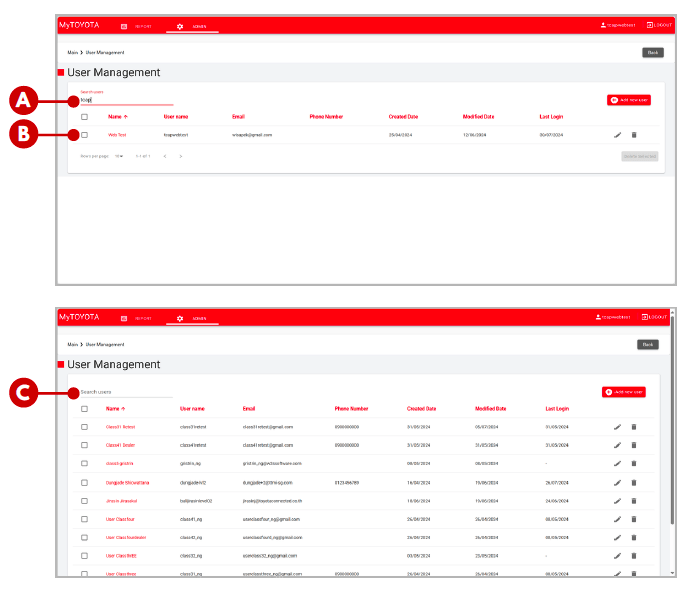
This section explains how to search for a new user on the MyT web platform. See the step-by-step guide below.
A. Enter a Keyword: Type a keyword into the ‘Search’ field located at the top left of the screen, as indicated by “A” in the image.
B. View Results: After entering the keyword, users matching that keyword will be displayed on the screen. Note: The keyword can be a name or username.
Key Input Field:
C. Search Field: This is where you enter the keyword to search for a user.
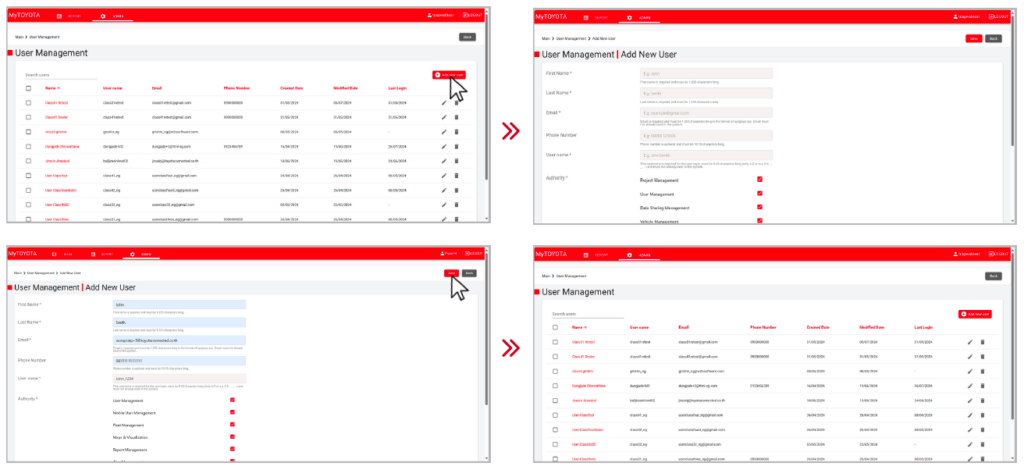
This section explores how to create a new user account on the MyToyota web platform. See the step-by-step guide below.
A. Add a New User: Click on the “Add New User” button on the main user management screen.
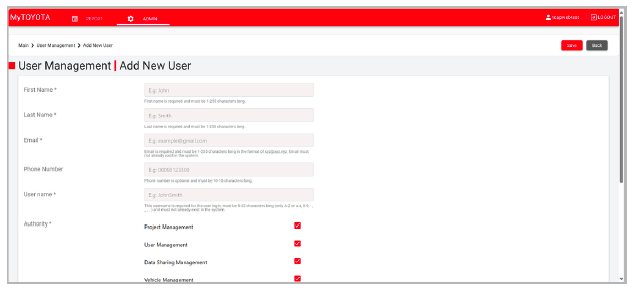
B. Enter User Details: You will be directed to a screen where you can input the user’s details.
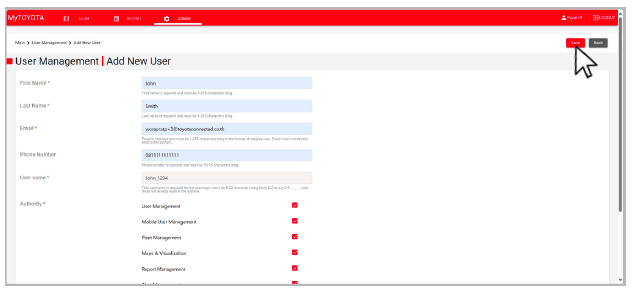
C. Save the Information: After filling in all the mandatory fields, click the Save button.
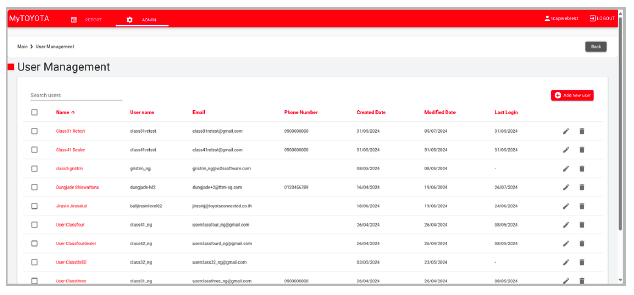
D. Return to User Management: You can also navigate back to the main user management page from this screen.
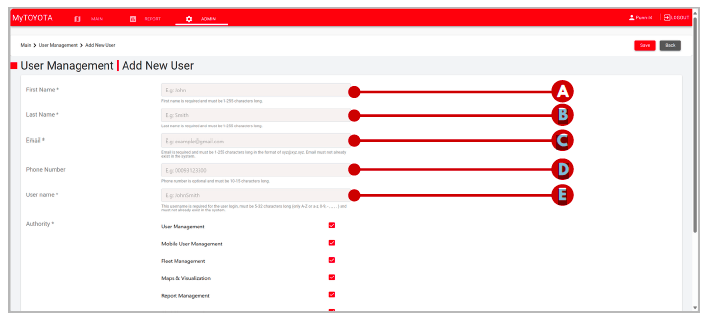
When adding a new user, please provide the following information:
A. First Name: Enter the user’s first name.
B. Last Name: Enter the user’s last name.
C. Email: Enter the user’s email address. This email will be used to send instructions from the system for setting up their password.
D. Phone Number: Provide the user’s mobile number for account-related communications.
E. Username: Input a username for the user; they will use this to log in.
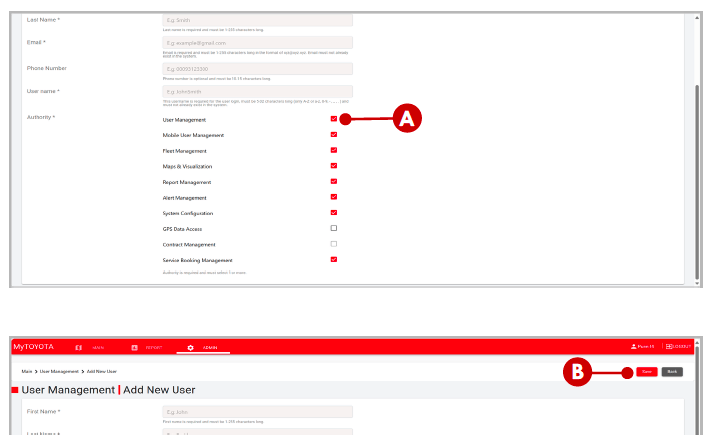
A. Checkbox: By ticking a checkbox for a specific function, the user account gains access to that function. If you leave the checkbox unchecked while configuring the user account, the user will be restricted from accessing those unchecked features. The website provides default checkbox settings for convenience.
B. Save Button: After entering all the necessary information, click the Save button located at the top right of the screen. Once saved, the account will be created, and a link to set up the password will be sent to the provided email address.
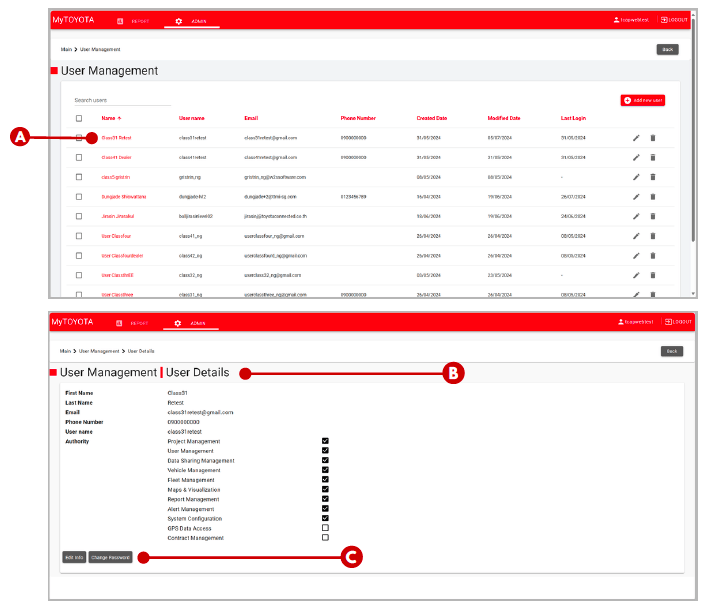
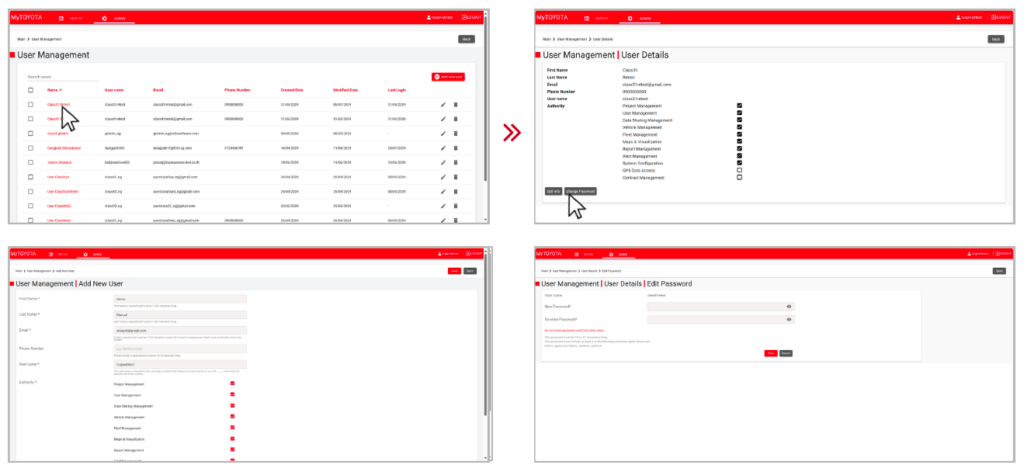
This section will guide you on how to view existing users’ accounts and their details. See the step-by-step guide below.
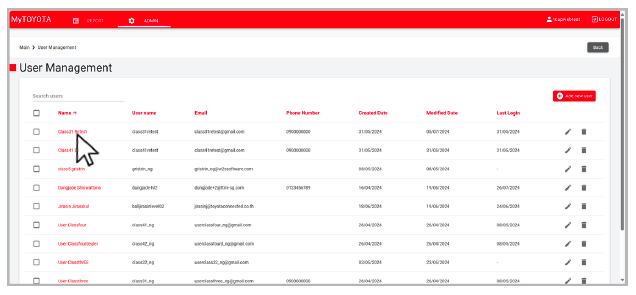
A. Username: Click on the user’s name displayed in red, that you wish to view.
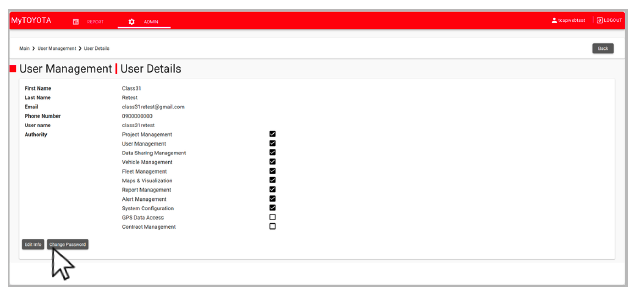
B. Details Screen: The website will then display detailed information like what was provided during account creation.
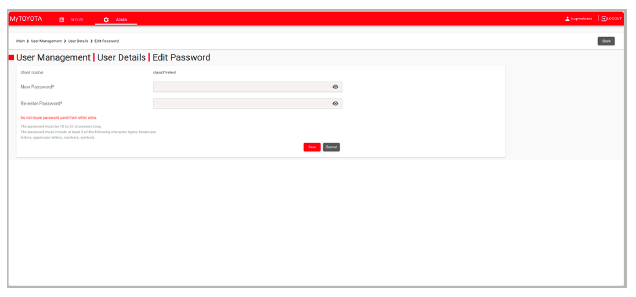
C. Modify Details: You can also click on the “Edit Info” or “Change Password” button to modify the user account as needed.
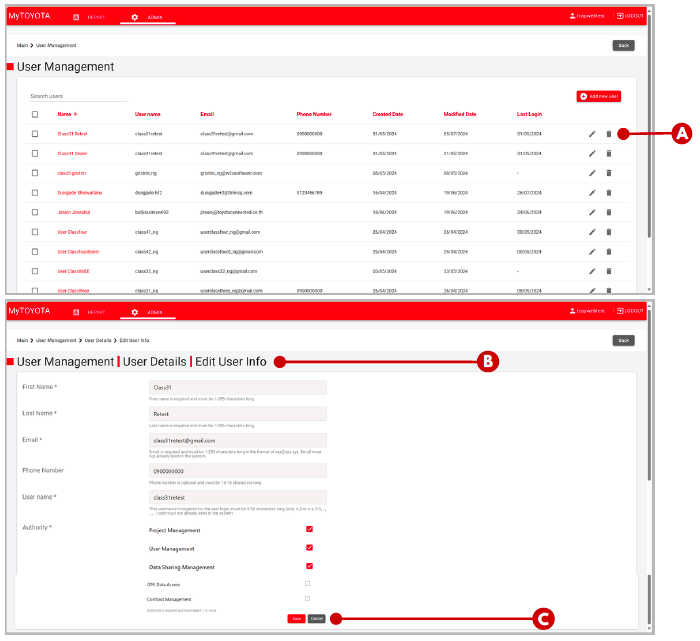
This section explains how to edit existing user accounts and their information. See the step-by-step guide below.
A. Edit Function: Click on the pencil icon located on the right side of the user’s row.
B. View User Details: The website will display detailed information similar to what was provided during account creation.
C. Make Edits: Make the desired changes to the information, and then click the Save button at the bottom of the page.
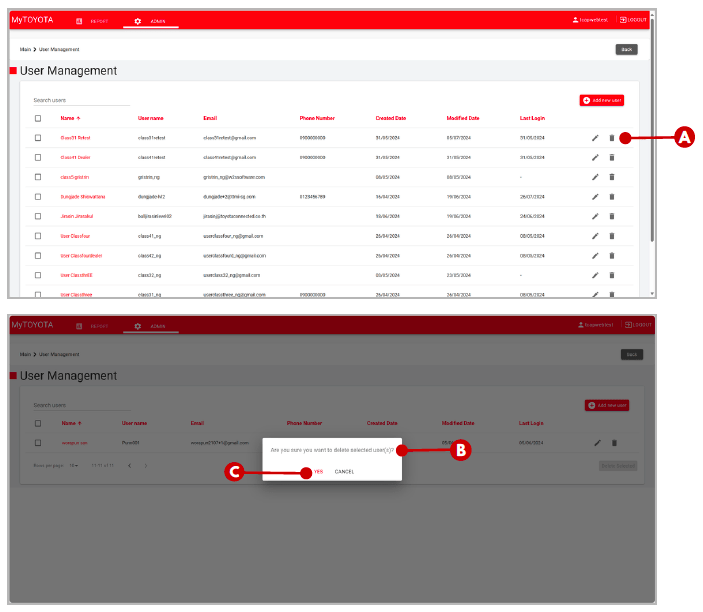
If you find user accounts that are no longer in use or inactive, you have the option to delete them. This helps maintain an organised and up-to-date system. Before deleting an account, ensure that it is no longer needed, as doing so will permanently remove all associated information. See the step-by-step guide below.
A. Initiate Deletion: Click on the bin icon located on the right side of the user’s row.
B. Confirm Deletion: The website will display a confirmation message to ensure the deletion is intentional.
C. Complete Deletion: Click the ‘Yes’ button, and the user account will be deleted.
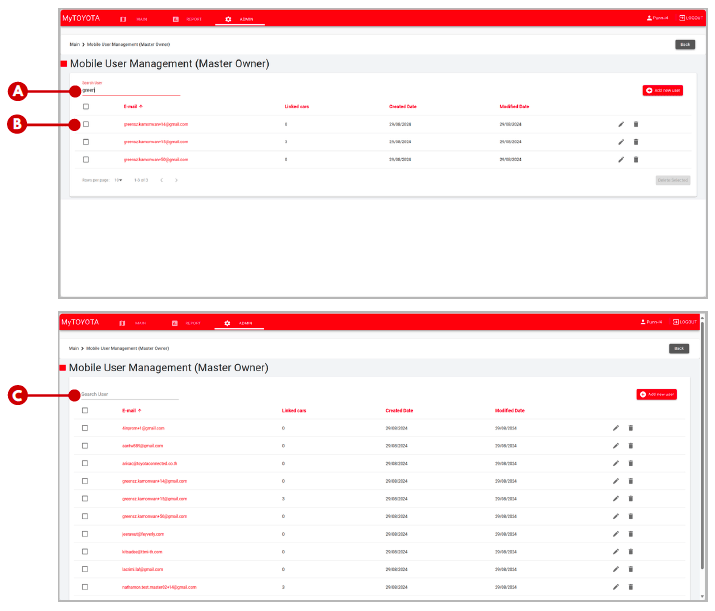
The User Management feature enables you to create accounts and invite users to complete their registration. You can also edit the user’s information and delete their account.
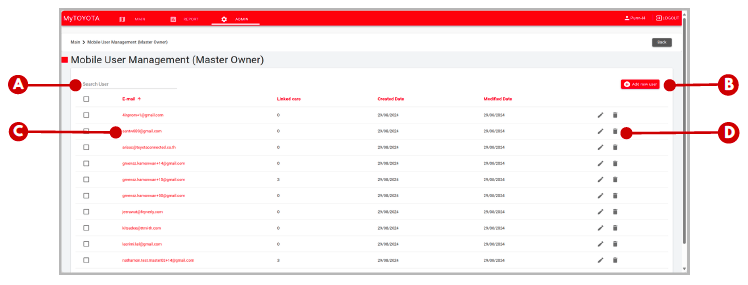
Mobile User Management Fields:
A. Search Function: Enter a keyword into the text box to find a specific user account from the list.
B. Add New User Button: Click this button to access the form for creating a new mobile user account.
C. User Name: will show detailed information about the user account.
D. Action Buttons: This includes the edit button for modifying information and the bin button for deleting the account.
This section explains how to search for a mobile user on the MyT web platform. See the step-by-step guide below.
A. Enter a Keyword: Type a keyword into the ‘Search’ field located at the top left of the screen. Note: The keyword can be a name or username.
B. View Results: Users matching that keyword will be displayed on the screen.
Key Input Field:
C. Search Field: This is where you enter the keyword to search for a user.
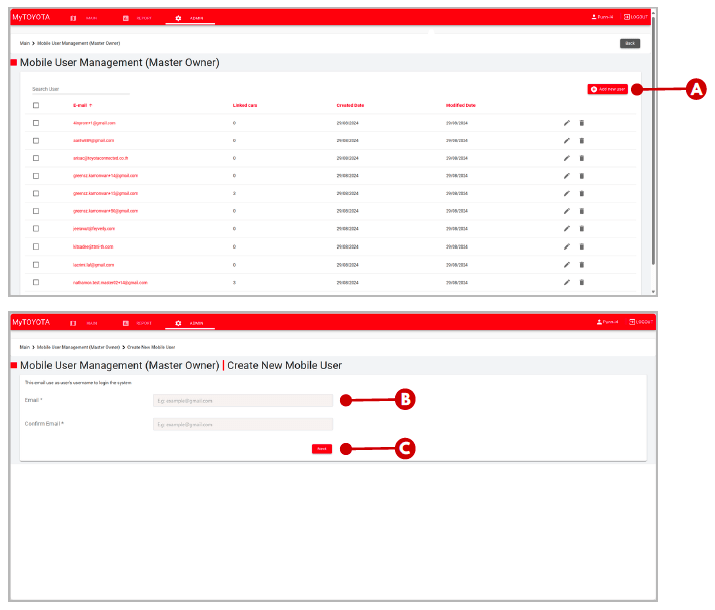
This section explores how to create a new mobile user account on the MyToyota web platform. See the step-by-step guide below.
A. Add a New User: Click on the “Add New User” button on the main user management screen.
B. Enter Mobile User Email: You will be directed to a screen where you can input the mobile user’s email.
C. Next button: You now need to click on Next button to fill in other information about the user.
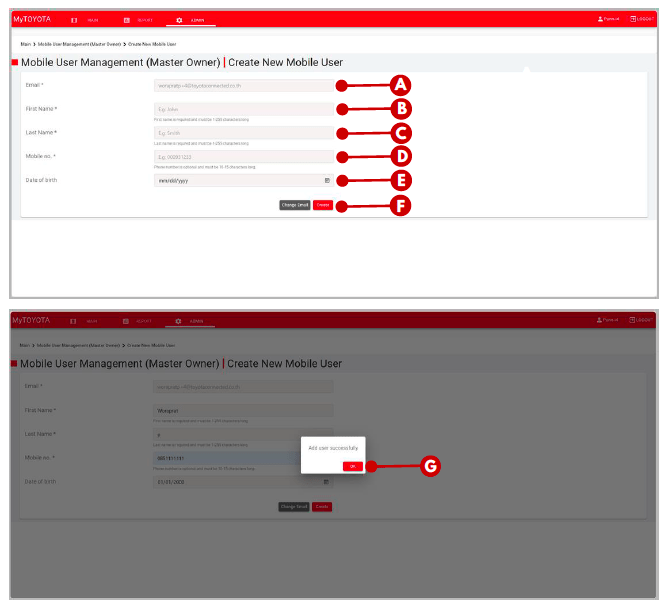
When adding a new user, please provide the following information:
A. Email: The system will show the email of the mobile user that you input on the previous page.
B. First Name: Enter the mobile user’s first name.
C. Last Name: Enter the mobile user’s last name.
D. Mobile no: Provide the user’s mobile phone number for account-related communications.
E. Date of birth: Select the date of birth of the user.
F. Create button: Click on the Create button to continue with the process.
G. Success Message: After clicking on Create, the system will show a message “Add user successfully”. Click on “OK” to continue.
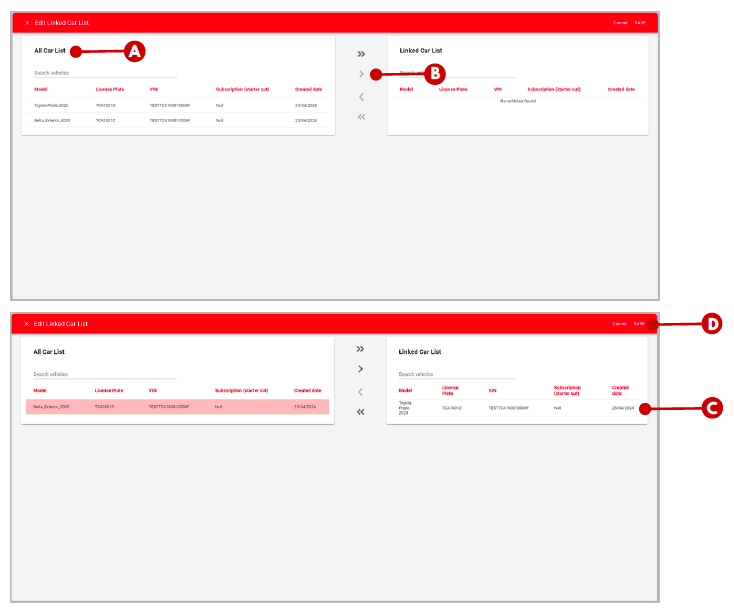
To learn how to add vehicles to the customer’s account, follow the steps below:
A. Vehicle all list: The list on the left is the list of the vehicles that are currently available for you to assign to the customer. Please select the vehicle that you want to add to their account.
B. Arrow icon: After selecting the vehicles that you want to add, click on the arrow icon to move the vehicles to the list on the right.
C. Project vehicle list: After clicking on the arrow icon, all the selected vehicles on the left will move across, meaning they have been added to the customer’s account.
D. Save Button: Then click on the “Save” button on the top right side of the screen.
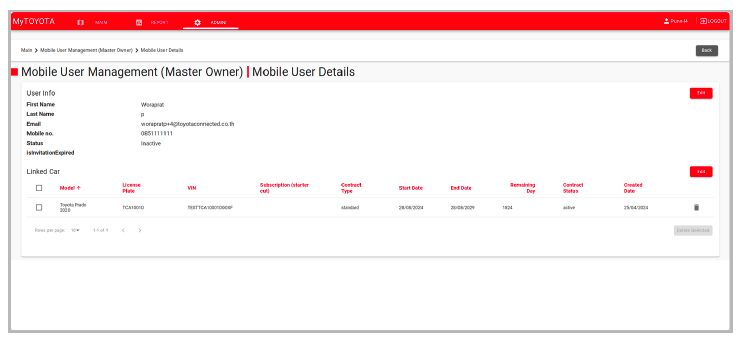
After click on Save button, the system will show you the Mobile user detail page of the user that you just created.
If there are information that needed to be change, you can also click on Edit button to change the information as well.
Fleet management is the function that user can use to classify the group of the vehicles as they need. The Fleet will also be required to be created before import the vehicle information to the system.
Fleet Management Fields:
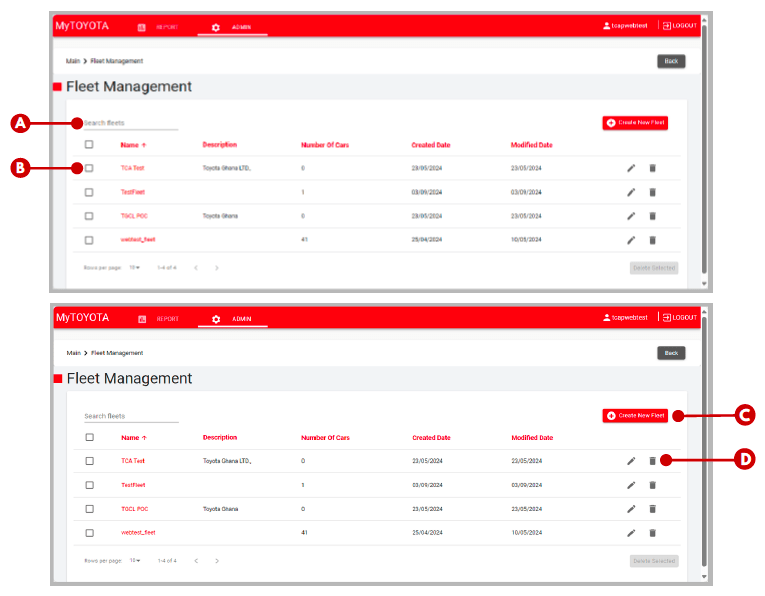
Understanding the fields on the Fleet Management page is crucial for accurately populating each section. See the breakdown below:
A. Search Function: Enter a keyword in the text box to search for a specific fleet in the list.
B. List of fleets: The list of the existing fleets in the system (Created only by your distributor).
C. Create New Fleet Button: Clicking this button allows you to access the form for creating a new fleet.
D. Action Buttons: This includes the edit button for modifying information and the bin button for deleting the Fleet.
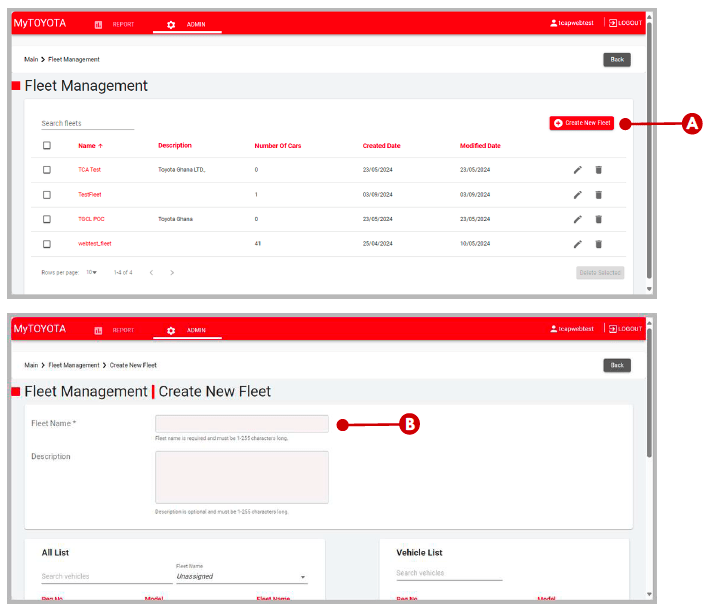
Now let’s look at how to create a new Fleet. See the step-by-step guide below.
A. Access the Form: Click on the “Create New Fleet” button on the main Fleet management screen.
B. Input Details: You will be directed to a screen where you can enter the mandatory details for the new fleet.
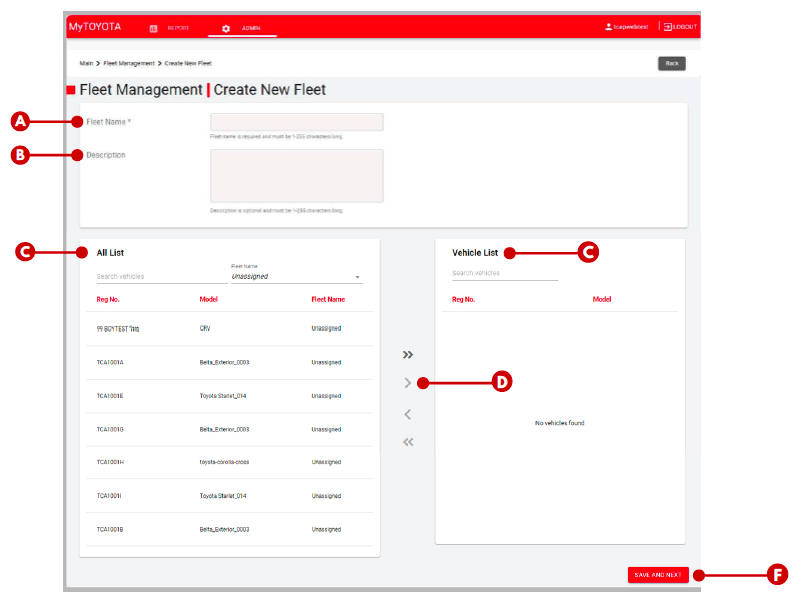
When creating a new project, please provide the following information:
A. Fleet name: Enter a name of the fleet, which will be used for vehicle imports.
B. Description: Input the additional description needed for the fleet information.
C. All list: The list on the left will show all the vehicle in the distributor project that are not assign to any fleet yet. Please select vehicle on the list if you wish to add to fleet manually.
D. Arrow: After select vehicles, please click on the arrow to move the selected vehicle to the right-hand panel.
E. Vehicle list: After click on the arrow, the vehicle will show on this list which will be the vehicles that will be add to the fleet.
F. SAVE button: Click on the button to go to the next page.
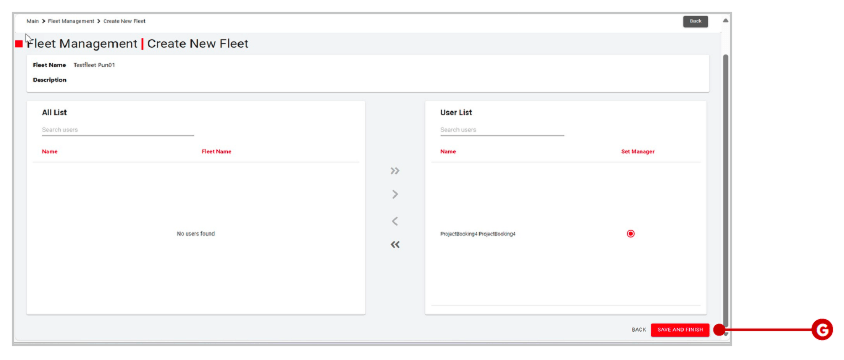
After you clicked on SAVE AND NEXT button, the system will show the user list for you to add the user to the fleet.
Please move the user from the list from left to right the same method you operated on the fleet list in the previous page.
G. SAVE AND FINISH: Click on the button to finish the fleet creation.
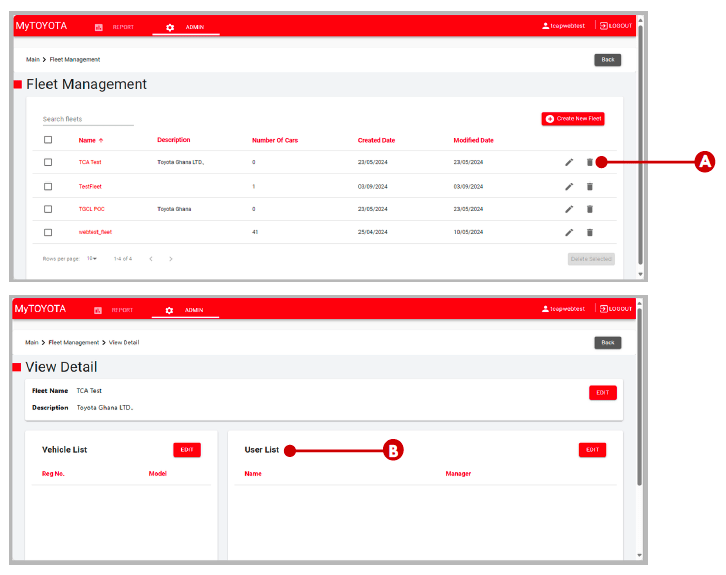
You can view existing fleet information as well. See the steps below.
A. Click on the pencil icon of the fleet that you want to view. The website will then display detailed information like what was provided during fleet creation.
B. Additionally, you will also see the sections called ‘Vehicle List’ and ‘User List’ at the lower part of the page, which will allow you to view vehicle and user information.
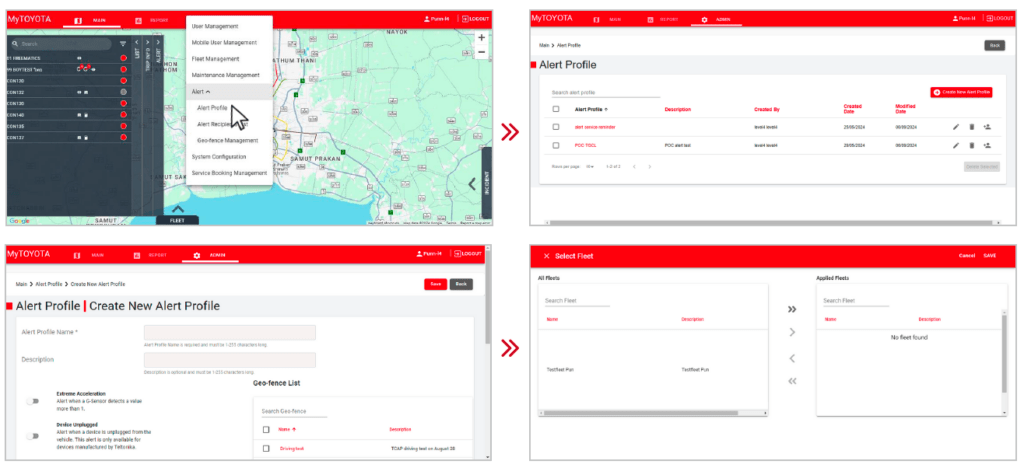
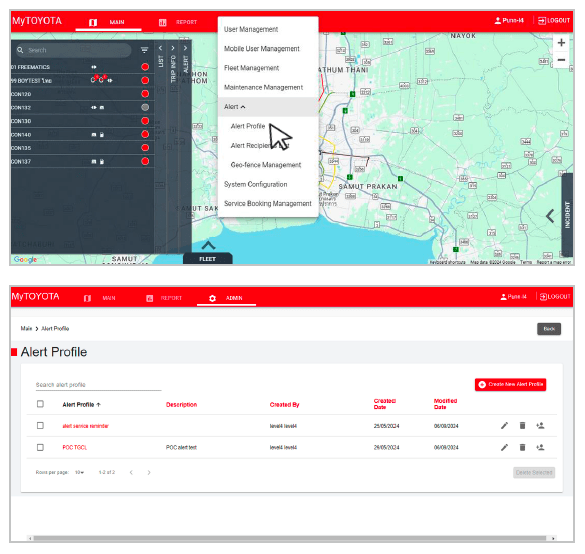
The Alert function allows you to create detailed alert profiles, enabling the system to send notifications for specific events. You can customise each alert by selecting the event type and choosing recipients, ensuring timely notifications reach the right individuals or groups. This feature helps you manage and respond to important events efficiently.
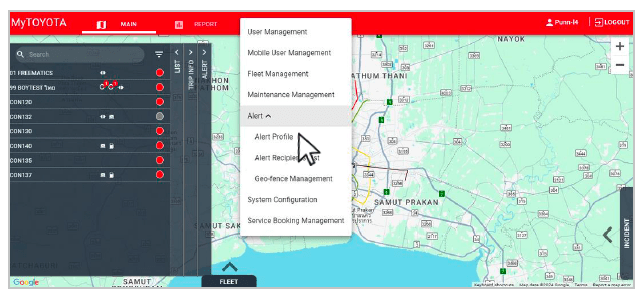
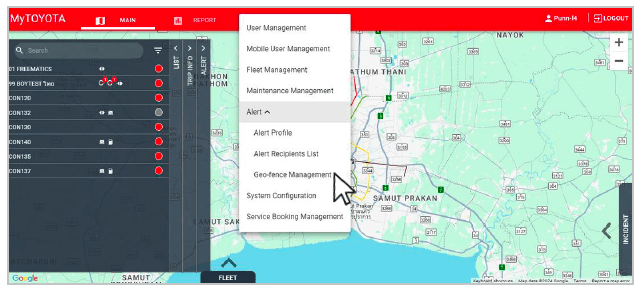
To access the Alert menu, click on the Admin menu in the top header bar. The Alert menu includes three submenus:
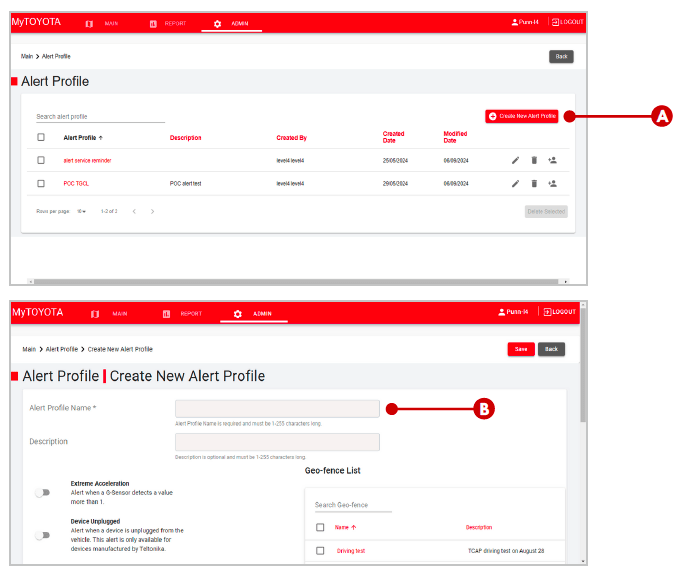
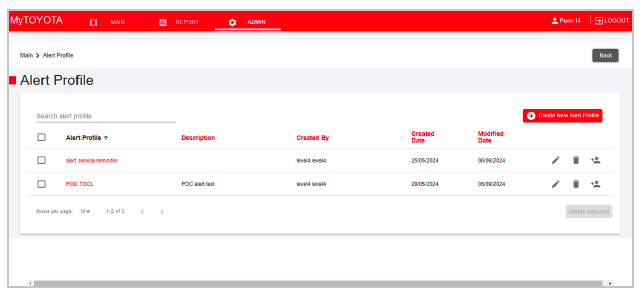
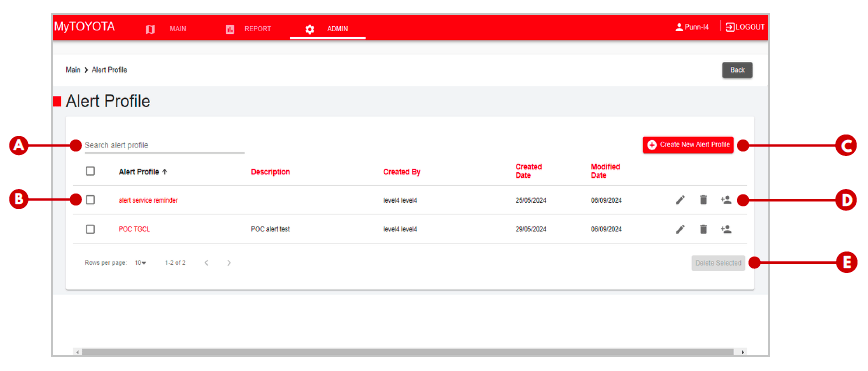
You can see the list of existing alert profiles here, as well as create a new alert profile.
A. Search Function: Enter a keyword to find a specific alert profile.
B. Multiple Select Checkbox: Select multiple alert profiles using the checkboxes.
C. Create a New Alert Profile: Click to access the form for creating a new alert profile.
D. Action Buttons: Use these to edit profiles, delete them, or add recipients.
E. Delete Selected: Delete multiple selected alert profiles at once.
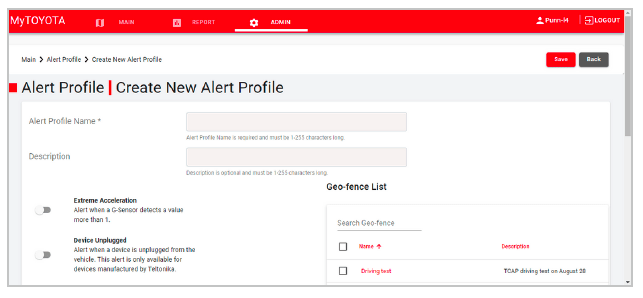
Now let’s look at how to create a new Alert Profile. See the step-by-step guide below.
A. Access the Form: Click on the “Create New Alert Profile” button on the alert profile screen.
B. Input Details: You will be directed to a screen where you can enter the mandatory details for the new alert profile.
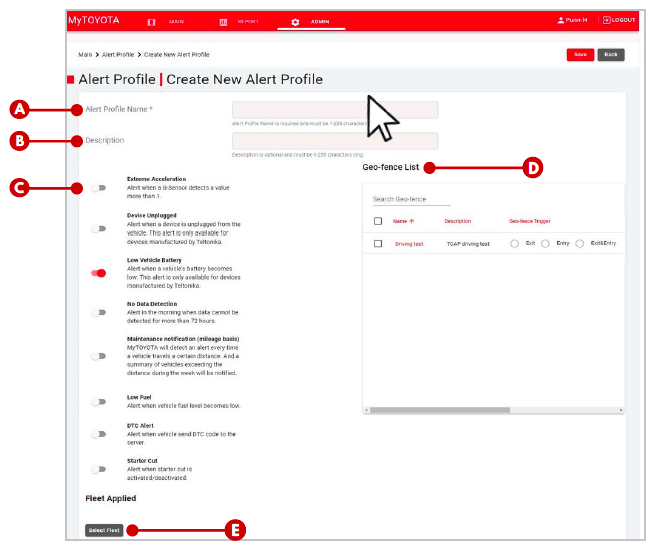
When creating a new alert profile, provide the following details:
A. Alert Profile Name: Enter a name for the alert profile.
B. Description: Add any relevant description for the alert profile.
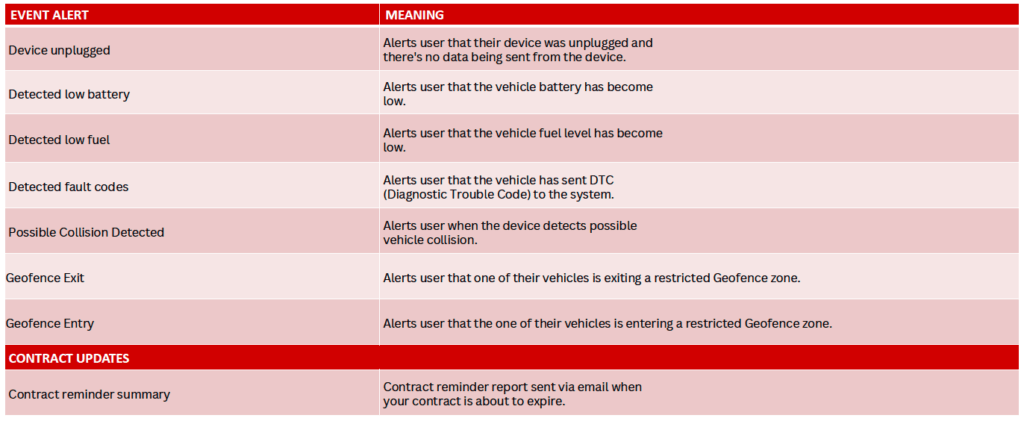
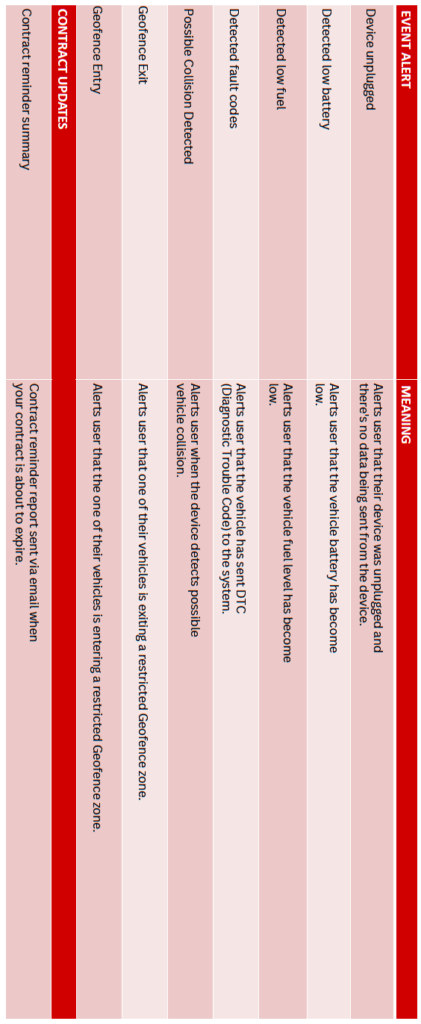
C. Event List: This list shows all events for which you can set up alerts. To receive notifications for a specific event, toggle the switch to ‘on’ next to the desired event. The system will notify you when the event occurs.
D. Geo-fence List: Select available Geo-fences to include in your alert profile by checking the box. Choose whether the alert should trigger when a vehicle exits or enters the Geo-fence by selecting the corresponding radio button.
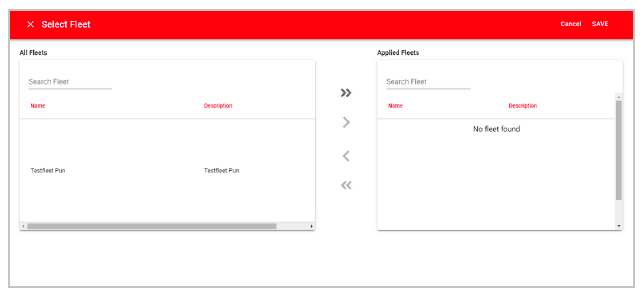
E. Select Fleet: Specify which fleet the alert profile will apply to. Clicking this option takes you to the ‘Select Fleet’ screen.
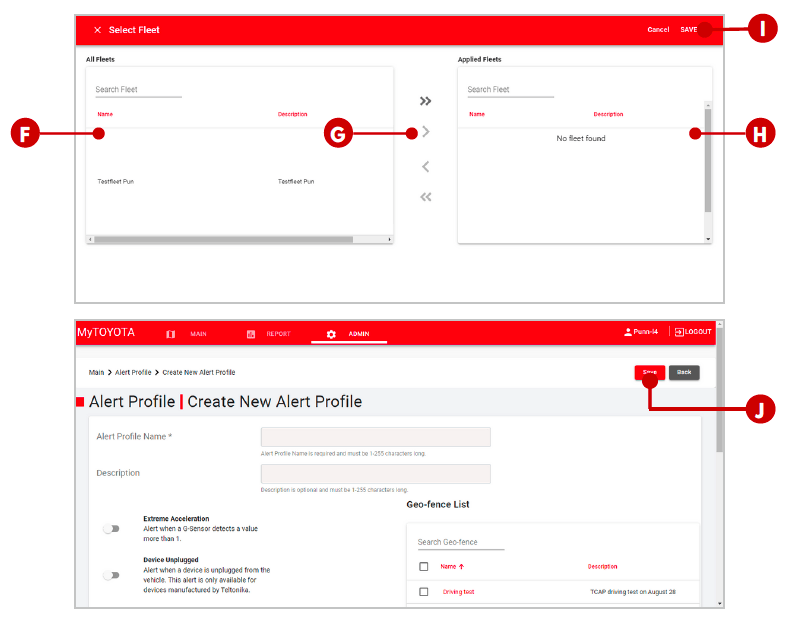
F. All Fleet List: The left panel displays all available fleets in the project. Select the fleets you wish to add to the alert profile manually.
G. Arrow: After selecting a fleet, click the arrow to move the selected fleet to the right-hand panel.
H. Applied Fleets List: The selected fleets will appear in this list, indicating the fleets to which the alert profile will apply.
I. Select Fleet SAVE Button: Click this button to confirm your fleet selection. You will return to the ‘Create New Alert Profile’ screen.
J. SAVE Button: Click this button to complete the creation of the alert profile
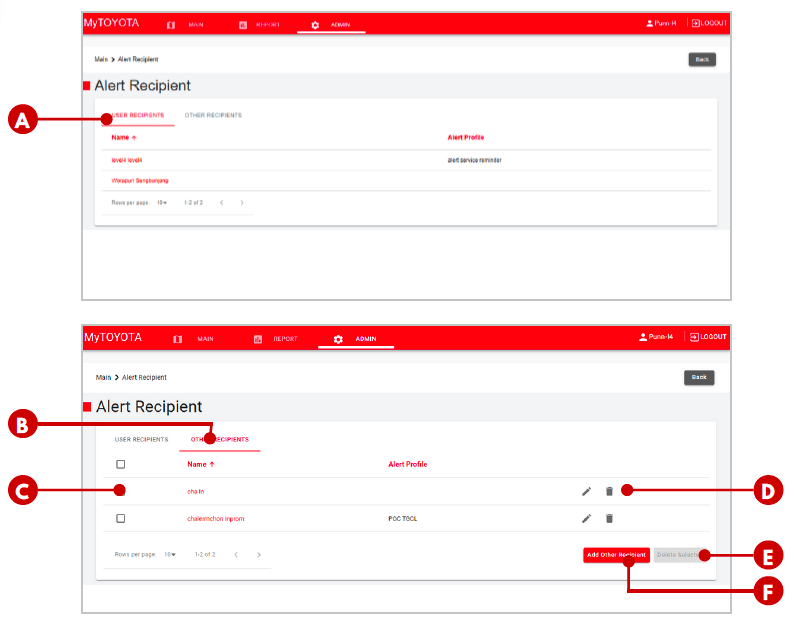
Here, you can view the list of available alert recipients:
A. User Recipients: Click this tab to display a list of user accounts eligible to receive alerts within the system.
B. Other Recipients: Click this tab to display a list of external contacts who can receive alerts via email, offering flexibility beyond internal users. You can also add new recipients to this list.
C. Multiple Select Checkbox: Select multiple recipients by clicking the checkboxes.
D. Action Buttons: Includes the edit button for modifying information and the bin button for deleting a recipient.
E. Delete Selected: Delete multiple selected recipients from the list.
F. Add Other Recipient: Click this button to open a pop-up, allowing you to input the recipient’s information.
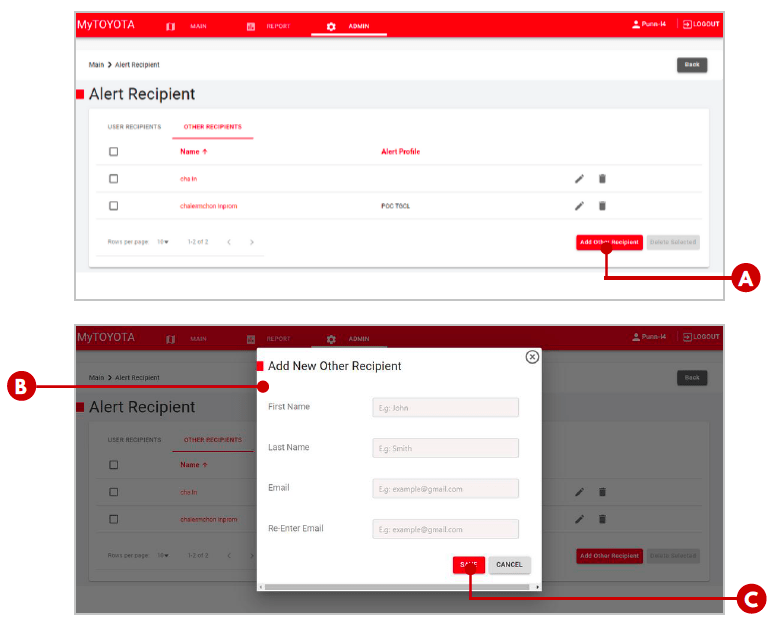
You can add individuals who are not registered users of the system as external recipients for alerts. These contacts will receive notifications via email. Follow these steps:
A. Add Other Recipient Button: Click this button to begin adding a new recipient. A pop-up will appear for you to enter the recipient’s details.
B. Information Input Field: Enter the required information, including the recipient’s first name, last name, and email address.
C. SAVE Button: Click this button to complete the process. The newly added recipient will appear on the list and can be assigned to specific alert profiles.
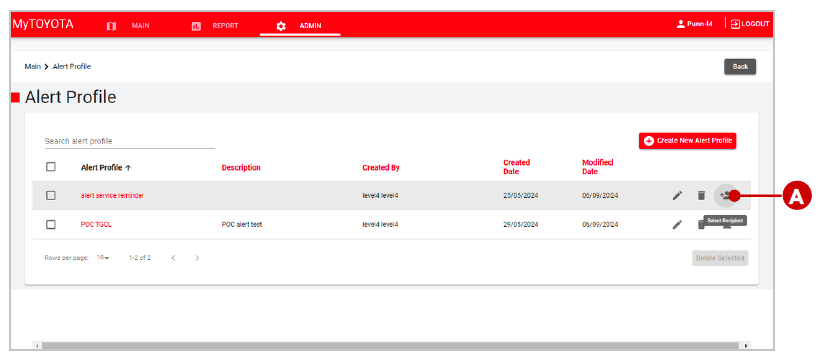
You can assign specific recipients to an alert profile, ensuring they receive notifications whenever an event occurs. This allows you to tailor the notification process so that users or external contacts are promptly informed about relevant events. Follow these steps:
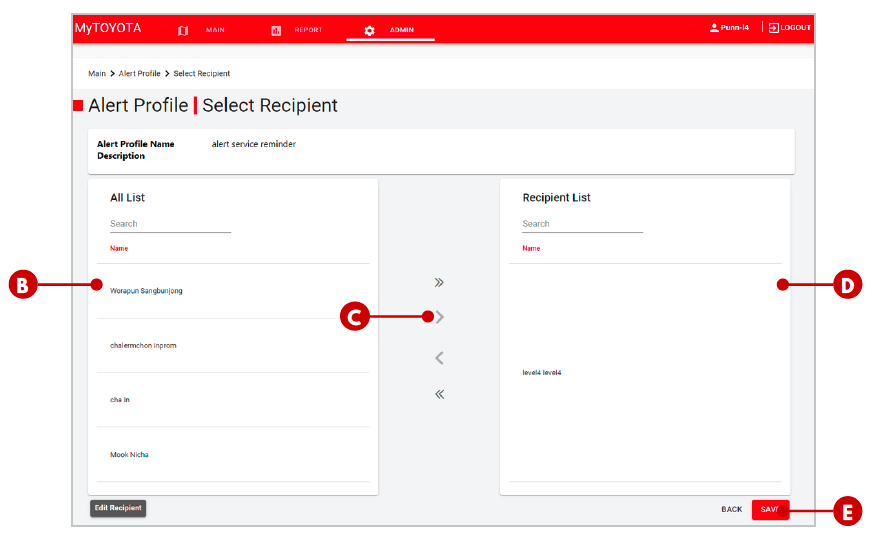
A. Select Recipient Icon: From the alert profile list, click on the ‘Select Recipient’ icon next to the alert profile you want to assign recipients to. This will navigate you to the recipient selection screen.
B. All Recipient List: The list on the left displays all available recipients for assignment. Select a recipient from this list if you wish to add them to the alert profile manually.
C. Arrow: After selecting a recipient, click the arrow to move the selected recipient to the right-hand panel.
D. Applied Recipient List: After clicking the arrow, the recipient will appear in this list and be designated to receive alerts.
E. SAVE Button: Click this button to finalize the recipient selection.
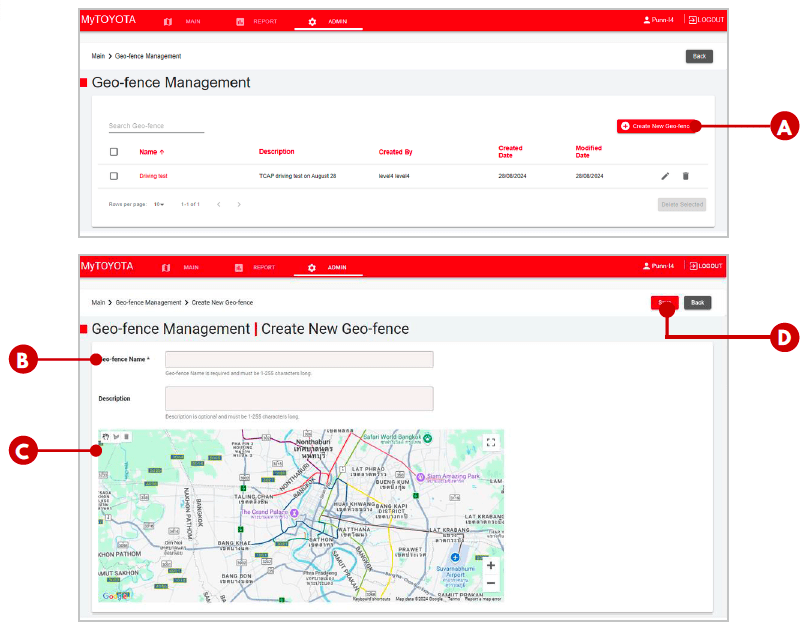
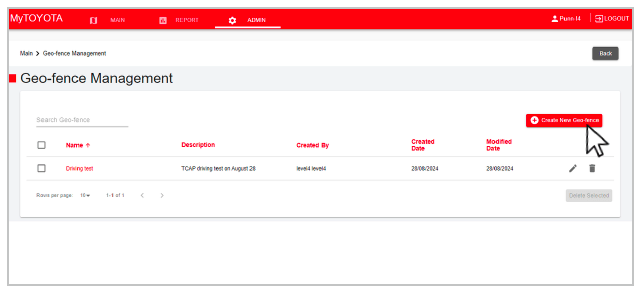
To create a Geo-fence to receive alerts when a vehicle enters or exits a defined area. Set boundaries, then assign it to an alert profile for notifications on vehicle movements. The Geo-fence Management screen lists existing Geo-fences.
A. Search Function: Enter keywords to find a specific Geo-fence.
B. Multiple Select Checkbox: Select multiple Geo-fences.
C. Create New Geo-fence: Start creating a new Geo-fence.
D. Action Buttons: Edit or delete Geo-fences.
E. Delete Selected: Delete selected Geo-fences.
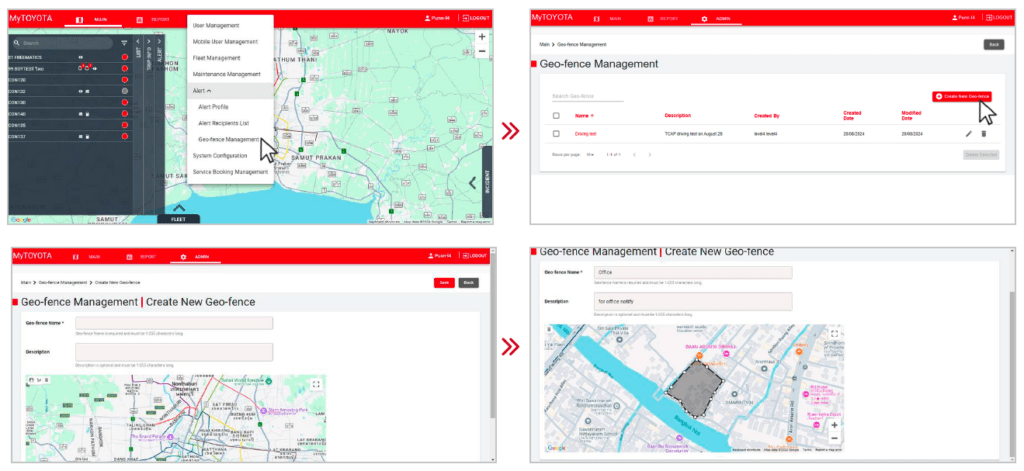
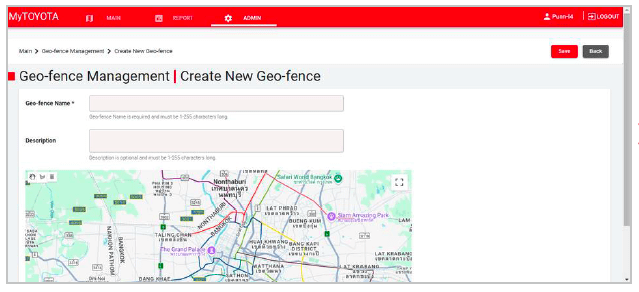
Follow these steps to create a new Geo-fence:
A.Create New Geo-fence: Click the “Create New Geo-fence” button on the Geo-fence management screen to access the entry form.
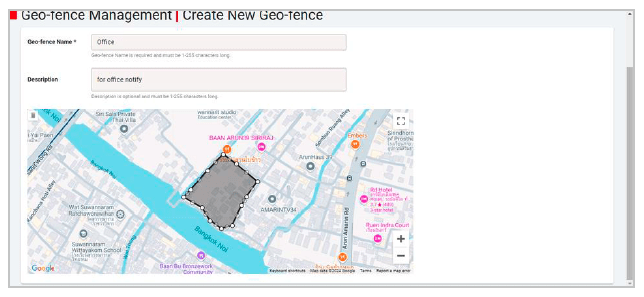
B.Input Details: Enter the Geo-fence name and description.
C.Draw Geo-fence Area: Click the polygon icon to place the first dot on the map. Add additional points to outline the area, connecting the final dot to the first. Use the hand icon to navigate the map and the bin icon to delete the Geo-fence if needed.
D.SAVE Button: Click the button to finalize the Geo-fence creation.
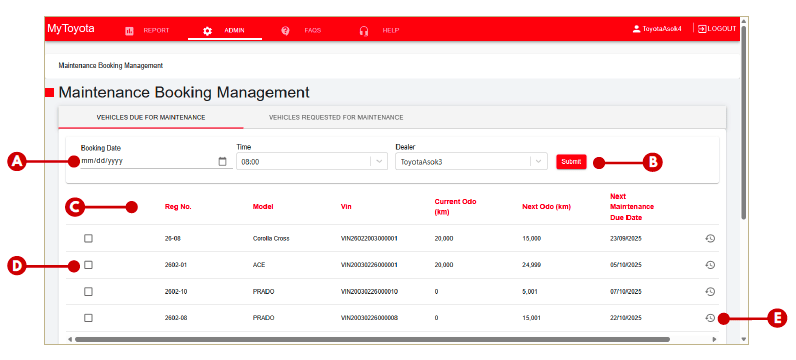
Maintenance Booking Management allows you to submit maintenance requests to your preferred dealer, view your vehicles and their maintenance history, and schedule bookings directly using the Schedule function.
Main Screen Features:
A. Schedule selection: Select the date, time, and preferred dealer for your maintenance booking.
B. Submit: Click this button to send your maintenance booking request.
C. Vehicle list: Displays all vehicles linked to your account.
D. Checkbox: Tick the checkbox next to each vehicle you wish to include in the booking.
E. Service history: Click this button to view the maintenance history of the selected vehicle.
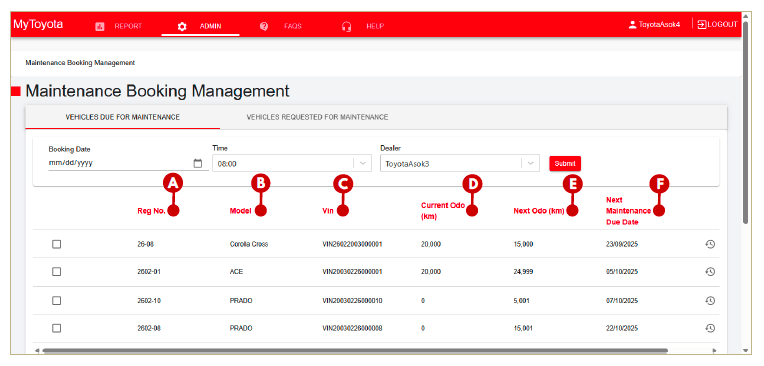
The vehicle list here will show vehicle information as follows,
Vehicle information:
A. License: License plate number
B. Model: Vehicle model
C. VIN: Vehicle Identification Number
D. Current Odo (km): Current mileage of the vehicle
E. Next Odo (km): The target mileage of upcoming maintenance
F. Next Service due date: The target date of upcoming maintenance
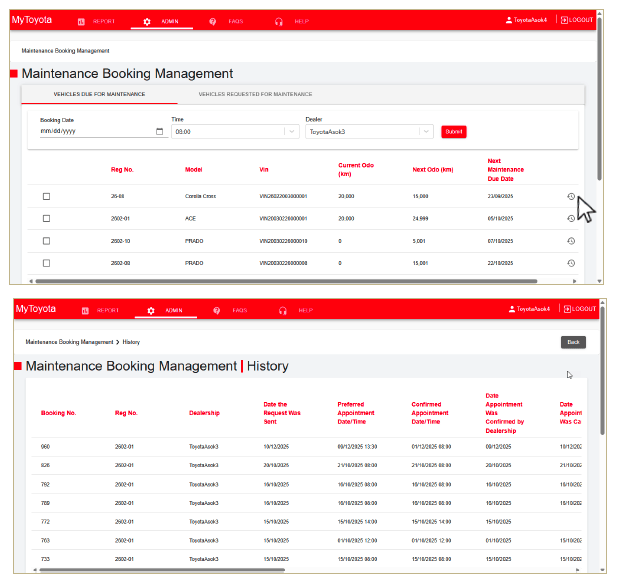
You may also review comprehensive vehicle service records by navigating to the right side of vehicle list within Maintenance Booking Management.
To review a vehicle’s maintenace history, click the rightmost button on the line of the appropriate vehicle. The website will update to the History page (bottom image)
To request a maintenance booking, select the “Vehicles Due For Maintenance” tab and follow these steps:
A. Checkbox: Select the vehicle/s you would like to request maintenance for by clicking the associated checkboxes.
B. Booking date: Click to open the calendar and select the preferred date.
C. Time: Click to see the available time slots of the desired booking date. Select the preferred time.
D. Dealer: Select your preferred dealership to go for the vehicle’s maintenance.
E. Submit: Click to continue.
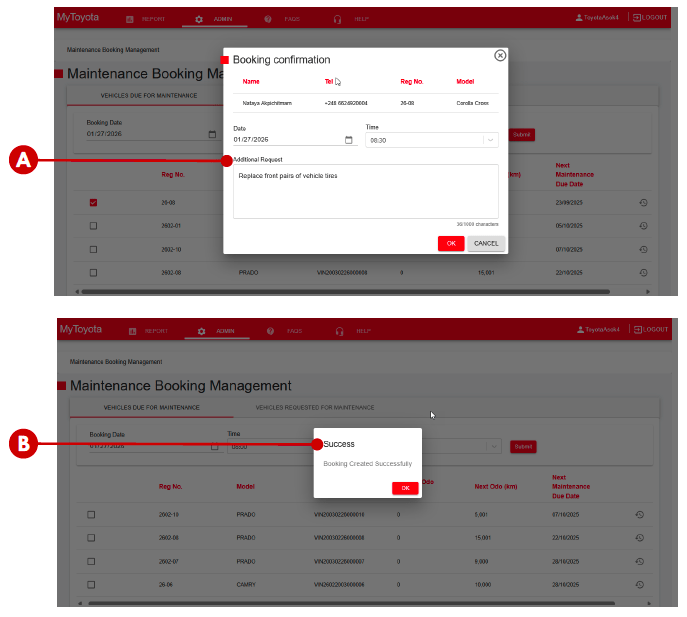
F. Confirmation box: The confirmation box will appear and show a list of the selected vehicles, date and time of your requested booking.
In the confirmation box, please recheck to confirm the vehicle list, date and time of the booking before confirming and sending through the request to your dealership. You can also send a note to the dealership regarding any additional requests.
A. Additional Request: Text box to input any additional requests, so the dealership can prepare in advance for your appointment.
B. Click OK to confirm the booking. Once the ‘Booking Created Successfully’ message appears, your request has been sent to the dealership for processing.
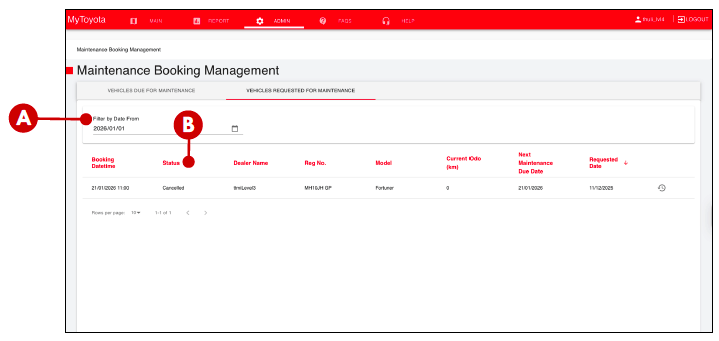
After submitting your booking request, you can review the booking status on the “Vehicles Requested For Service” tab.
A. Date filter: Filter to refine the list by date.
B. Status: On this page you will see the status of each booking request. The statuses shown here are:
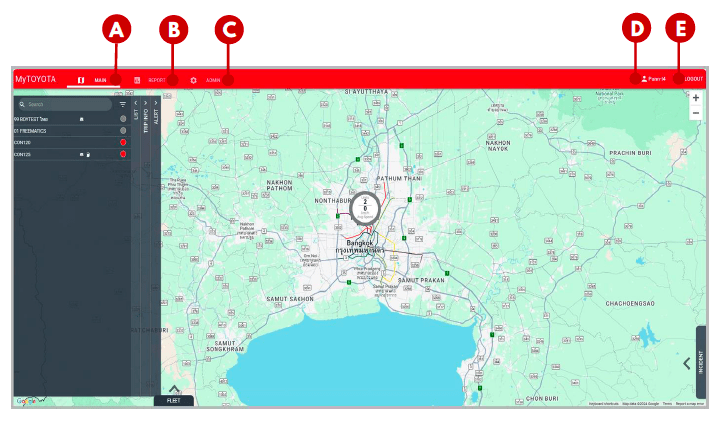
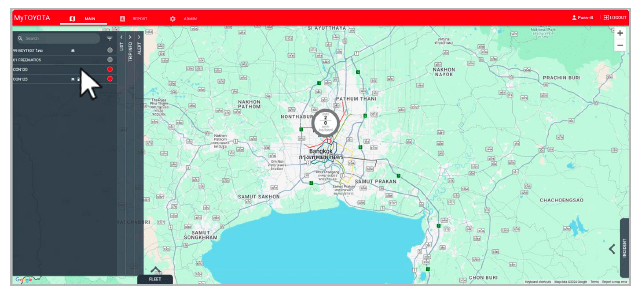
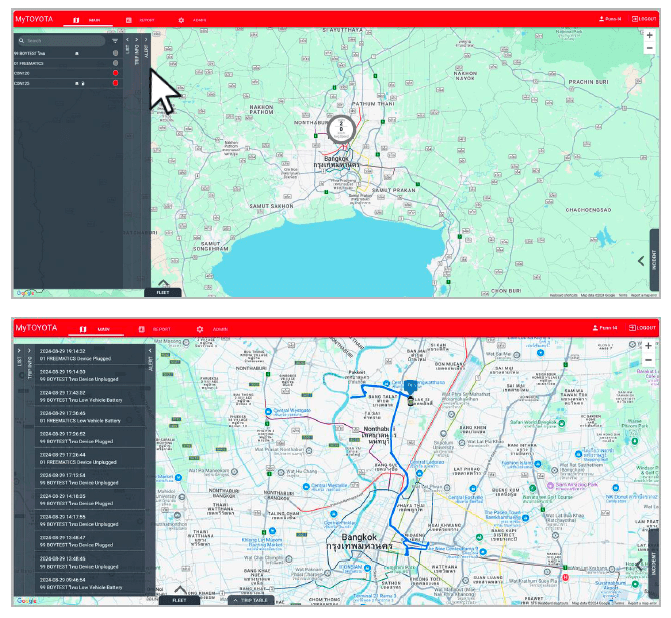
Once you have logged in, the system will take you to the main screen. Here, you can access vehicle information, vehicle locations on the map, and other important menu options.
Understanding The Features:
A. Main: Leads to the main screen.
B. Report: Leads to the vehicle report.
C. Admin: Contains two sub-menu options – User Management and Alert Recipient.
D. User Profile Name: Displays your profile name.
E. Logout: Allows you to log out of the website.
F. List Panel: Displays a list of all vehicles registered in the system, showing registration numbers and vehicle status. The status breakdown is as follows:
⚪ Grey: Engine off
🔴 Red: Idling (0.0 km/h – less than 1.0 km/h)
🟢 Green: Moving (1.0 km/h or over)
G. Search: Search for a specific vehicle by entering the vehicle registration number.
H. Trip Info Panel: View detailed driving trip information for each vehicle.
I. Alert Panel: Displays alert records from the last 12 hours.
J. Map: Check vehicle locations on an interactive map, which allows you to zoom in and out.
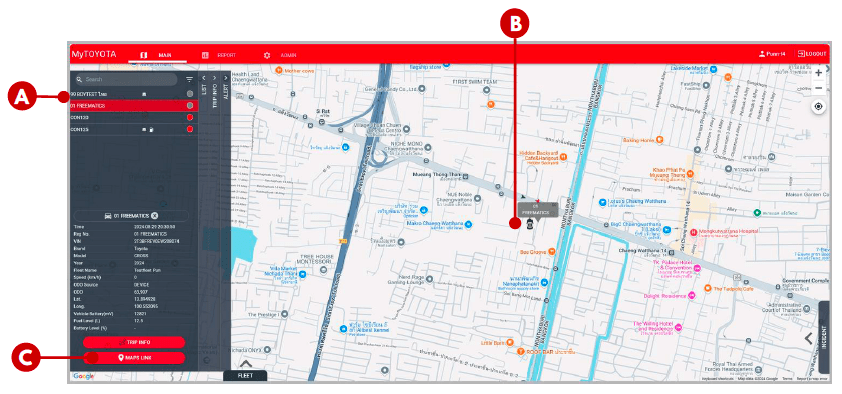
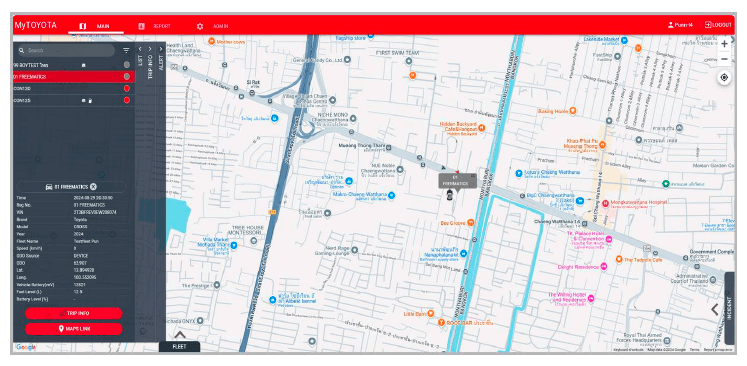
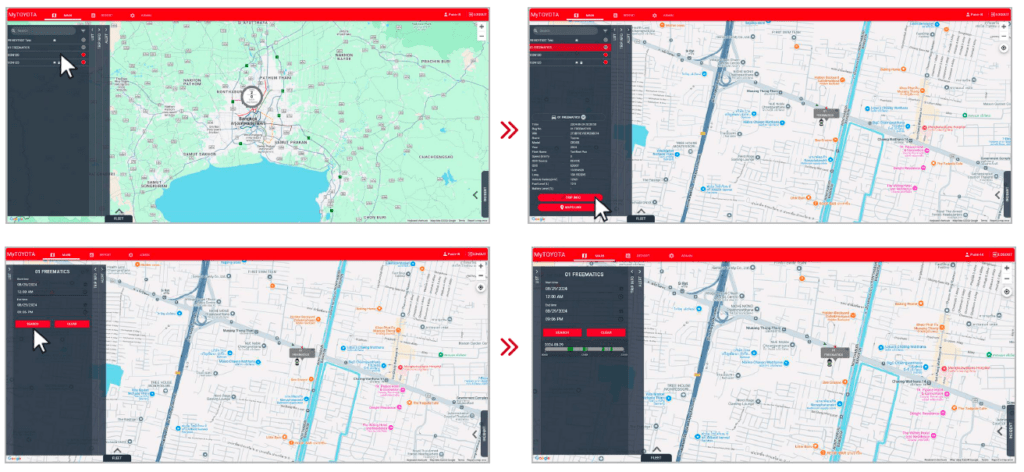
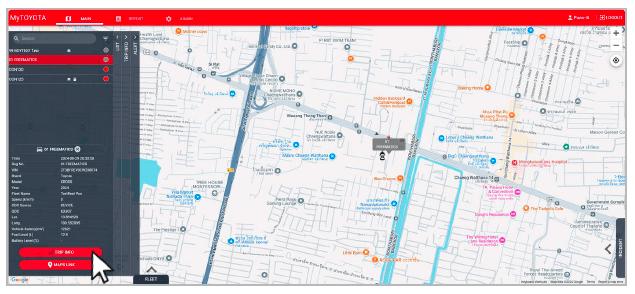
You can check each vehicle’s current location on the main screen map and Google Maps by following these steps:
A. List Panel: From the List Panel, click on the vehicle whose location you want to check.
B. Vehicle Icon: The current location of the vehicle will be displayed on the map. You will see a vehicle icon with its registration number on the map.
C. Map Link Button: If you want to see the vehicle on Google Maps, click the “MAPS LINK” button in the List Panel under vehicle information. This will direct you to Google Maps with the vehicle’s location.
You can check each vehicle’s information from the List Panel by following these steps:
A. From the List Panel, click on the vehicle you want to view.
B. The vehicle’s information will be displayed in the panel below the vehicle list. You can scroll through this area to see all the details.
Vehicle information includes the following:
1. Time: Time of the most recent data upload
2. Registration Number: License plate number
3. VIN: Vehicle Identification Number
4. Brand: Brand of the vehicle
5. Model: Model of the vehicle
6. Year: Year of the vehicle
7. Speed (km/h): Vehicle’s current speed in km/per hour.
8. ODO Source: Source of the odometer reading.
9. ODO: Total distance travelled by the vehicle.
10. Lat.: Latitude coordinate of the vehicle’s location.
11. Long.: Longitude coordinate of the vehicle’s location.
12. Vehicle Battery (mV): Voltage of the vehicle’s battery in millivolts.
13. Fuel Level (L): Amount of fuel in litres.
14. Battery Level (%): Remaining battery capacity as a percentage.
15. GMS Signal: Strength of the device’s mobile network signal.
16. Device Brand: Manufacturer of the telematics device.
17. Device Model: Model of the telematics device.
18. Status: Current status of the device (e.g., active, inactive).
19. DTC: Code indicating vehicle errors or malfunctions.
20. ST Cut: Status of the vehicle’s starter (active/disabled).
21. Unplugged Count: Number of times the device has been unplugged.

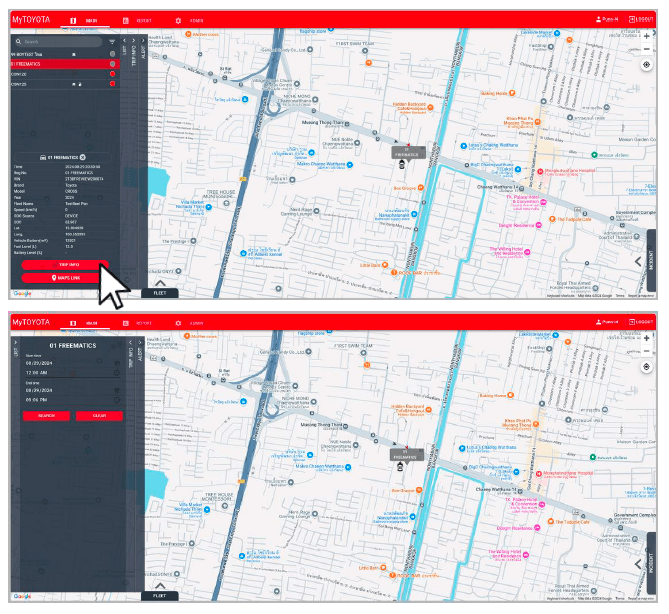
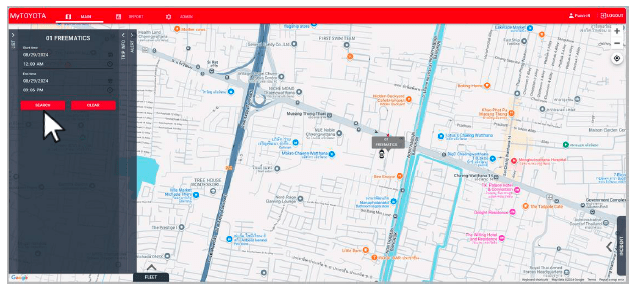
You can view a vehicle’s detailed driving or trip history by following these steps:
1. From the List Panel, click on the vehicle you wish to check. Then click the “TRIP INFO” button at the bottom of the panel or the Trip Info panel on the right.
2. The Trip Info panel will allow you to select the date and time range for the vehicle’s driving history. Enter the specific date and time, then click the “SEARCH” button. The input’s duration can be up to 7 days.
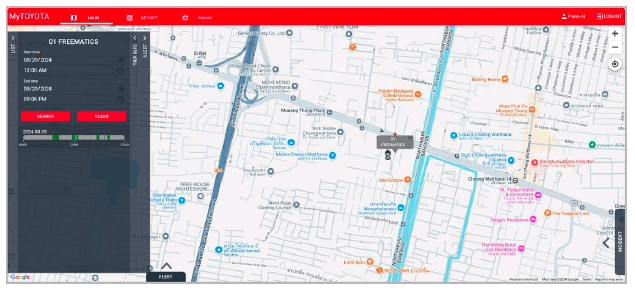
3. The trip info bar for the specified date and time will be displayed. You can click on the trip info bar of the to see more details and view the vehicle route
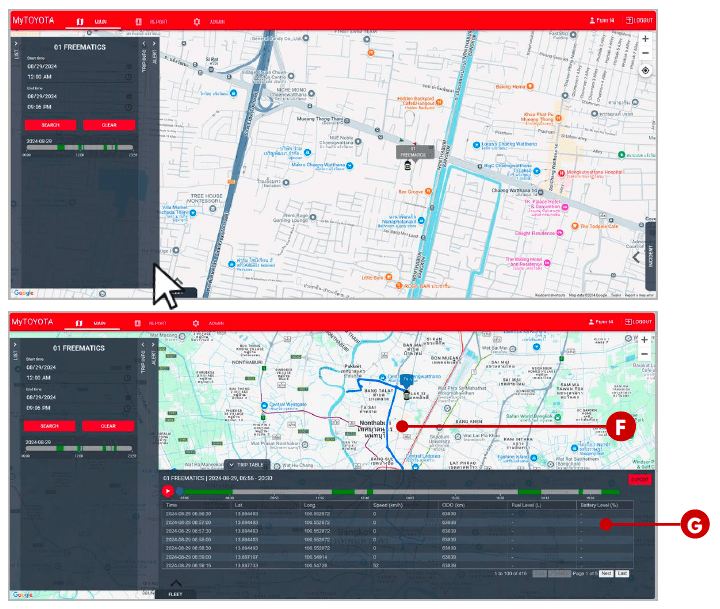
You can view a vehicle’s detailed driving or trip history by following these steps:
1. From the List Panel, click on the vehicle you wish to check. Then click the “TRIP INFO” button at the bottom of the panel or the Trip Info panel on the right.
2. The Trip Info panel will allow you to select the date and time range for the vehicle’s driving history. Enter the specific date and time, then click the “SEARCH” button. The input’s duration can be up to 7 days.
3. The trip info bar for the specified date and time will be displayed. You can click on the trip info bar of the to see more details and view the vehicle route
F. Vehicle Route: Click on the trip info bar to view the entire driving route for that day.
G. Trip Table: Displays detailed driving trip information, including:
1. Time: Timestamp of each data point.
2. Lat.: Latitude coordinate.
3. Long.: Longitude coordinate.
4. Speed (km/h): Vehicle speed in km/per hour.
5. ODO (km): Odometer reading in kilometers.
6. Fuel Level (L): Amount of fuel in litres.
7. Battery Level (%): Battery capacity as a percentage.
8. Temperature 1~4 (℃): Temperature readings from up to four sensors.
9. Humidity 1~4 (%): Humidity readings from up to four sensors.
10. Door 1~2: Status of up to two doors (open/closed).
You can view records of all alerts that have occurred in the last 12 hours in the Alert Panel.
Accessing Alerts:
1. From the main screen, click on the Alert Panel to expand it.
2. The panel will display a list of all vehicle alerts. You can scroll up and down to view the complete list. The displayed details include the date and time, registration number, and event name. You can sort the list by the date and time of each event.
3. Click on a specific alert to see the location where the event occurred on the map.
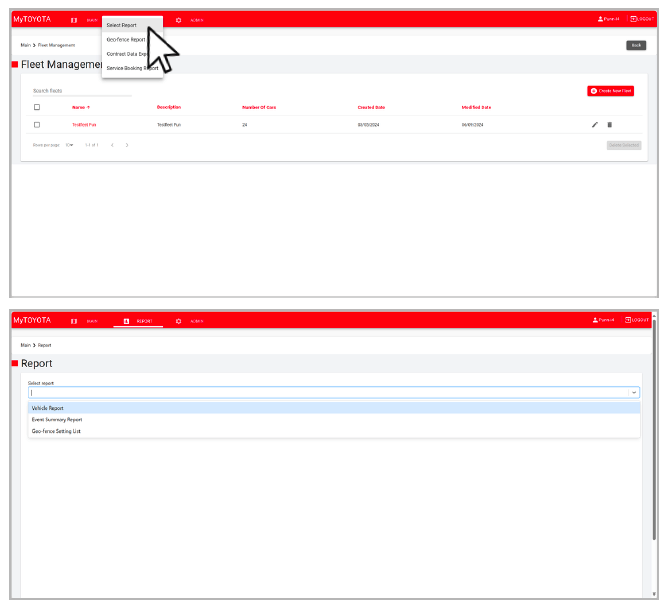
To view a report for a specific vehicle, follow these steps:
Please select the report you wish to export.
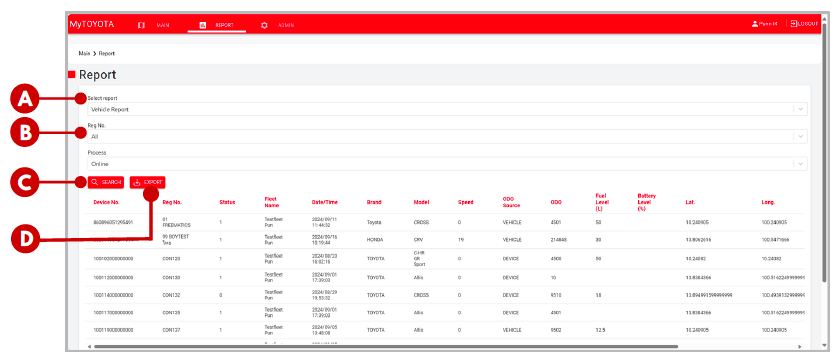
Vehicle Report Fields:
The Vehicle Report will export the overall information of the selected vehicle to display on the screen (e.g., registration number, speed, odometer, fuel level, etc.). Follow the steps below:
A. Select Report: Choose the vehicle report from the list.
B. Registration Number: Select either “All Vehicles” or specify the registration number of the vehicle.
C. Search Button: Click the Search button to view the report on the website.
D. Export Button: Use the Export button to download the report as a CSV file.
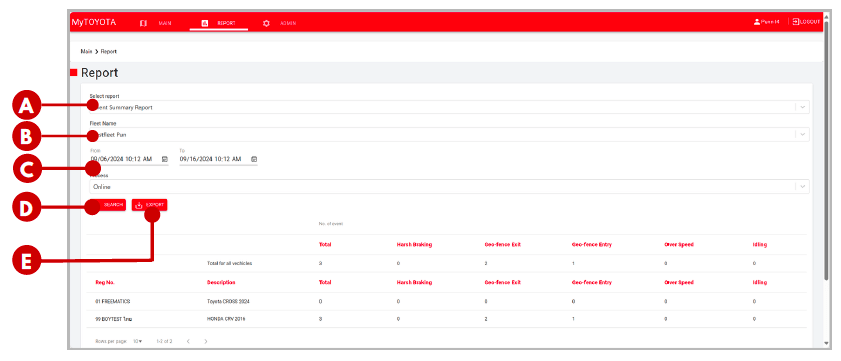
Event Summary Report Fields:
The Event Summary Report exports the number of each event that occurred with the vehicles during the selected time period (e.g., harsh braking, geo-fence violations, speeding). Follow the steps below:
A. Select Report: Choose the Event Summary Report from the list.
B. Fleet Name: Select either “All Fleets” or the specific fleet for which you want to view the report.
C. Date Range: Specify the date range for summarising the report.
D. Search Button: Click the Search button to view the report on the website.
E. Export Button: Use the Export button to download the report as a CSV file.
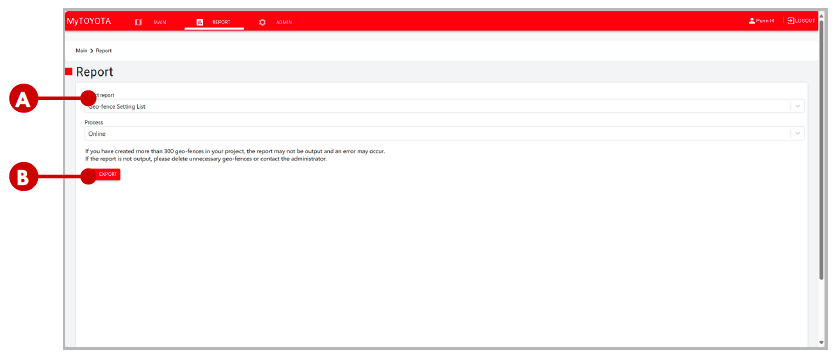
Geo-Fence Setting List Report Fields:
The Geo-Fence Setting List Report exports all geo-fences that have been set up by users, summarised in a report format. Follow the steps below:
A. Select Report: Choose the Geo-Fence Setting List Report from the list.
B. Export Button: Use the Export button to download the report as a CSV file.
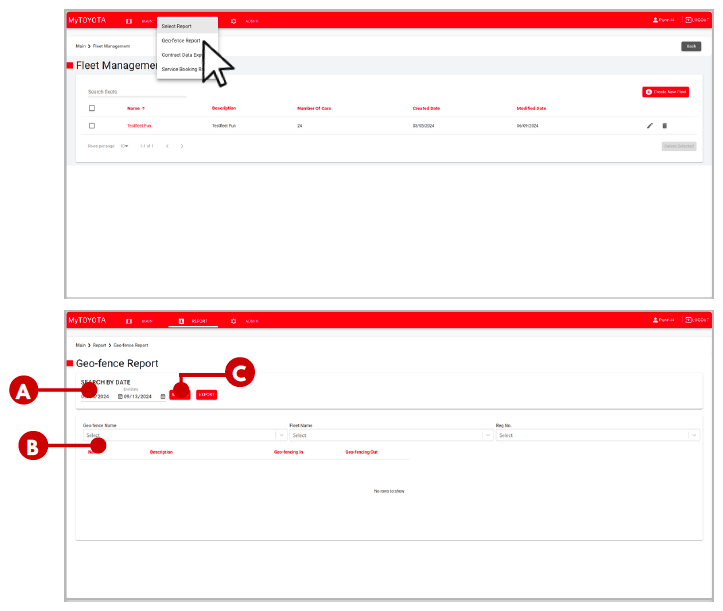
To view a report for geo-fence events, follow these steps:
Geo-Fence Report Fields:
A. Date Range: Select the date range to summarise the report.
B. Item Selection: Choose the Geo-Fence, Fleet, or Registration Number from the list to specify your search.
C. Search and Export Button: Click the button to view the report on the website and to export the report as a CSV file
Contract Data Export Fields:
You can export all contracts in the project for review by following these steps:
From the main screen, click REPORT in the top bar menu, then select Contract Data Export. This will take you to the Report screen.
Start/End Date: Select the date range type, either the start or end date.
Date Range: Specify the date range to summarise the report.
Package: Choose the package type: All, Standard, or Advanced.
Status: Select the status of the contracts to be exported: All, Ready, Active, Expired, or Terminated.
Export Button: Use the Export button to download the report as a CSV file.
Maintenance Booking Fields:
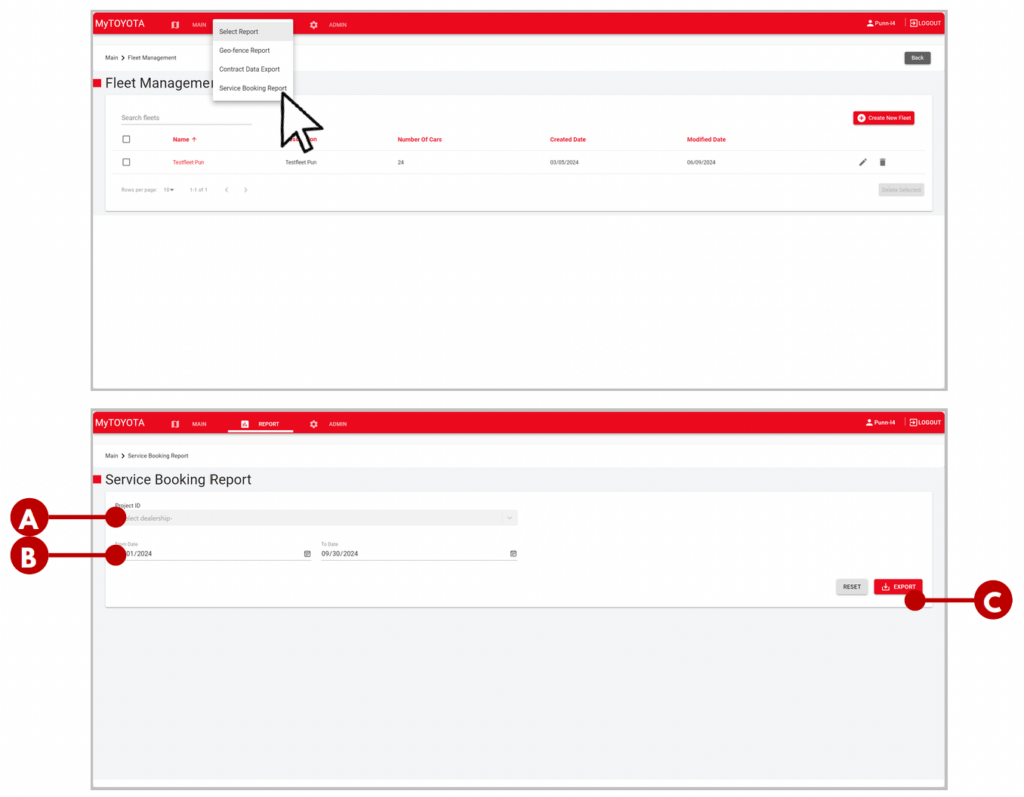
You can export all current service booking appointments in the project by following these steps:
1. From the main screen, click REPORT in the top bar menu, then select Service Booking Report.
This will take you to the Report screen.
A. Project ID: This selection will be disabled, as the report will only export service bookings within your dealership.
B. Date Range: Specify the date range to summarise the report.
C. Export Button: Use the Export button to download the report as a CSV file.
By Clicking “Accept all cookies”, you agree to the storing of cookies on your device to enhancesite navigation, analyze site usage, and assist in our marketing efforts.