PURPOSE OF THIS MANUAL:
Welcome to the Call Centre System Operational Guide. This manual will guide you through the features available on the MyToyota Call Centre Management website and demonstrate how to navigate the system. You will learn how to access customer and vehicle information and how to immobilise customers’ vehicles in emergencies.
WHAT YOU NEED TO REGISTER:
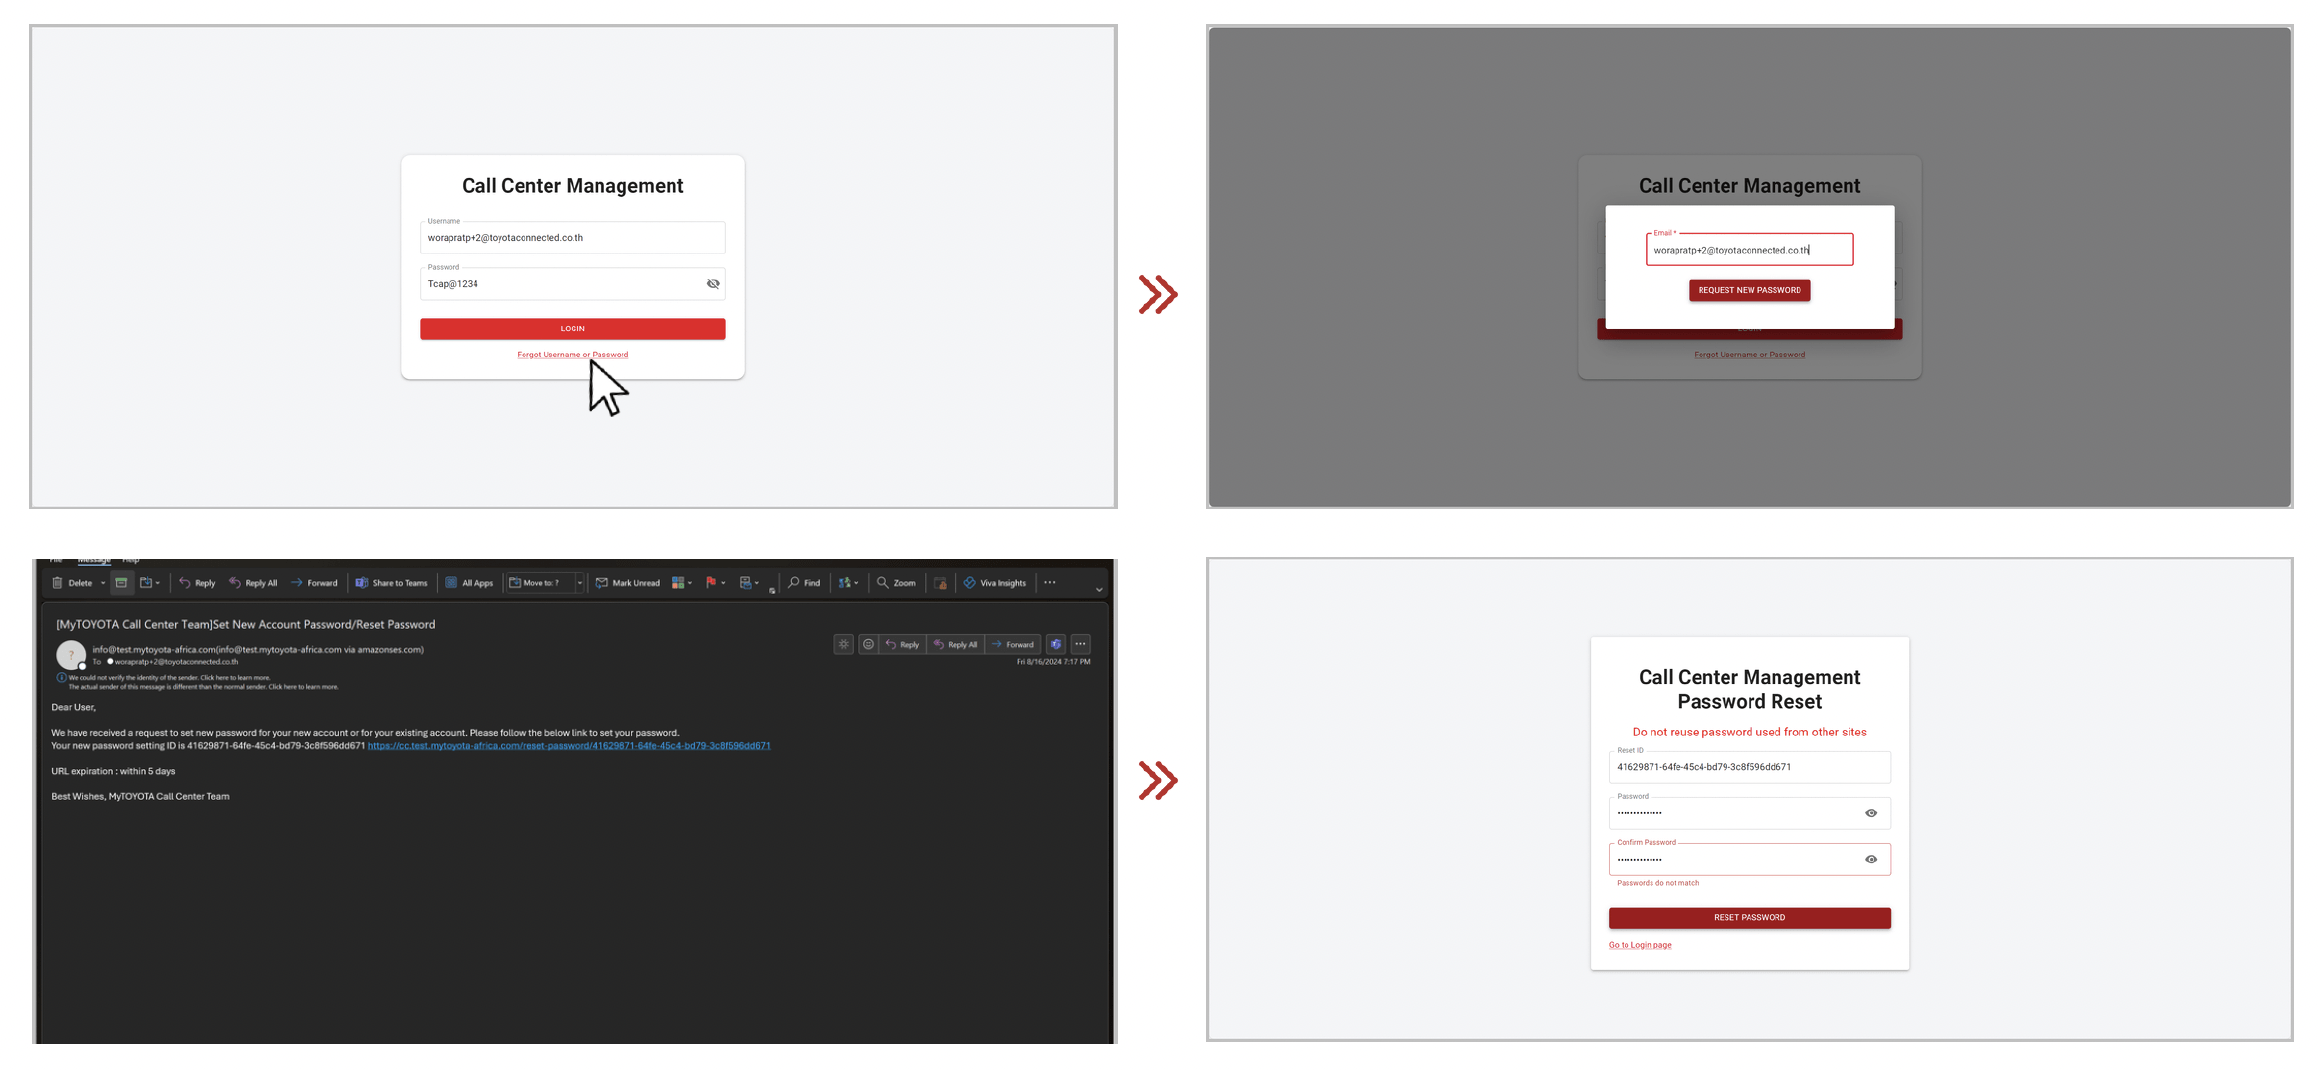
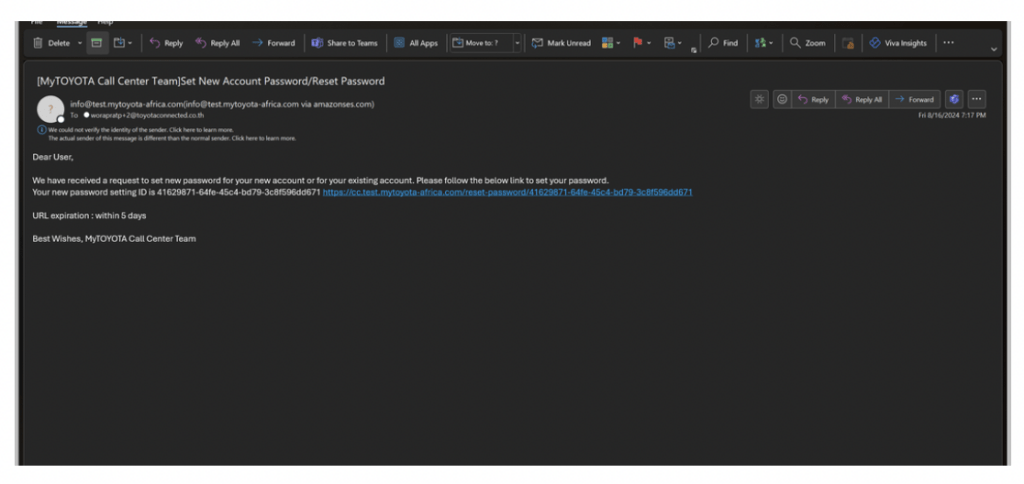
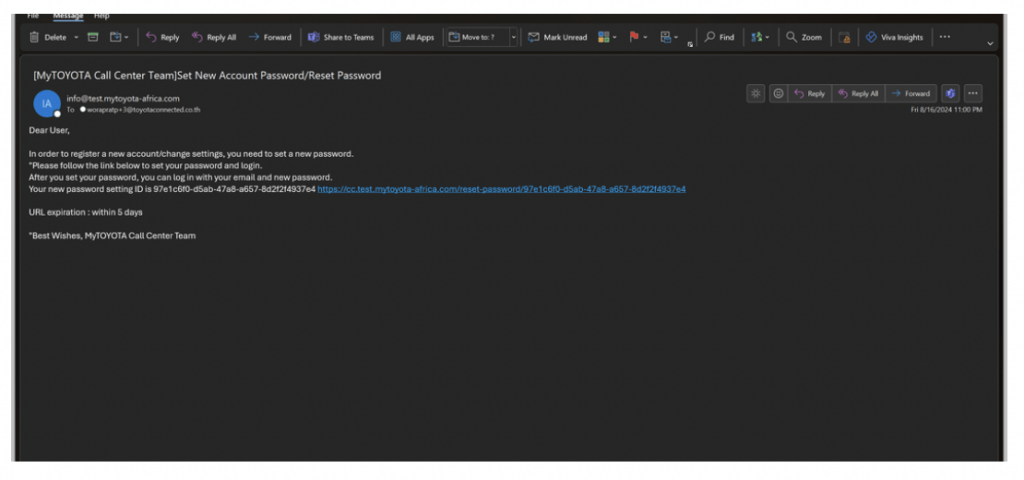
1. Once your Admin user creates your account, you will receive an email to complete the registration by setting a new password.
2. After you’ve set a new password for your account, log in to the system to complete the process.
WEBSITE URL:
Click on the URL below to access the Call Centre Management System.
https://cc.test.mytoyota-africa.com
First time logging in: If it’s your first time logging in to the system, follow the below instructions.
1. You will receive an email to complete the registration by setting a new password for your account.
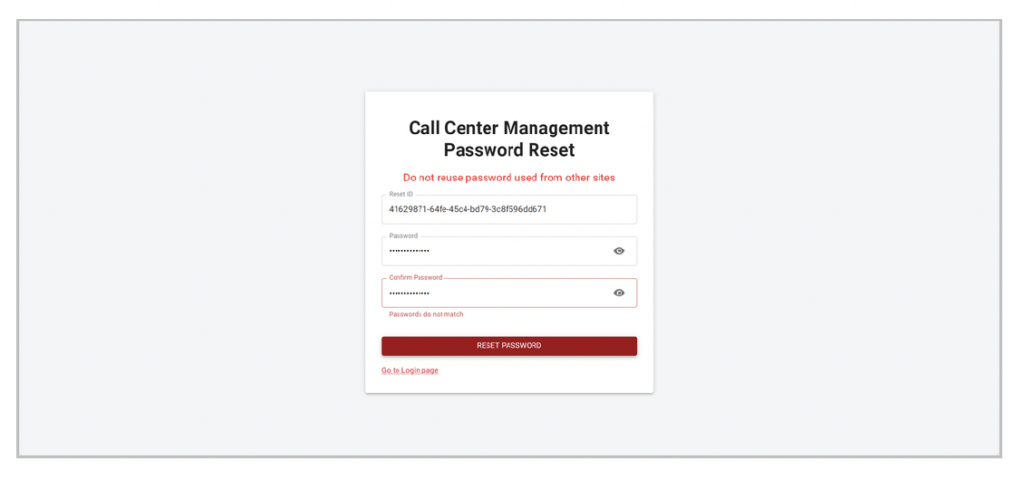
2. Click on the URL provided in the email. It will lead you to the Password reset screen.
3. Create a secure password, following the mandatory character requirements.
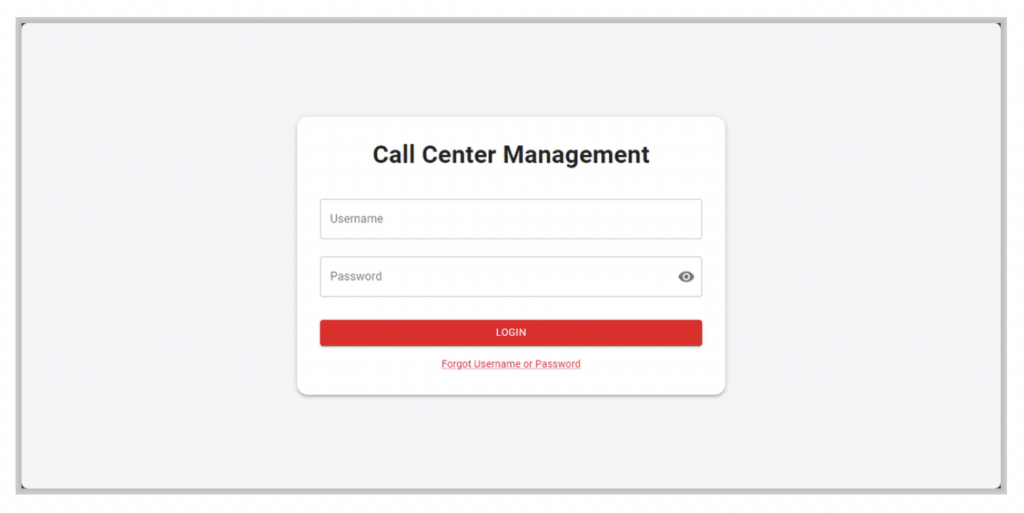
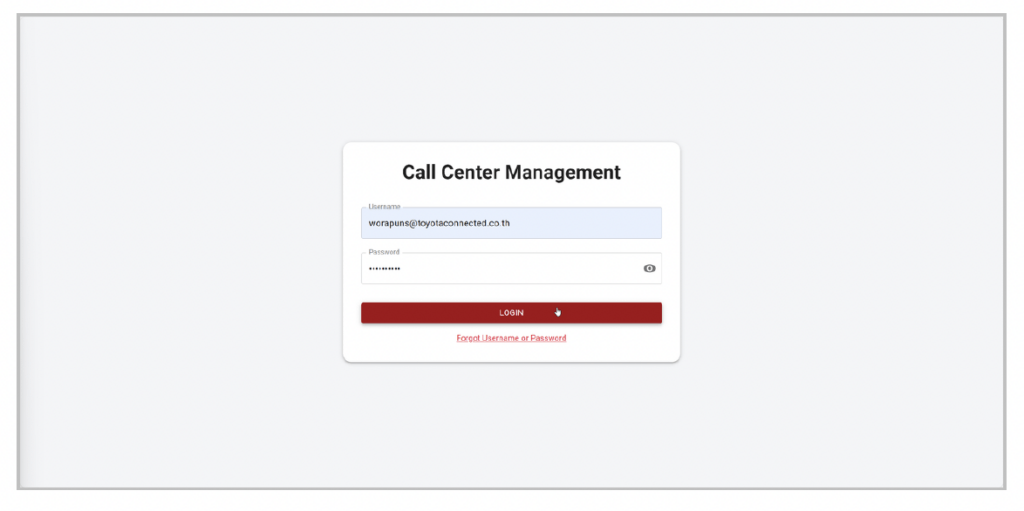
4. Enter your email in the “Username” field and your new password in the “Password” field.
Normal Login Process:
If you already have your username and password set up, follow the below instructions.
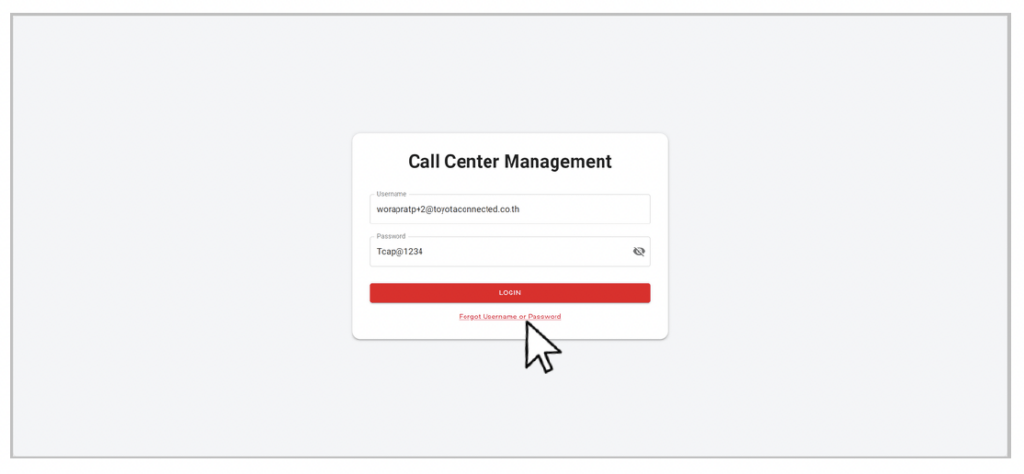
1. Enter your existing username and password in the “Username” and “Password” fields.
2. After entering your username and password, click the “LOGIN” button to access the main page of the app.
Note: The website will only allow login for existing accounts. If you don’t have an account, please contact the “Admin” user to create one for you.
Resetting Password Through an Email Request:
This section explains what to do if you’ve forgotten your password and need to reset it.
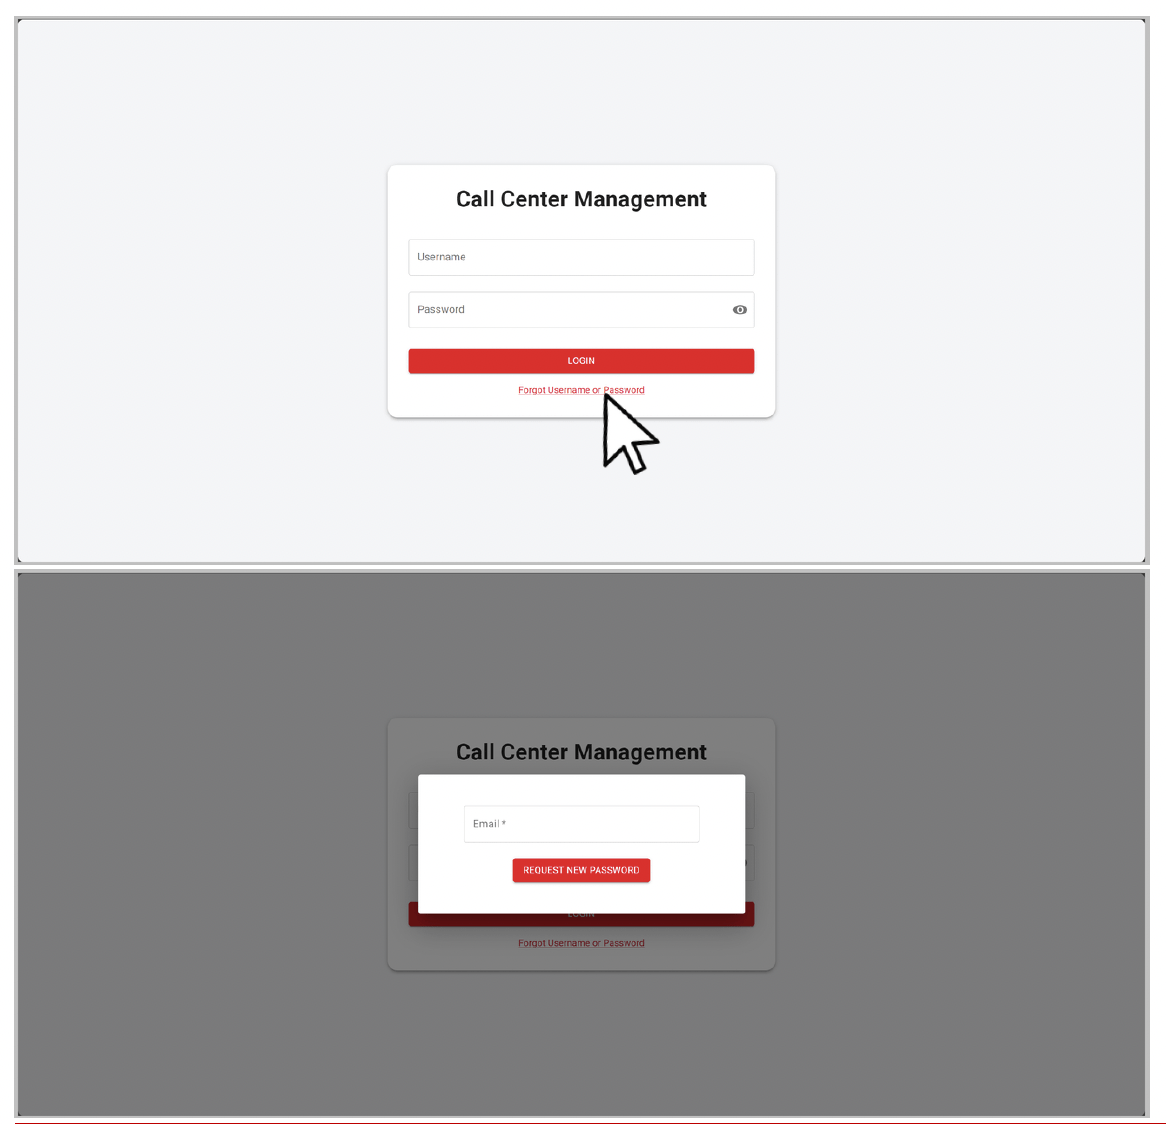
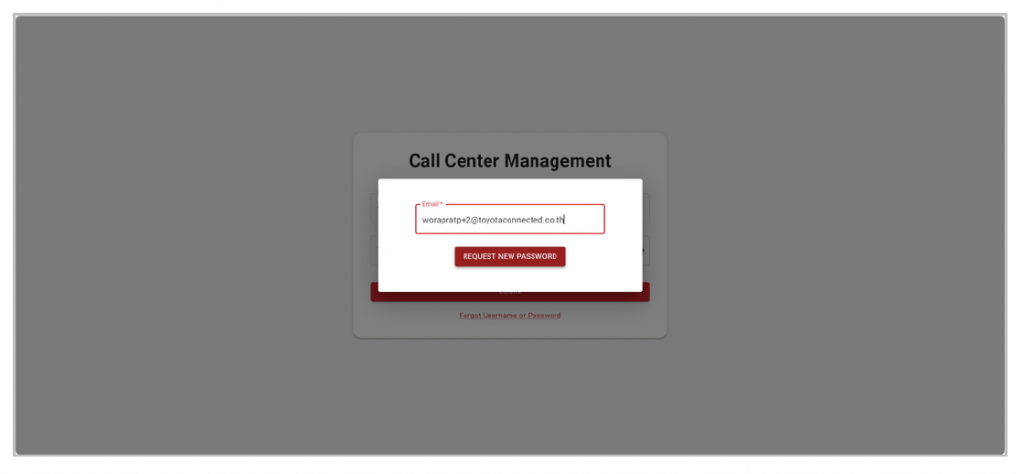
1. On the login screen, click ” Forgot Username or Password ,” then enter your email address. You’ll receive a reset email in your inbox.
2. The email will guide you on how to reset your password. From the email, you can access a link that will take you to the password reset screen.
3. On the reset screen, create your new password, then click the “ Reset Password ” button to confirm.
4. The system will redirect you back to the login screen, where you can log in with your new password.
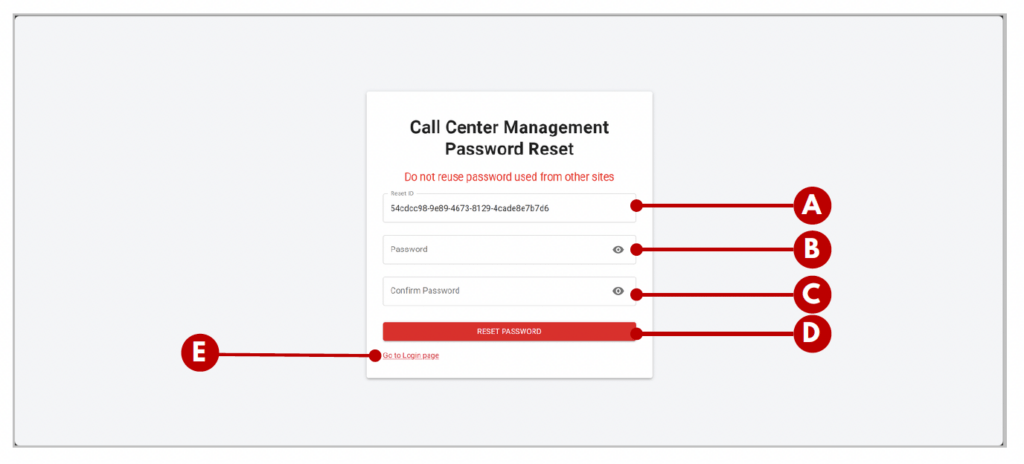
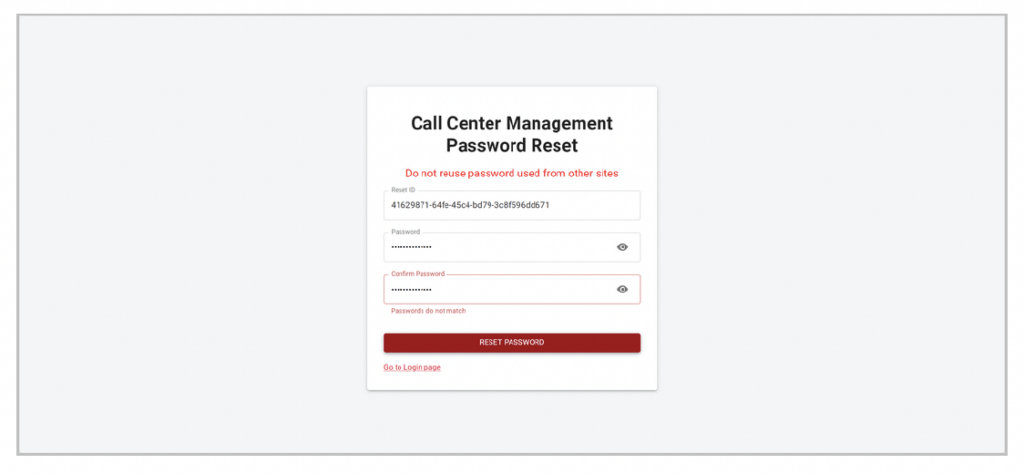
Understanding the “Password Reset” Fields:
A. Reset ID: Do not erase or make any changes in thisfield. It is used to identify your password reset process.
B. New Password: Enter your new password here.
C. Confirm New Password: Re-enter your new passwordto ensure it matches.
D. Reset Password Button: Once you’re satisfied withyour new password, click this button to confirm it.
E. Go to Login Page: If you decide not to reset yourpassword, click this to cancel and return to the loginscreen.
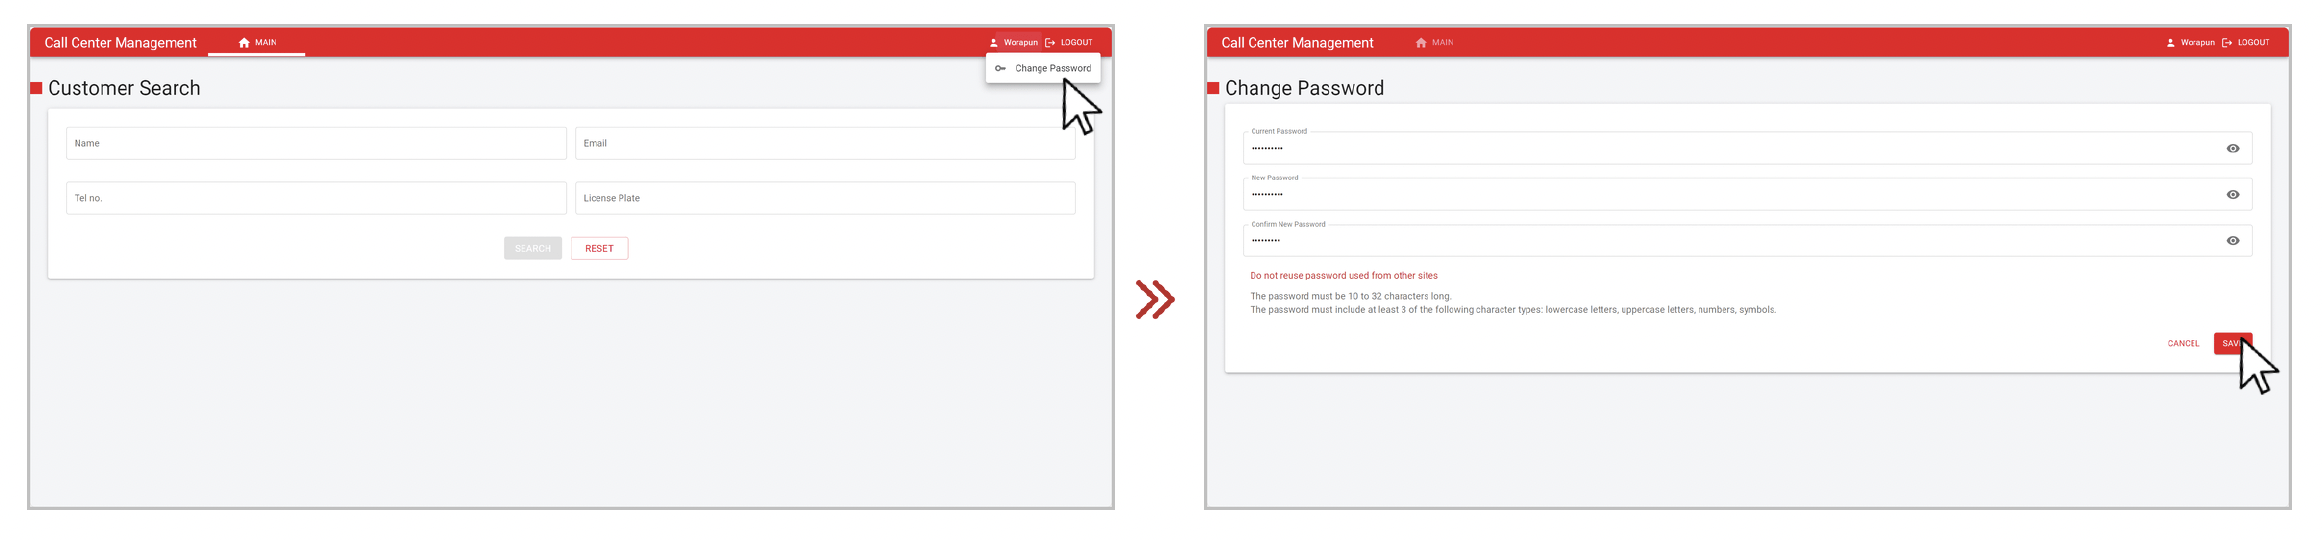
Change Password (In-App Process): This covers changing your password directly in the app, once logged in.
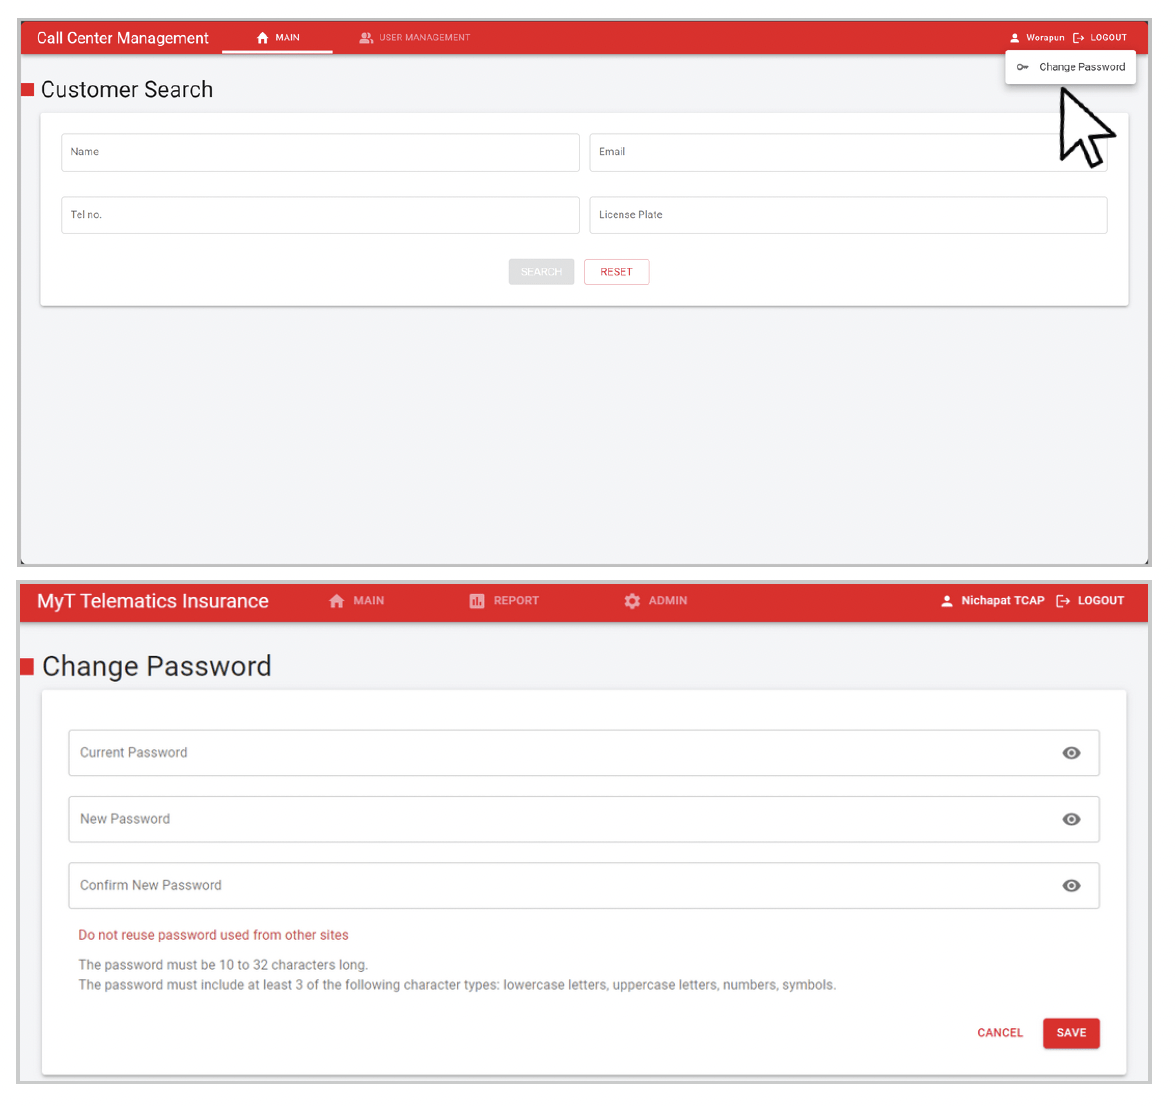
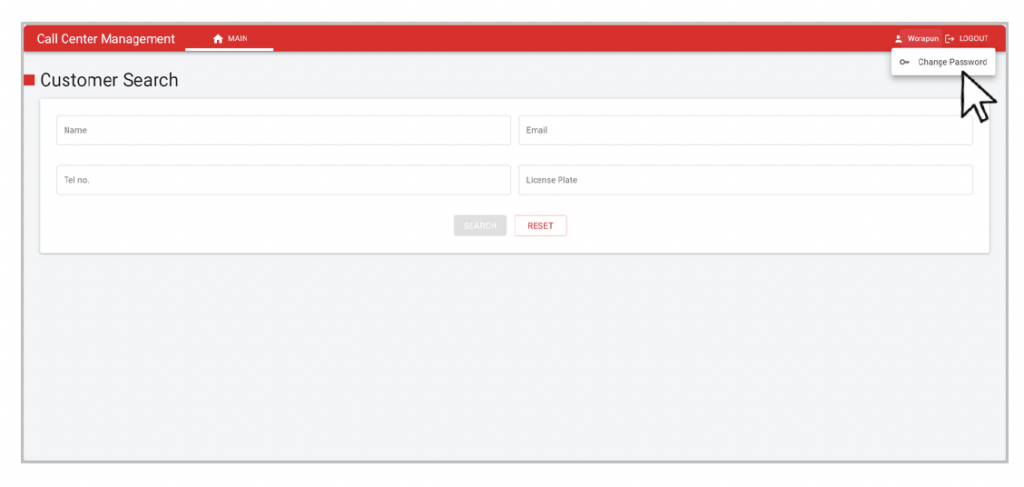
1. On the main screen, click on your profile name in the top-right corner of the header bar.
2. Click on the “ Change Password ” button, which will take you to the “ Change Password ” screen.
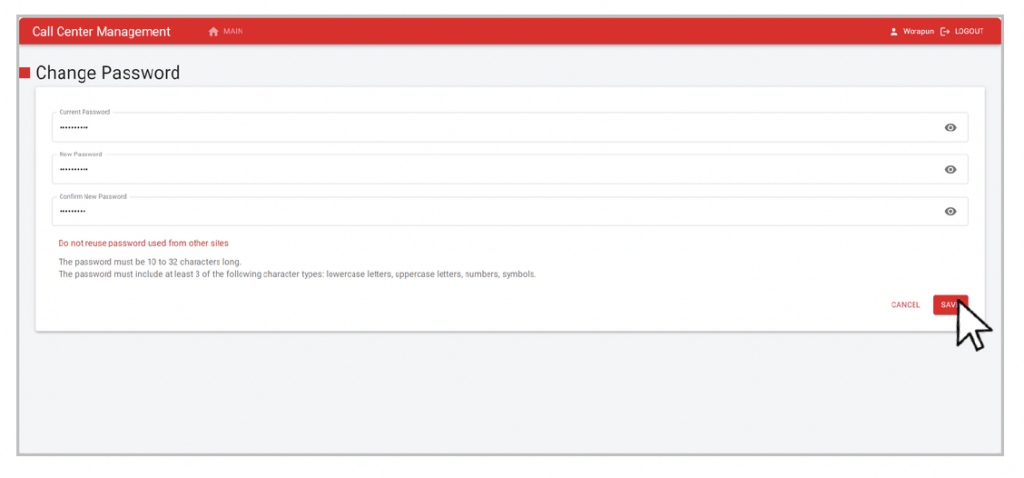
3. You will be prompted to enter your current password for security purposes.
4. Create a new secure password, adhering to the mandatory character requirements. Re-enter your new password in the “ Confirm New Password ” field to ensure it matches.
5. Click “ SAVE ” to confirm your new password. The system will then return you to the login screen.
Navigating the Customer Search Page:
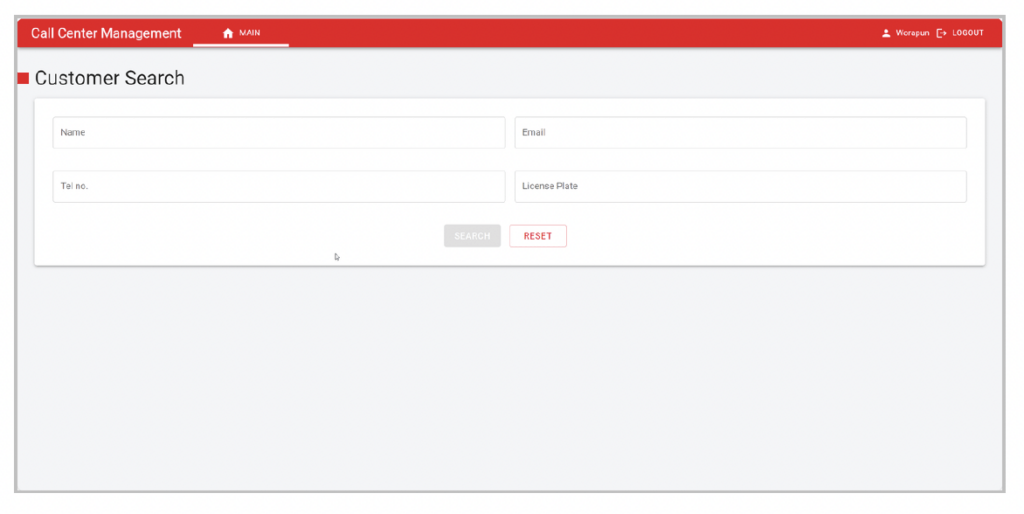
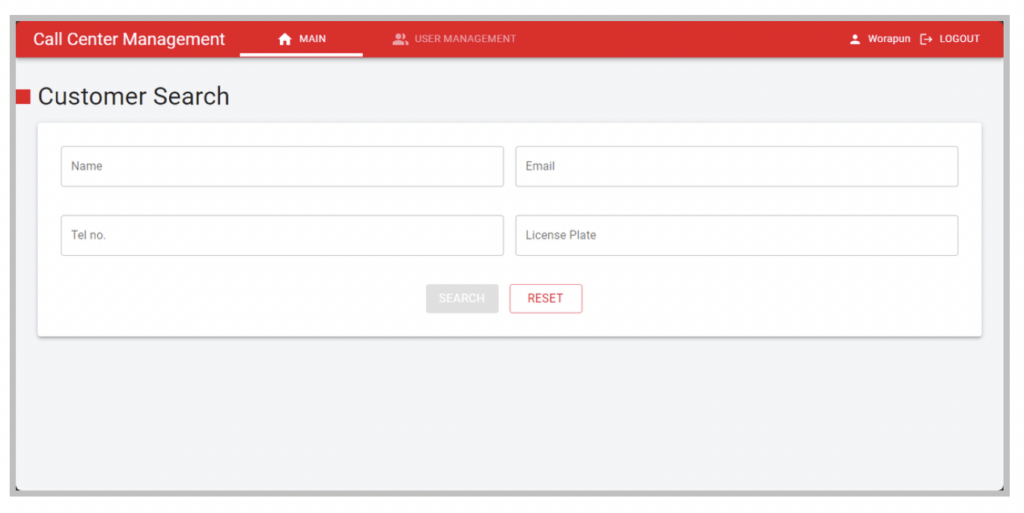
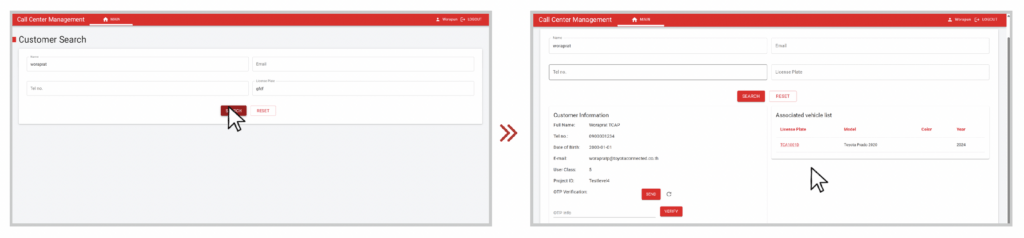
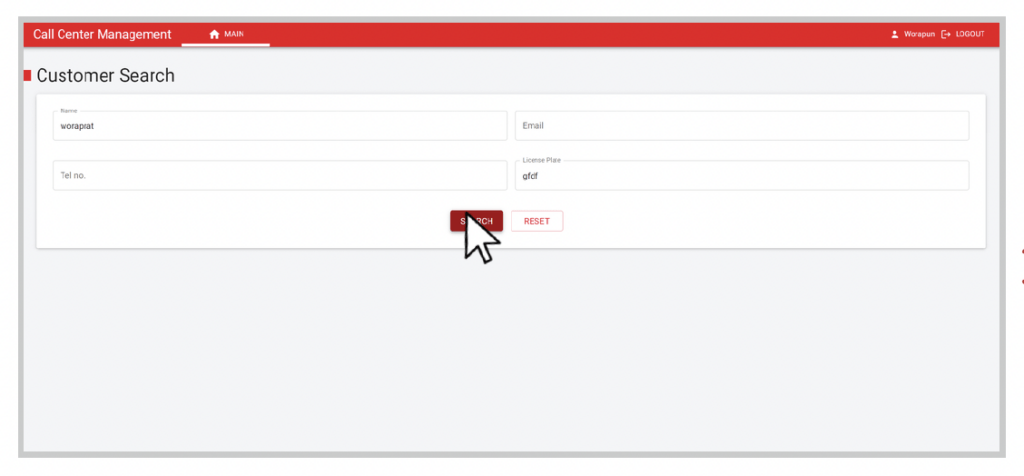
Congratulations on logging in successfully! You will now be directed to the “Customer Search” page. This is the main interface of the system where you can search for customer subscriptions and vehicle details to assist with their issues.
Searching for Customer Information:
To begin your search, you need to obtain key information from the customer. This includes their name, email address, mobile number registered on the system, and license plate number.
For more details on how to conduct a customer search,please continue to the next page. ->
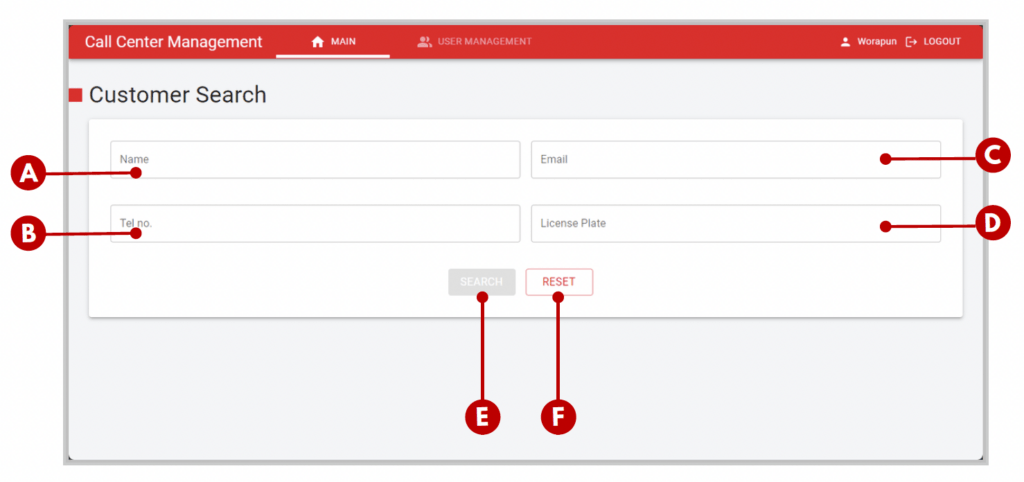
Understanding the “Customer Search” Fields:
A. Name: Request the customer’s full names (first name and surname) and enter it in the field.
B. Telephone Number: Ask the customer to confirm their mobile number registered on the system and enter it.
C. Email: Request the customer to confirm their email address and enter it in the field.
D. License Plate: Ask the customer to confirm their license plate number and enter it in the field.
E. Search Button: Click this button to perform the search and access the customer’s profile.
F. Reset Button: Click this button to clear the current search and start again.
Important Searching Tip: Ensure that the spelling of names and inputting of numbers are accurate in all fields for a successful search.
Navigating the Customer Detail Screen:
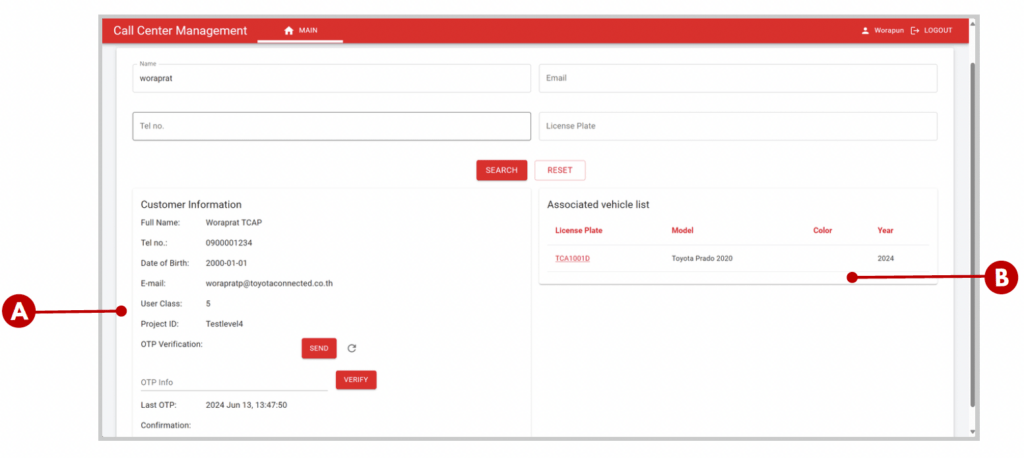
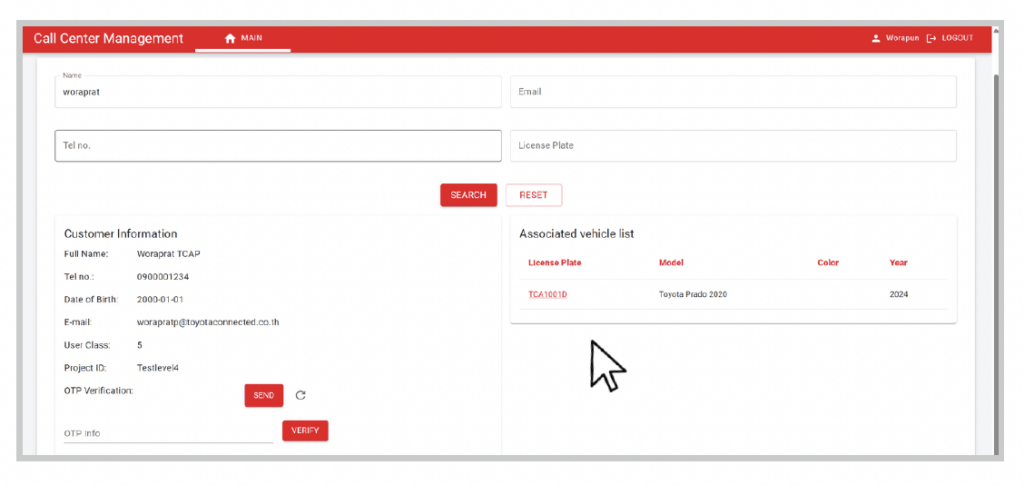
If all the input details are correct, the system will direct you to the Customer Detail Page. This page is divided into two sections:
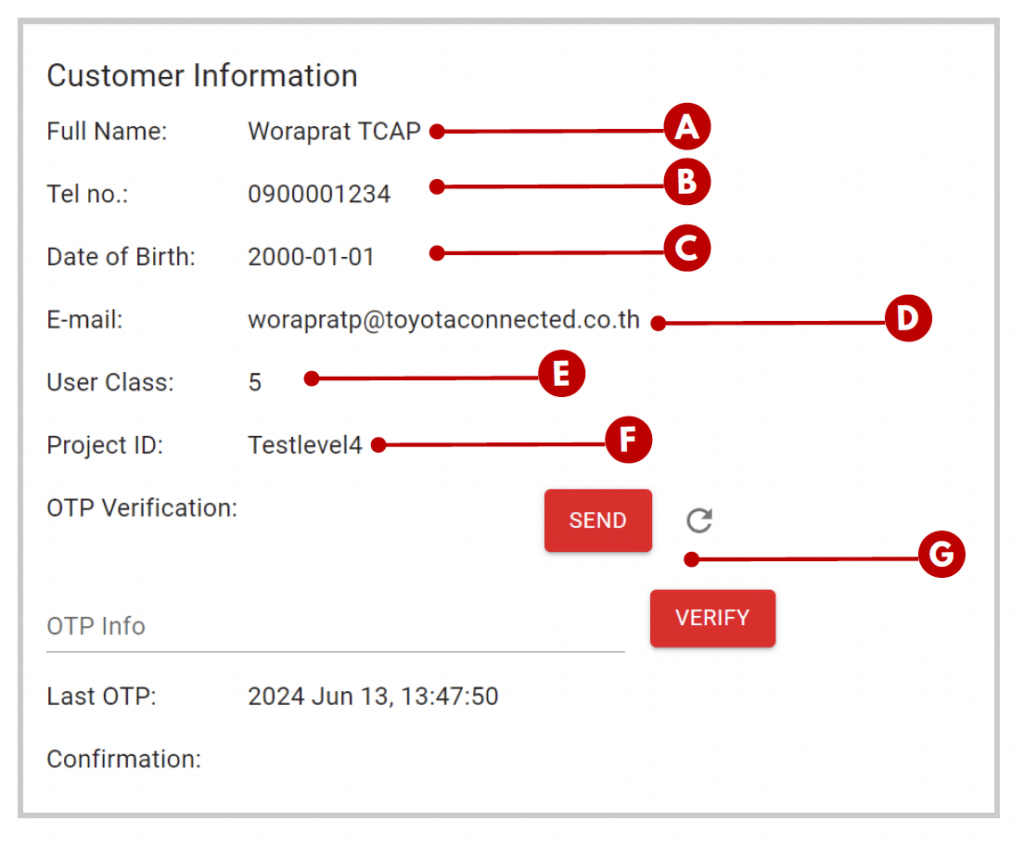
A. Customer Information: On the left side, you will see the customer’s details, including their full names, mobile number, date of birth, email address, user class, project ID, and an OTP verification section.
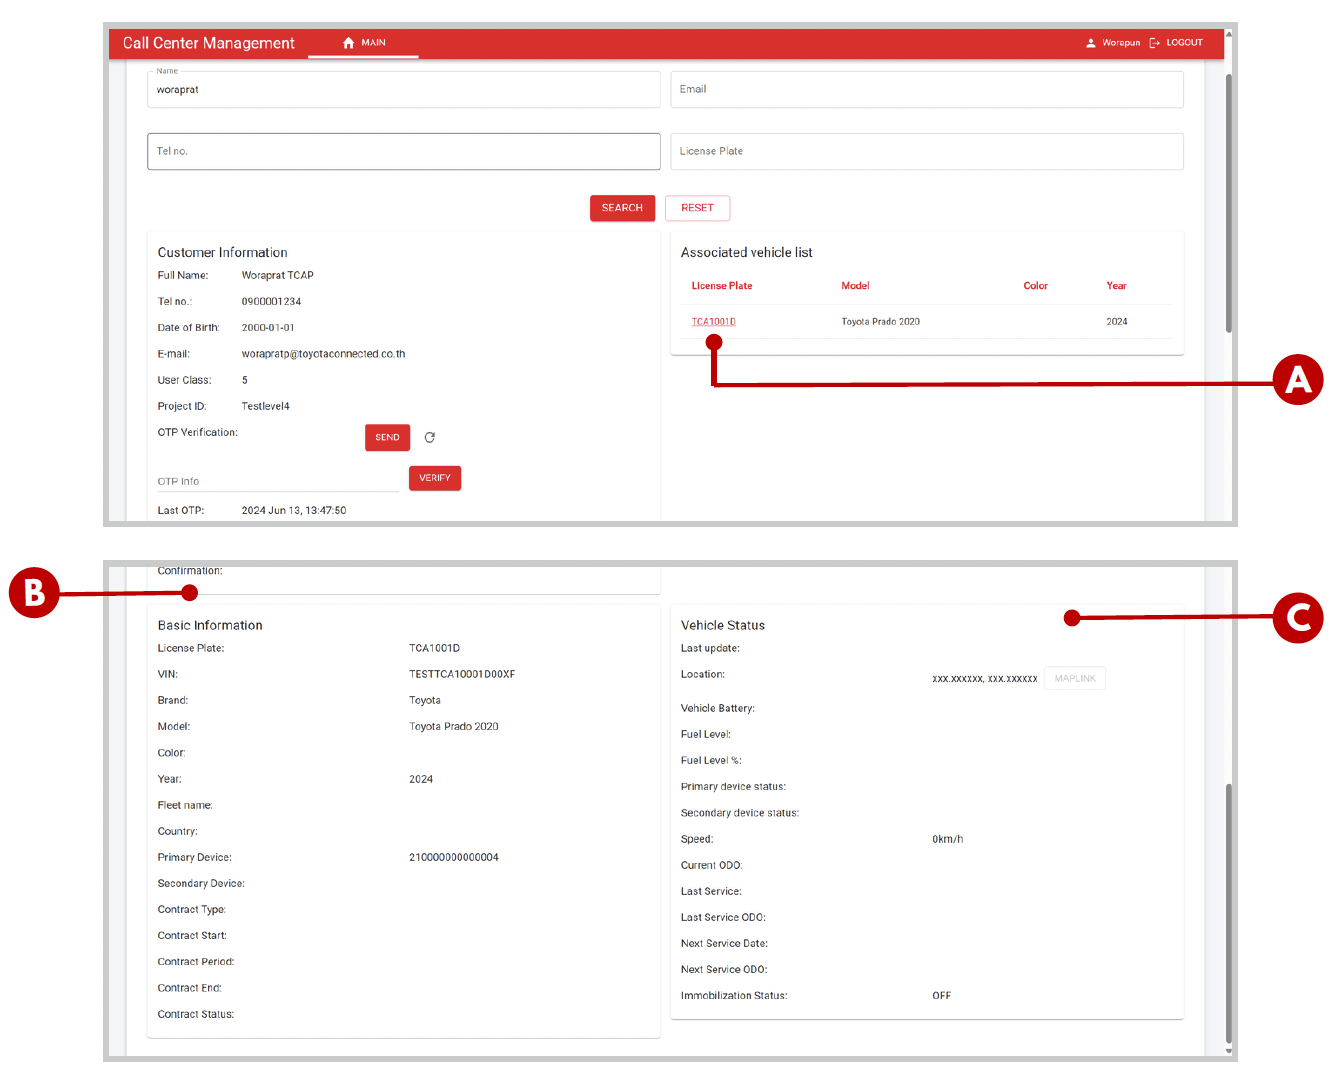
B. Associated Vehicle List: On the right side, you will find a list of all vehicles linked to the customer’s profile.

Understanding the “Customer Information” Fields:
Let’s examine the “Customer Information” section and its
various fields.
A. Full Name: The complete name of the customer.
B. Telephone Number: The registered telephone number associated with the MyToyota app.
C. Date of Birth: The customer’s date of birth.
D. Email: The registered email address linked to the
MyToyota app.
E. User Class: Indicates the customer’s category (e.g., web or
mobile) to help you understand which type of customer you are assisting.
F. Project ID: Displays the project associated with the
customer.
G. OTP Verification: Where you enter and verify the OTP code sent to the customer for security purposes.
Understanding the Vehicle List Fields: Let’s take a closer look at the “Associated Vehicle List” section and its various fields.
A. Associated Vehicle List: Click on the license plate number highlighted in red to view the vehicle’s information at the bottom of the screen. The bottom section is divided into two parts – “Basic Information” and “Vehicle Status.” Let’s break it down further.
B. Basic Information: This section displays overall details about the vehicle, such as the license plate number, vehicle model, and contract details.
C. Vehicle Status: This section provides information on the vehicle’s health, including location, fuel level, device status, mileage, service due date, and immobilizer status.
Understanding Security (OTP) Verification: For security reasons, two sections —“Map Link” and “Immobilisation”— are disabled by default. These sections will be enabled only after you receive an OTP verification number from the customer.
Getting the OTP Verification Number:
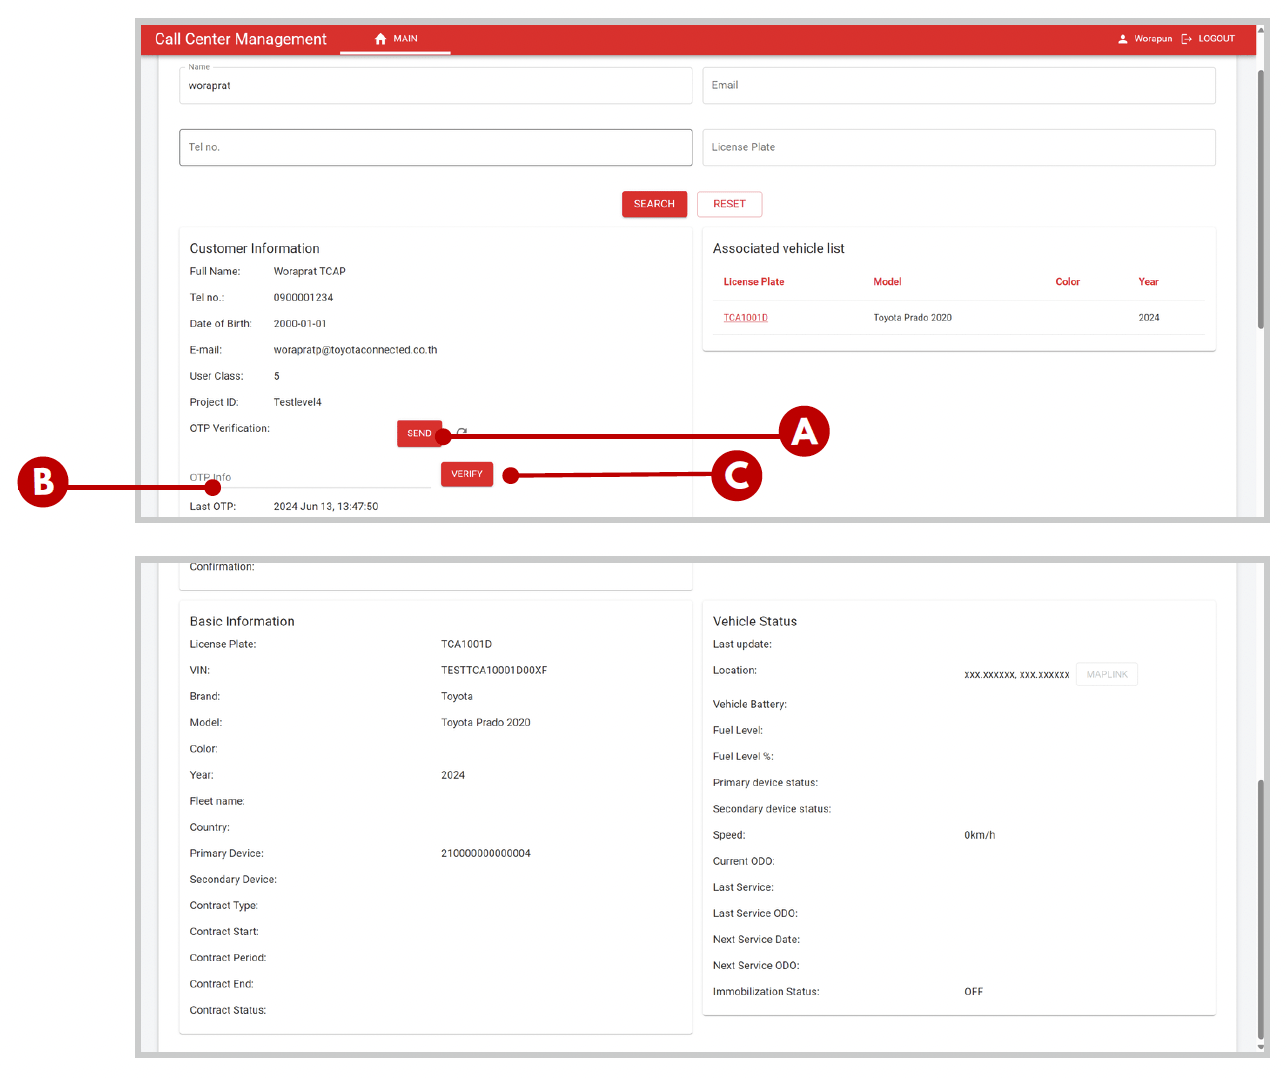
A. Send Button: Click the ‘Send’ button on the right side of the OTP verification section to trigger the sending of a code to the customer.
B. Enter Code: Ask the customer to check their email for the OTP. The customer must provide you with this OTP. C. Verify Button: Enter the OTP provided by the customer and click the “Verify” button. This will enable the “Map Link” and “Immobilisation” sections, allowing you to proceed with these functions.
Understanding the Map Link Function:
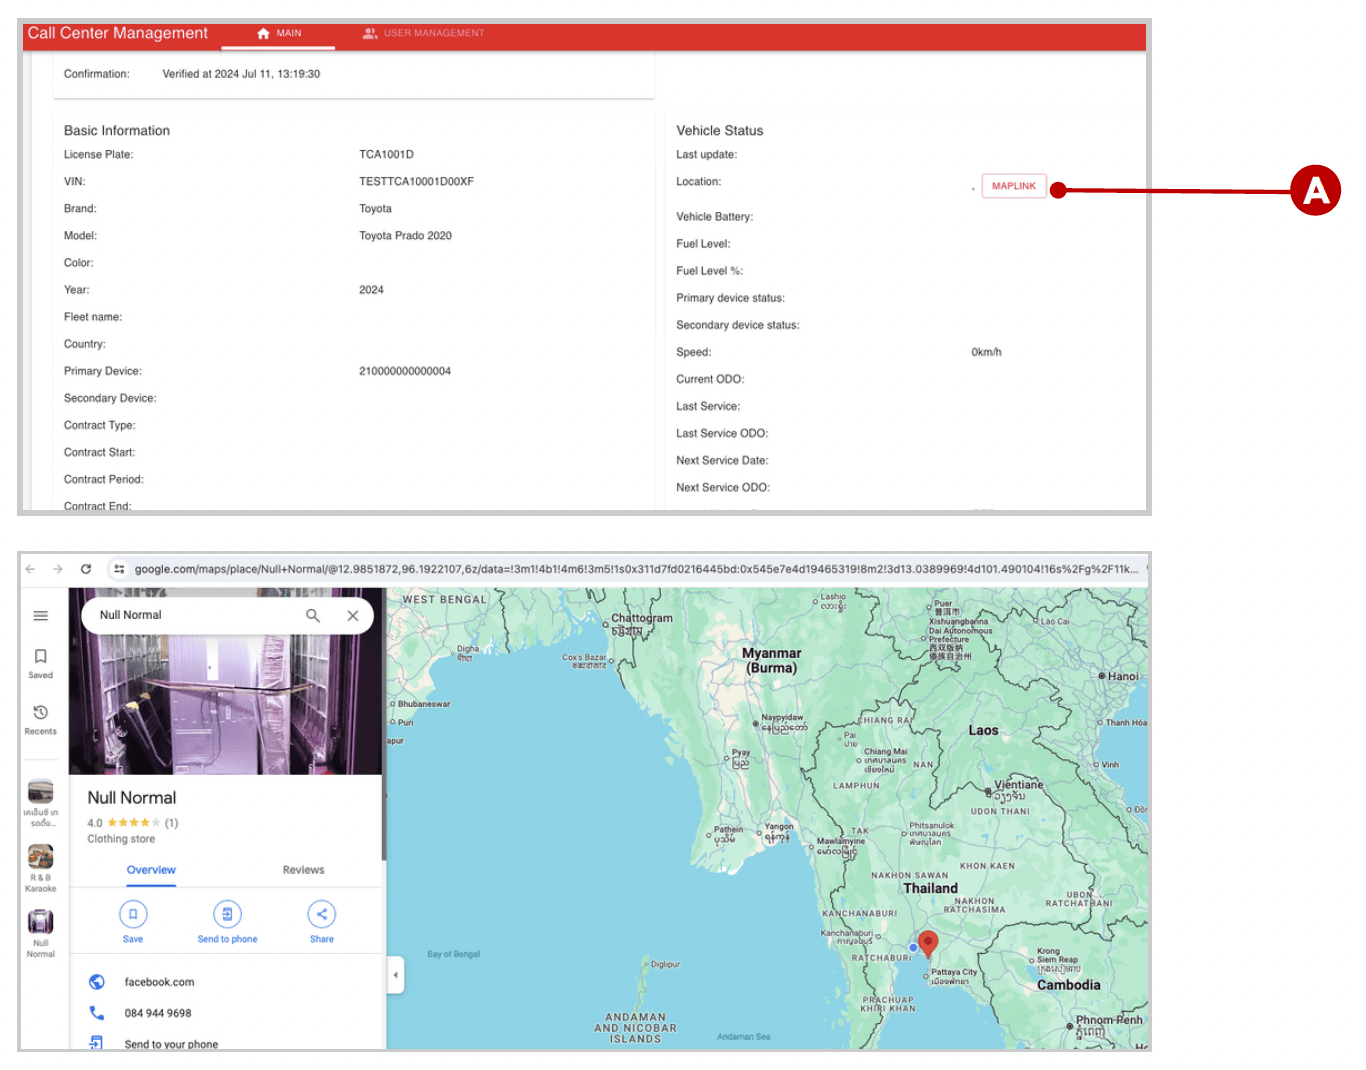
As mentioned previously, the “Map Link” feature becomes enabled once you have entered the OTP provided by the customer.
A. Map Link: This feature allows you to update the customer on the current location of their vehicle. It is particularly useful when immobilising the vehicle, as it enables you to guide the customer on the vehicle’s location and provide instructions on the next steps.
In cases where the customer’s vehicle has been stolen, the “Immobiliser” feature can assist them in an emergency.
The Immobiliser section: this allows you to remotely disable the vehicle’s engine. If the vehicle is in motion, this feature will stop it from being driven further, which helps in tracking and recovering the vehicle.
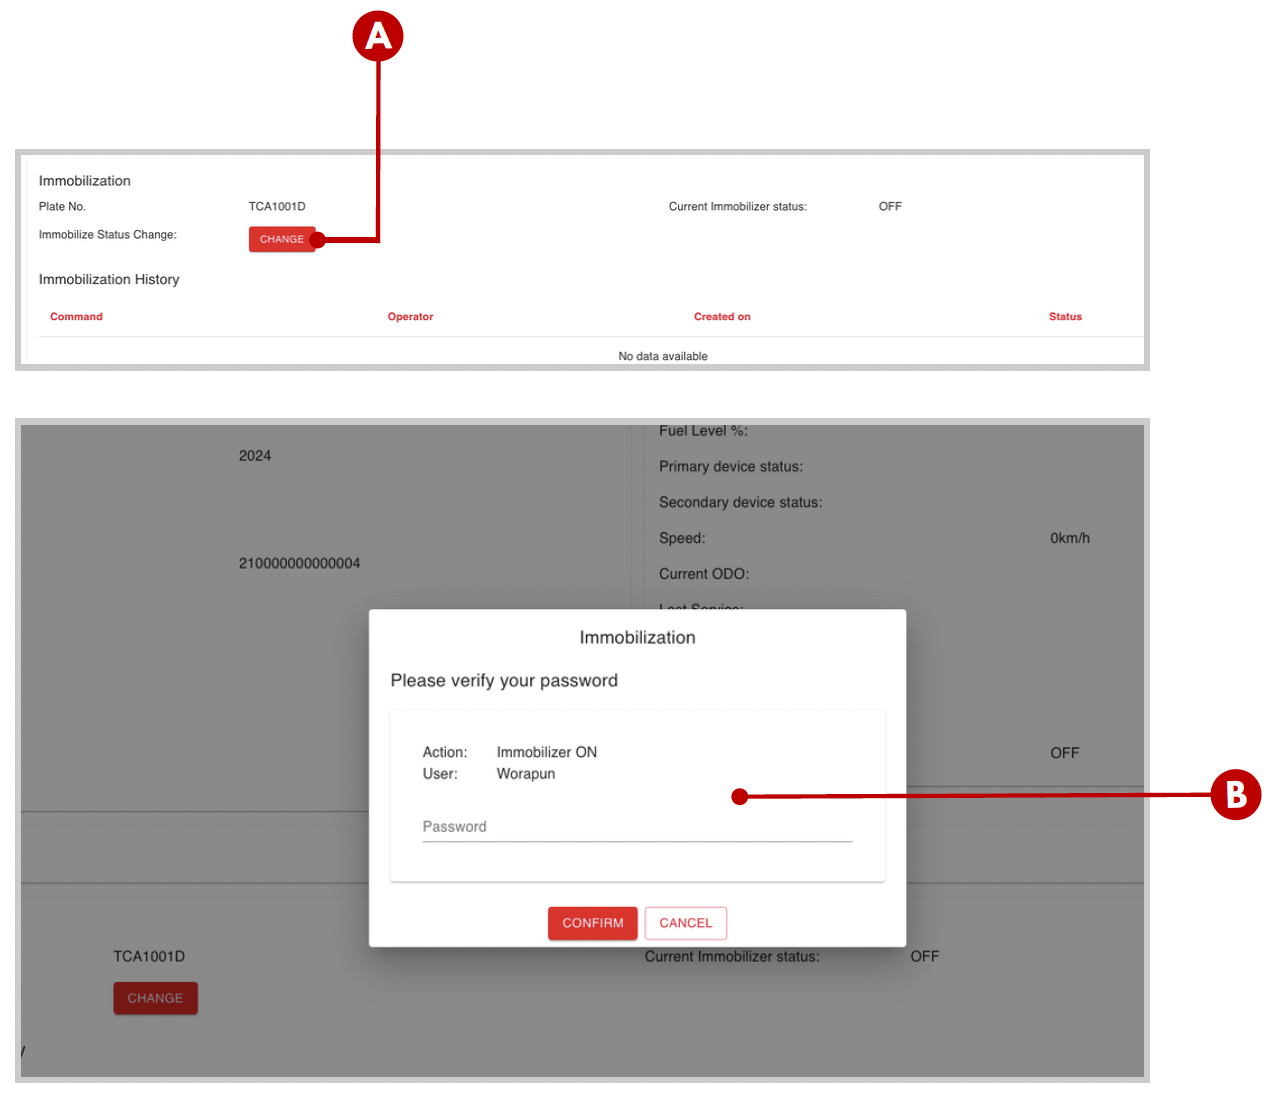
Immobilisation Features:
A. Change Button: initiates the Immobilisation process.
B. Confirmation Window: allows you to change andconfirm the Immobilisation Status.
How to Enable Immobilisation:
1. Navigate to the Immobilisation section on the customer information screen.
2. Click the ” Change” button” next to the Immobilise Status field.
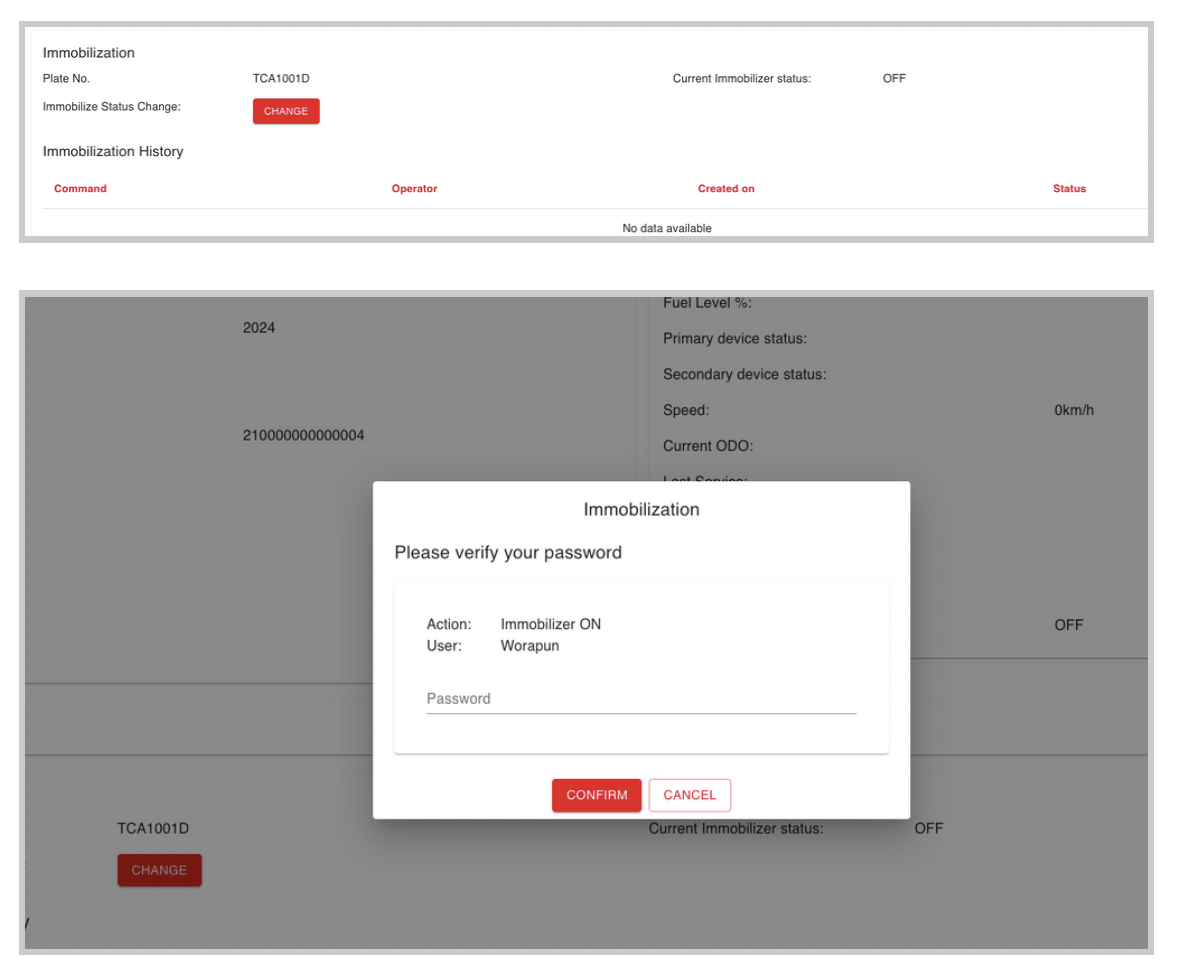
3. A pop-up confirmation screen will appear, showing the current Immobiliser status as “ON” or “OFF”.
4. To change the status, select the desired option (either “ON” or “OFF”) from the confirmation window.
5. Once you’ve updated the status, enter your account password to confirm the change. Note: Be careful and ensure accuracy, as this is a sensitive function.
6. The “Immobilisation History” table will be updated with the most recent activity.
Once you input the password of your account and click on confirm button at the bottom of the window, the immobilisation feature will activate to the customer’s vehicle.
1. The status of the immobilisation will change from OFF to ON (as shown in ‘Current immobilisation status’)
2. The Immobilisation action you have done will also update on the ‘Immobilisation History’ table as shown onscreen
The Admin user has the authority to grant and removeaccess within the Call Centre Management system.
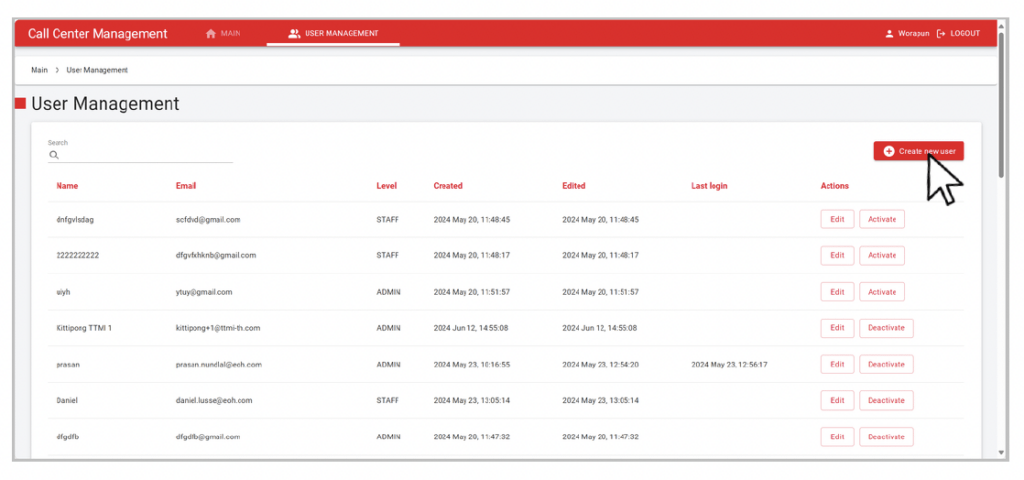
User Management Section:
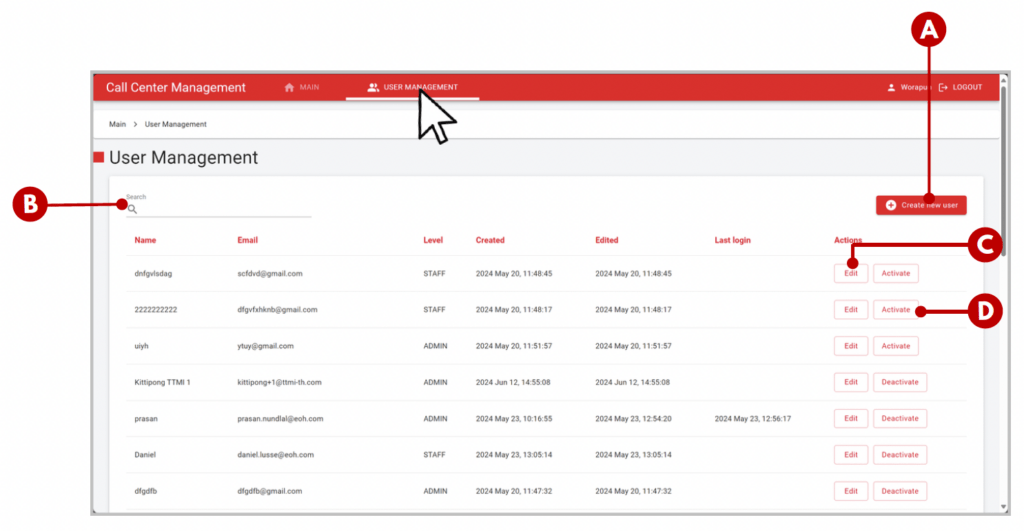
Let’s break down what you can do on the User Management page.
A. Create new users.
B. Search for existing users.
C. Edit user information.
D. Activate or deactivate user accounts.
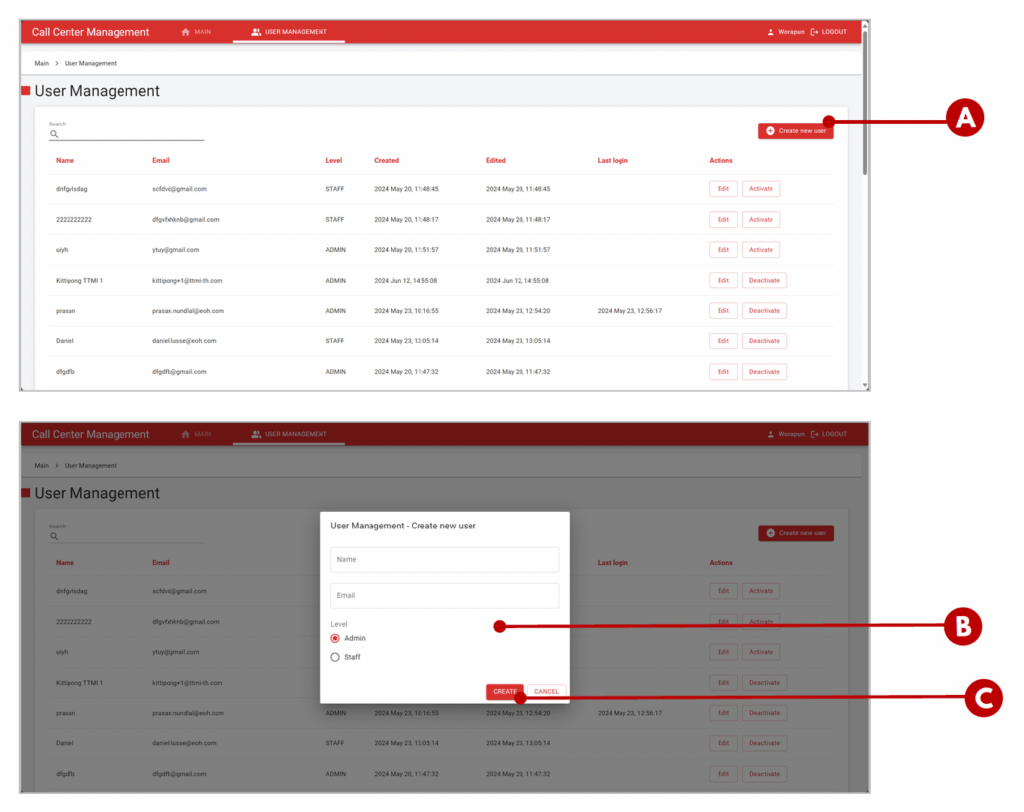
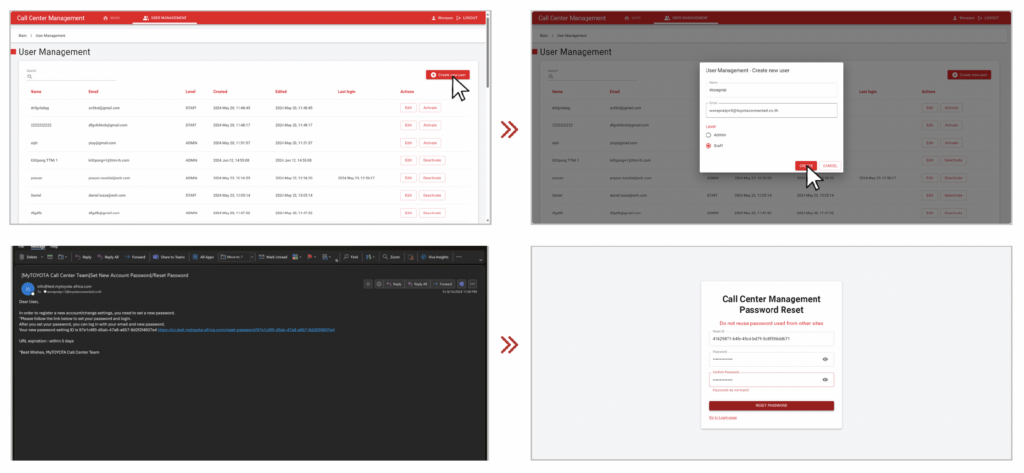
Let’s dive into how to create new user accounts on the User Management page.
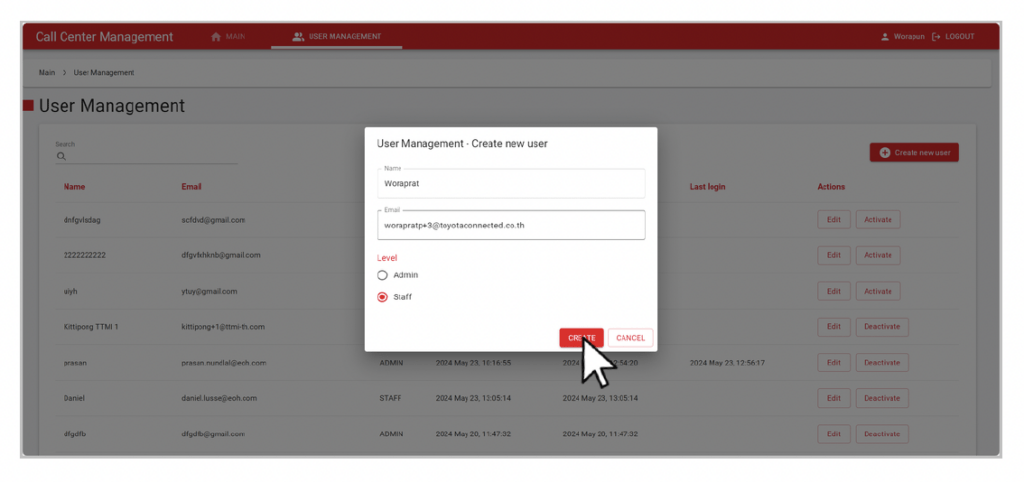
A. Create New User Button: click the “ Create New User ” button.
B. Details Input Screen: a pop-up screen will appear where you will enter the account information, including the name, email, and account level of the user.
C. Create Button: Click the ” Create ” button to confirm and create the account.
Note: Once the account is created, the new user will receive an email to complete their registration.
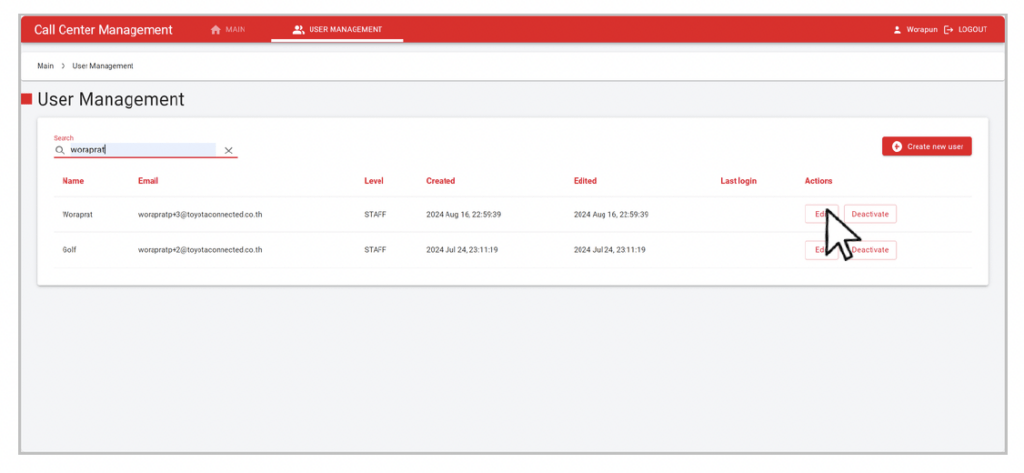
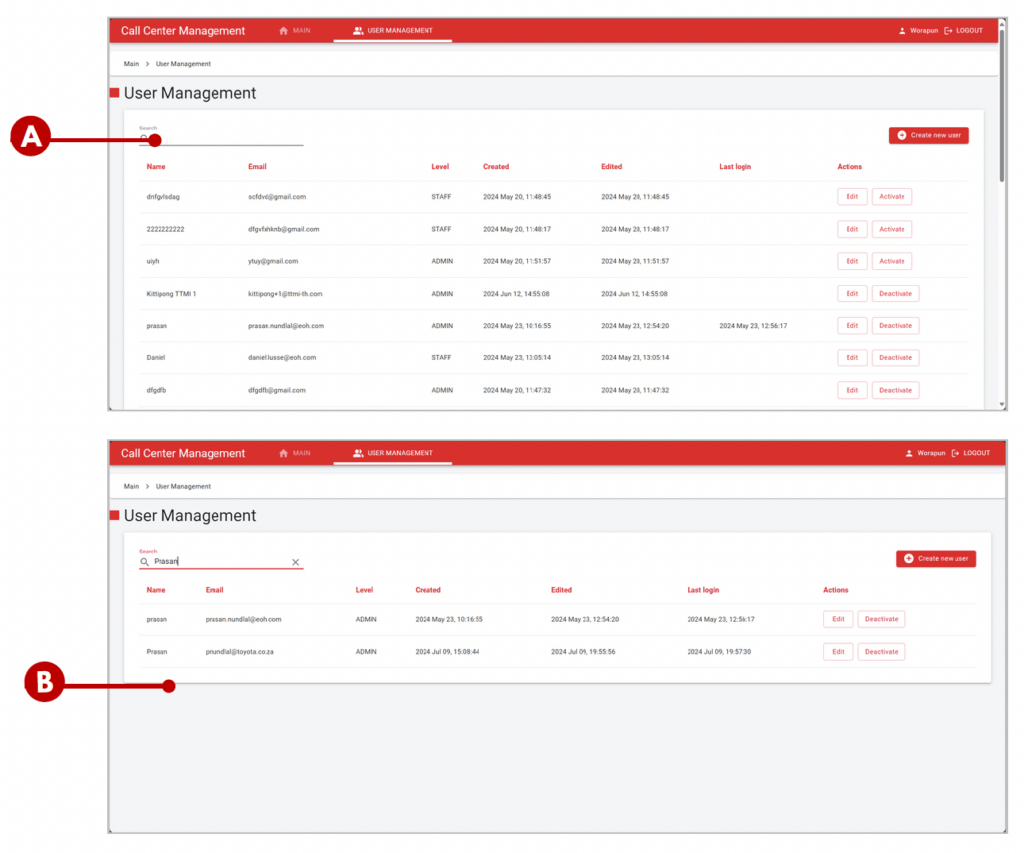
Now we’ll show you how to search for user accounts onthe User Management page.
A. Search Field: Enter keywords into the ‘Search’ field located at the top left of the screen (e.g., name, email, user level).
B. Search Result: Users matching the keywords will be displayed on the screen.
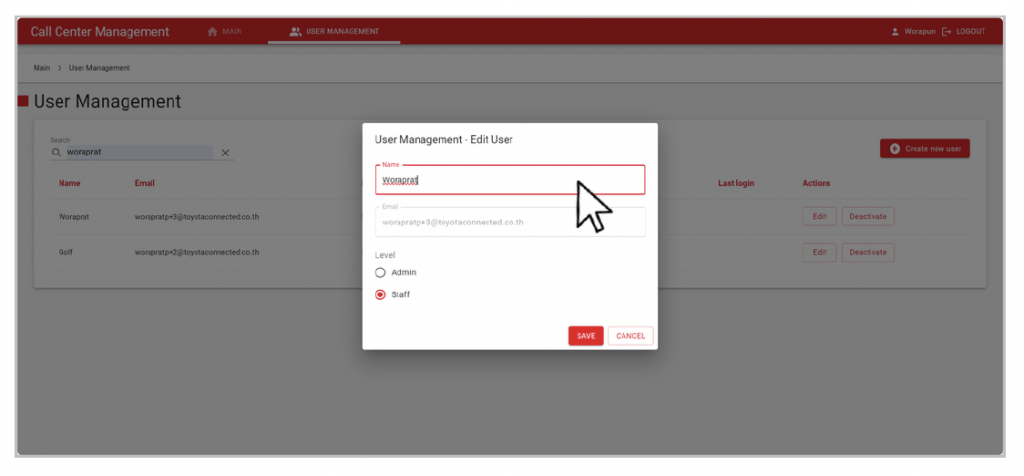
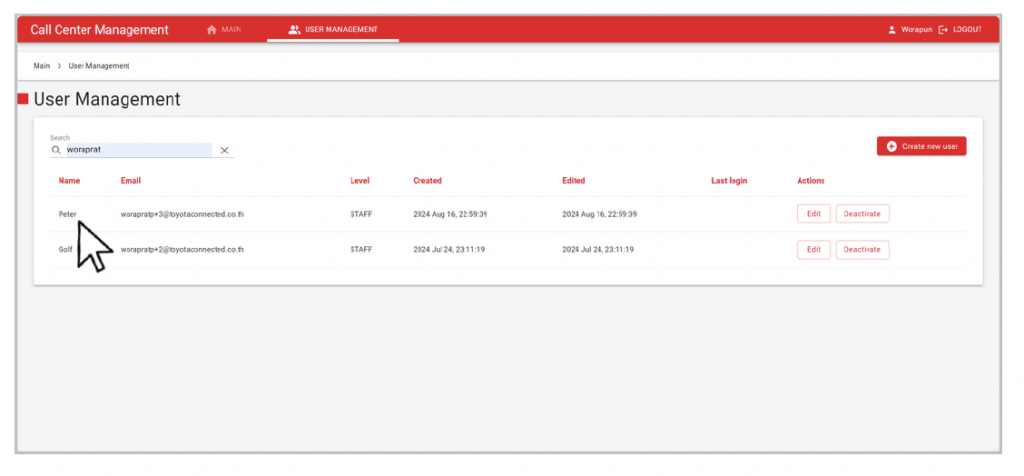
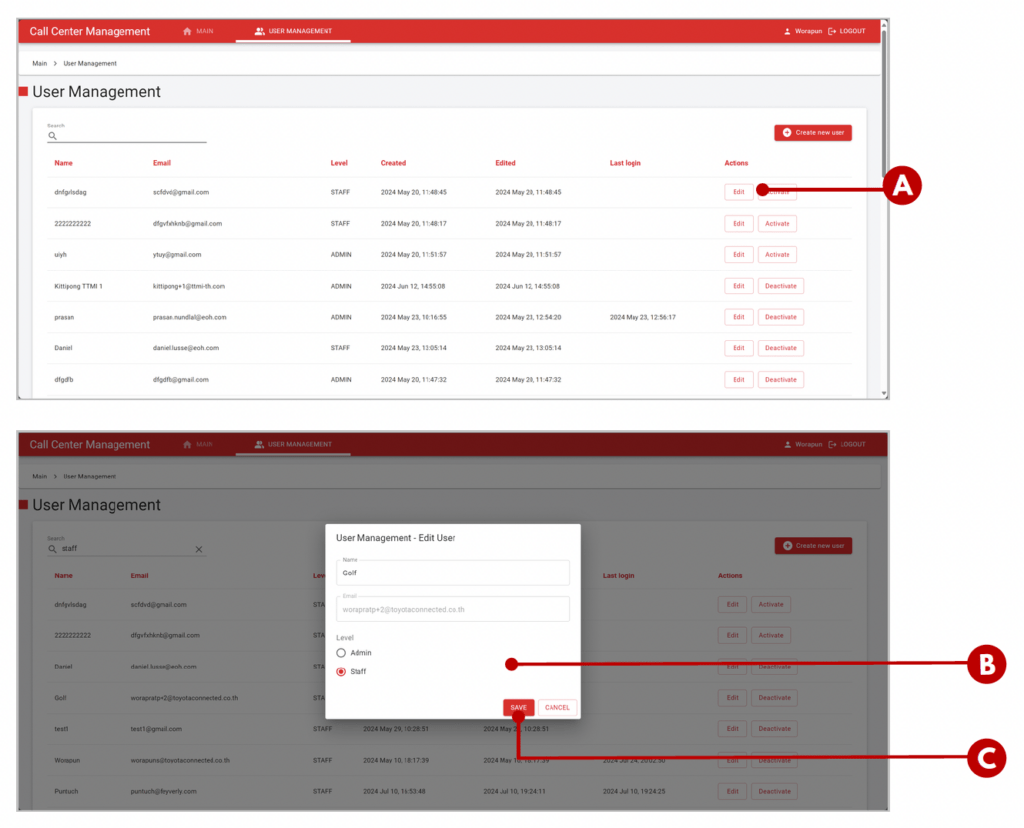
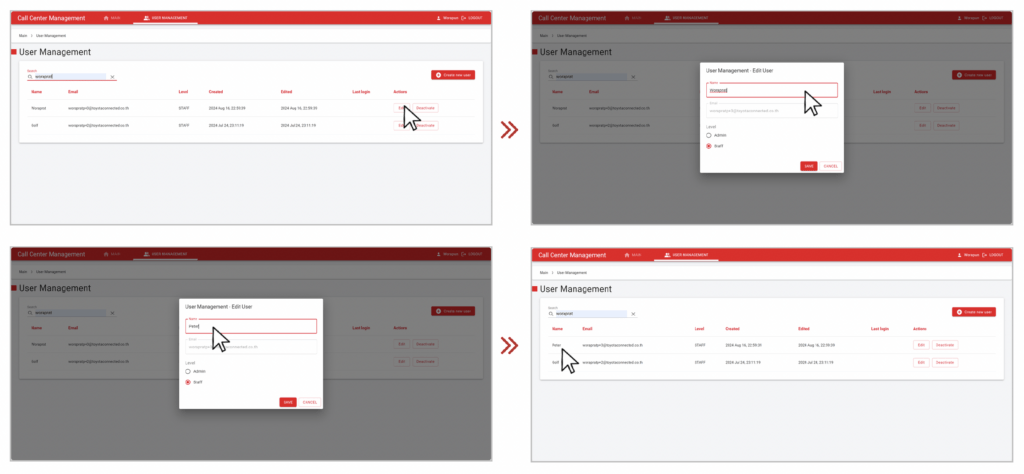
Now we will show you how to edit existing user accounts on the User Management page.
A. Edit Button: click the “Edit” button next to the user account you wish to modify.
B. Input Details Screen: a pop-up screen will appear where you can edit the user’s name and role (or level). C. Save Button: click the “Save” button to confirm and apply your changes.
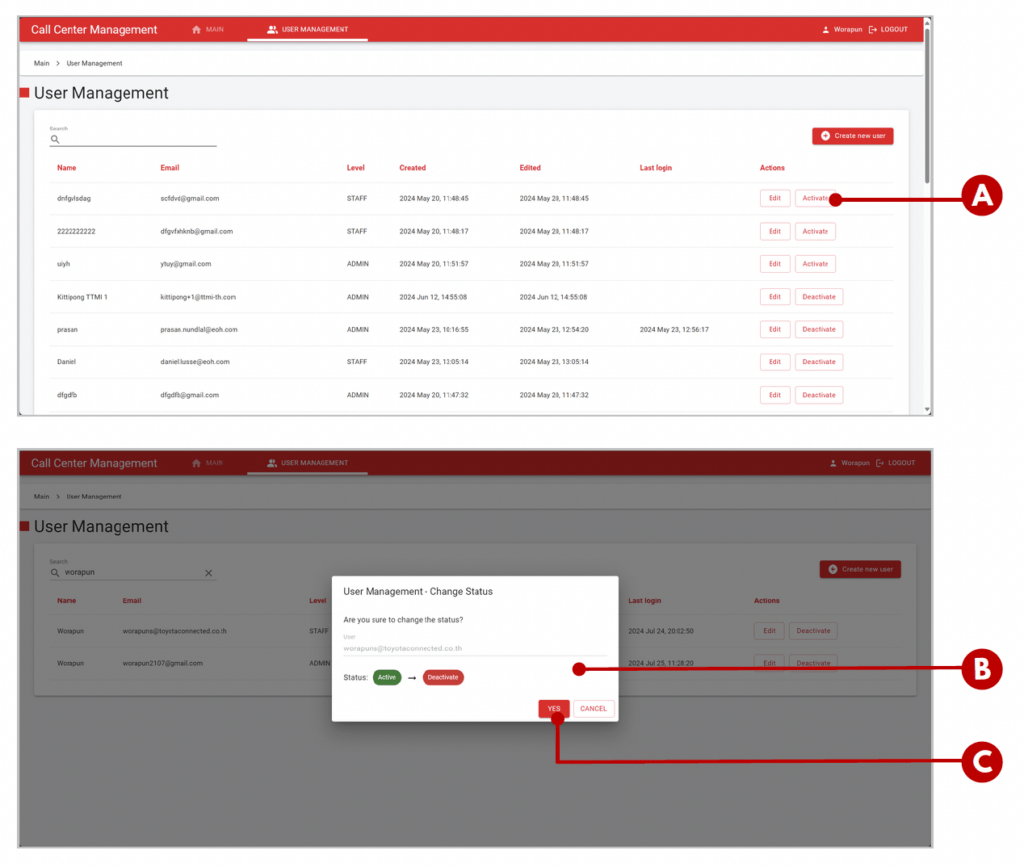
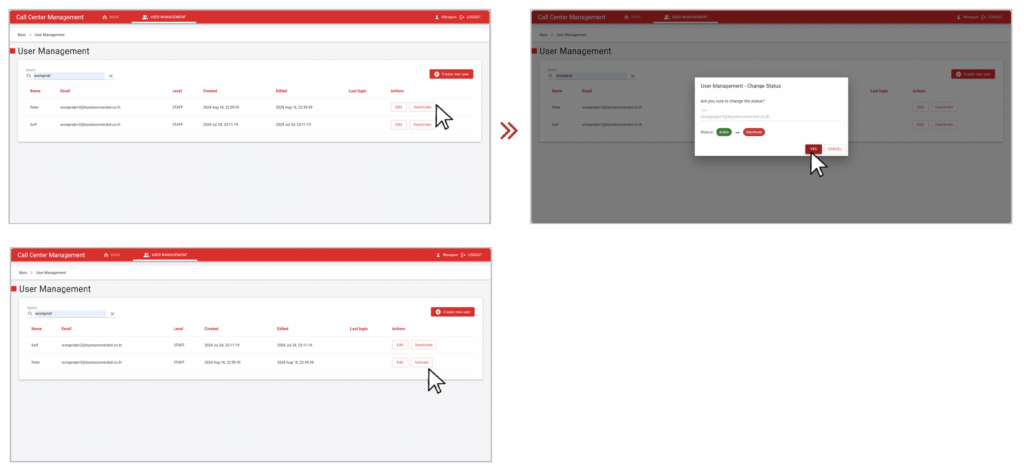
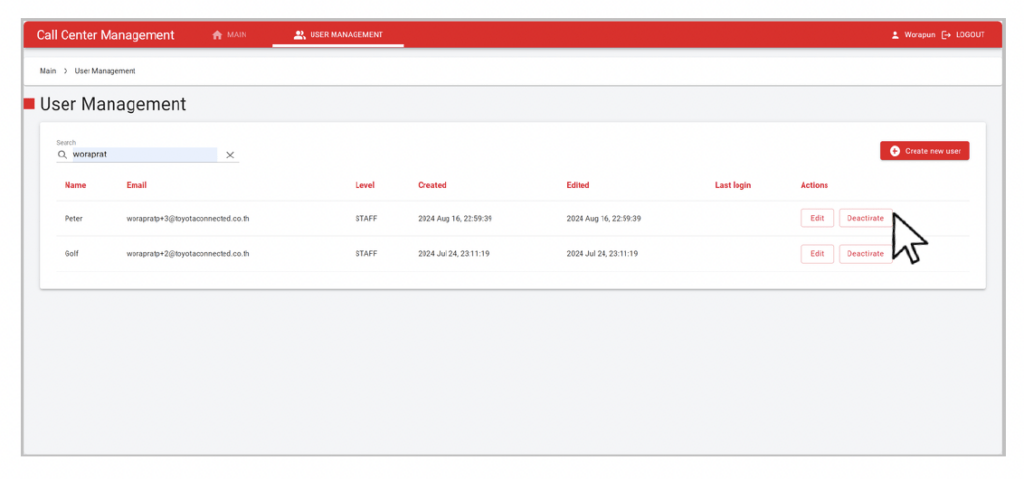
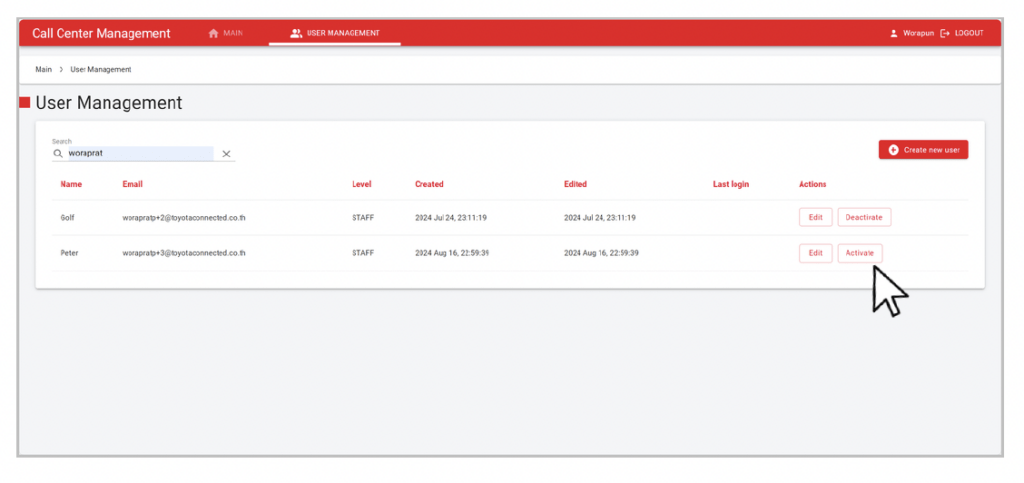
Now we we will show you how to activate or deactivate user accounts on the User Management page.
A. Activate / Deactivate Button: click the relevant button (either activate or deactivate) next to the user account for which you want to change the status.
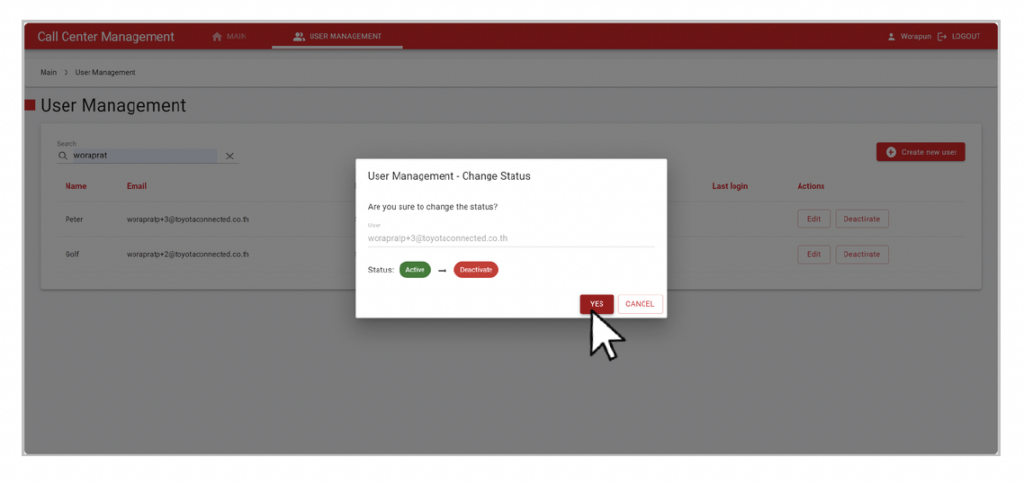
B. Confirmation Window: a pop-up window will appear, displaying the status change you have requested for confirmation.
C. Yes Button: click the “Yes” button to confirm the change.
By Clicking “Accept all cookies”, you agree to the storing of cookies on your device to enhancesite navigation, analyze site usage, and assist in our marketing efforts.