MOBILE APPLICATION USER MANUAL

My TOYOTA

Mobile Application User Manual

PURPOSE OF THIS MANUAL:

This guide will walk you through all the features of the MyToyota Mobile app. Whether you're new to the app or just want a refresher, this manual will show you how to use everything.

WHAT YOU NEED TO GET STARTED:

Before you dive into the app's features, you'll need an invitation.
This invitation must come from your local dealership or the master user.

DOWNLOADING THE APP

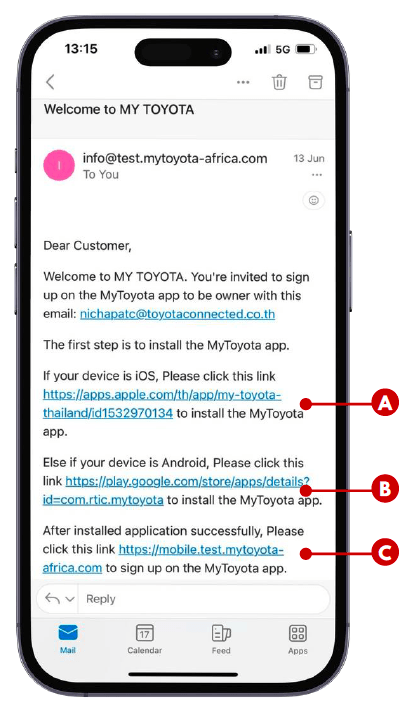
Once your dealership or master user sets you up with an account, you will get an invitation on email. This email will guide you on how to download the app and complete your sign-up journey.

THE DOWNLOAD LINK:

The invitation email will have special links to download the app, for both iPhone and Android.

A. iOS Link: Tap this link to download the app from the App Store. https://apps.apple.com/th/app/my-toyota-thailand/id1532970134

B. Android Link: Tap this link to download the app from Google Play. https://play.google.com/store/apps/details?id=com.rtic.mytoyota to

SETTING YOUR PASSWORD:

C. Sign-up Link: The invitation email will also include a link to set your password for the app.

HOW TO FINALISE SIGNING UP

TOYOTA Connected Asia Pacific Ltd. (TCAP)

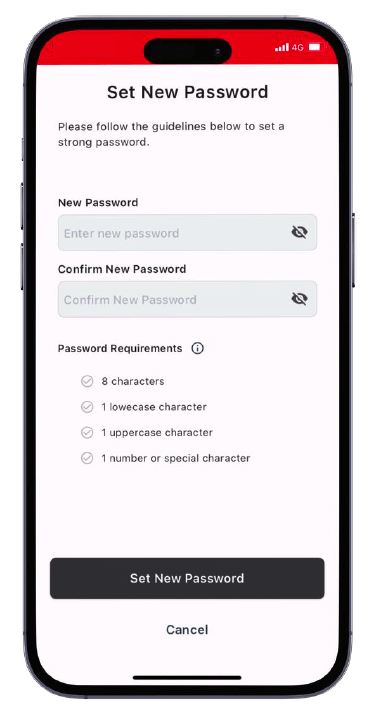
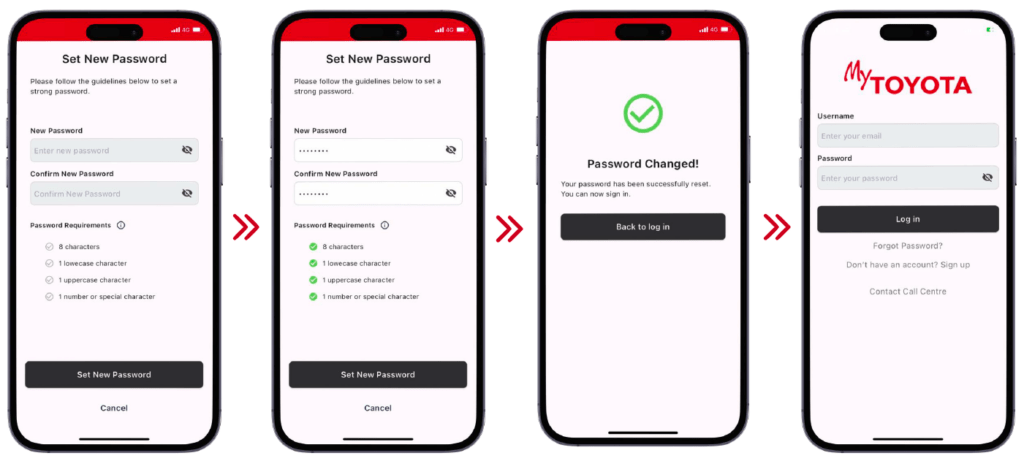
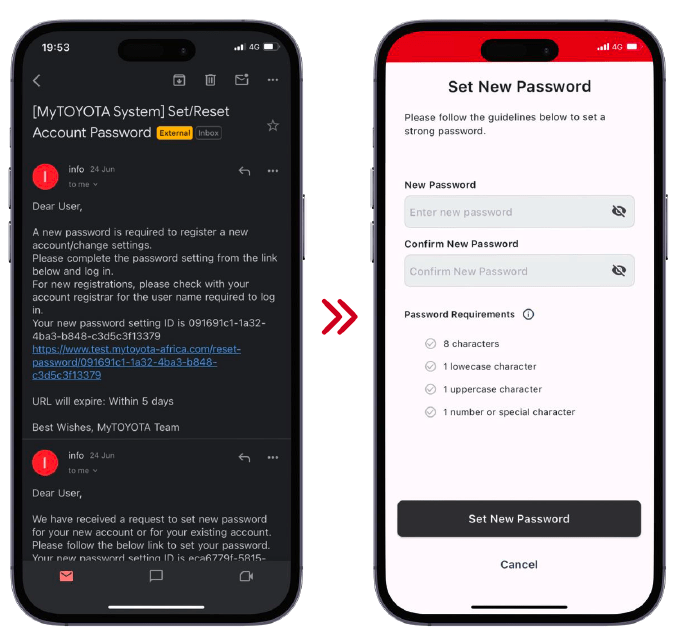
Once you click the sign-up link in your invitation email. This will take you straight to the app’s “Set New Password” screen. Here’s how to create your own special password:

1. Craft your password: Enter a strong password you can remember easily.

2. Make it a match: Type your password again to confirm it’s exactly the same (double-checking is always a good idea!).

3. Seal the deal: Tap the “Set New Password” button to finalise everything.

You’re In!

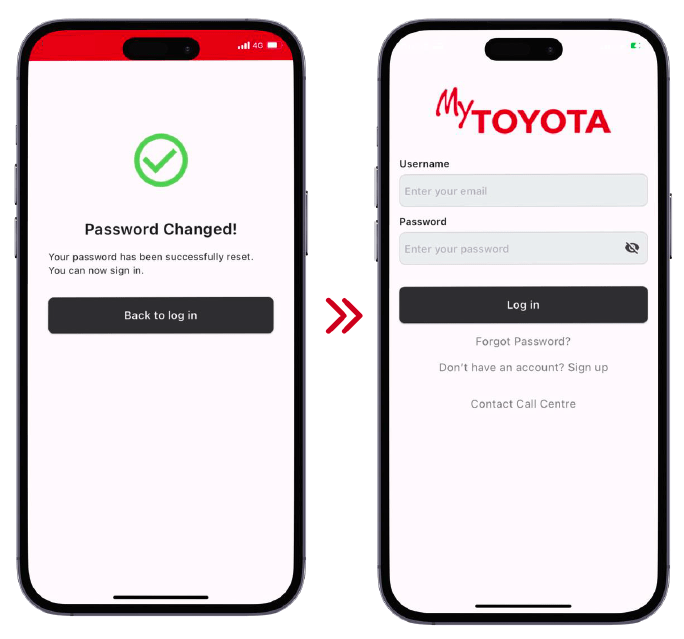
4. Success: You should see a “Password Changed!” message letting you know you’re good to go. Now you can head to the login screen and use your new password to sign in and explore the app!

HOW TO FINALISE SIGNING UP

FIRST TIME SIGNING UP

These instructions are for first-time users needing to
know how to sign up for the app. Before you sign up,
you’ll need an invitation from your local dealership or
master user. They’ll register you on the system, and then
you will receive an email with all the details.

SIGNING UP THROUGH AN EMAIL INVITATION:
Once you have the email, follow these quick steps:
1. Install the App: The email will have instructions to
download and install the app on your device.
2. Verify Your Email: Click on a special link in the email to
confirm your email address and finalise your registration.

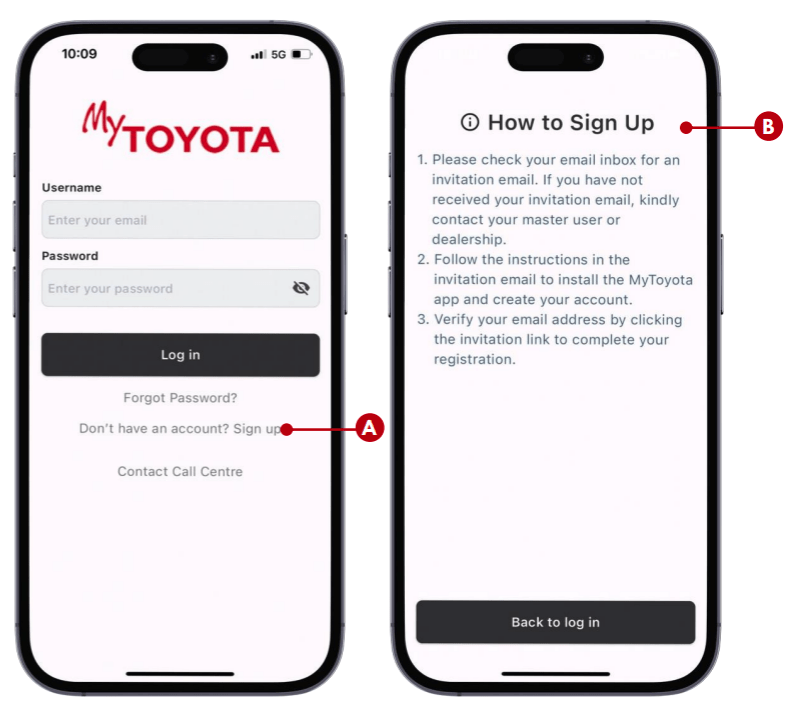
ABOUT SIGN-UP :
A. Sign-Up Link: This takes you to sign up instructions
B. Instructions Screen: This screen guides you on how to
sign up.

HOW TO LOGIN

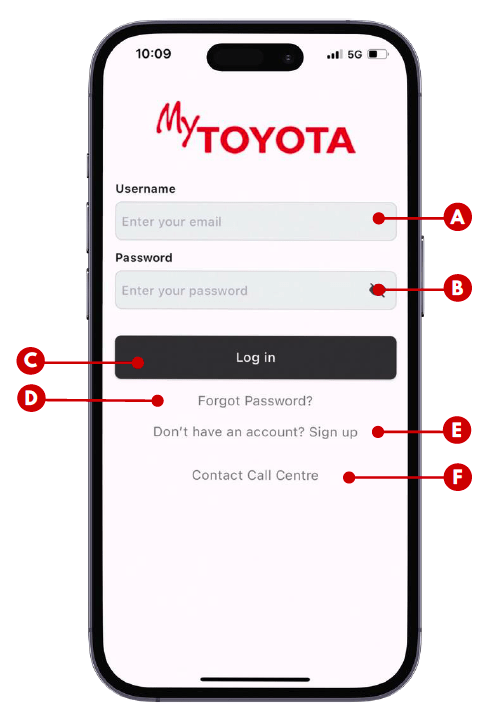
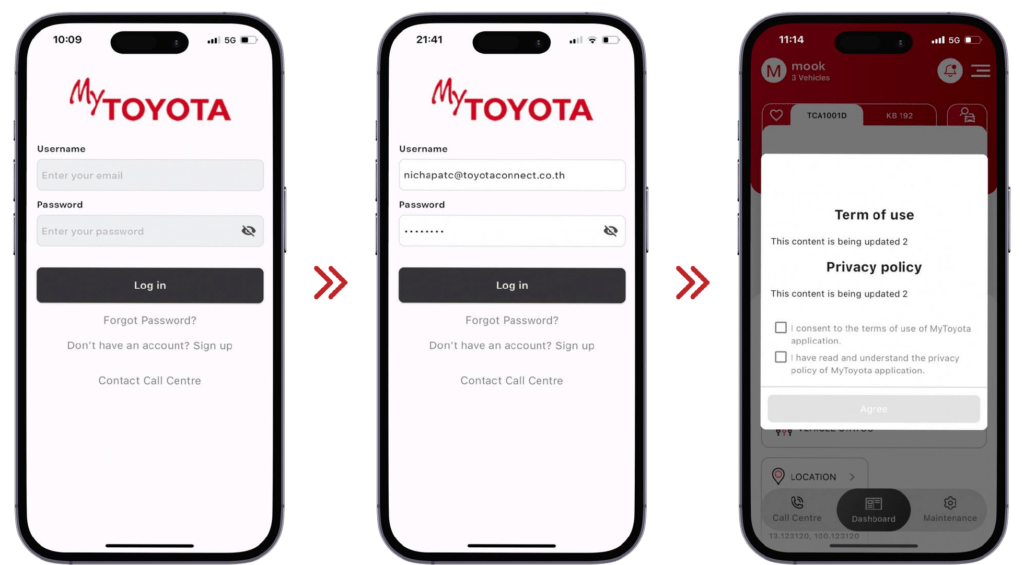
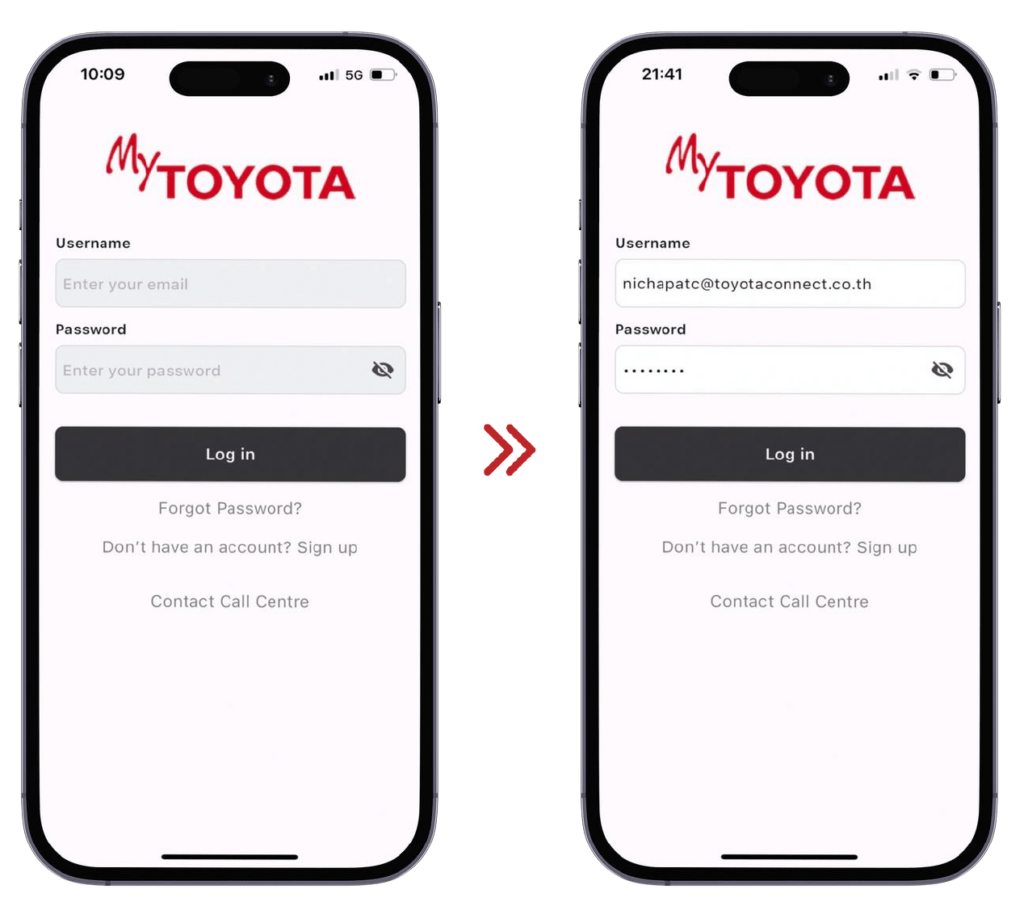
1. Email in the Username Field: Enter your email address into the field labeled “Username”.

2. Password in the Password Field: Enter your password in the “Password” field.

3. Tap “Log In” to Access the App: Once you’ve filled in both fields, tap the big “Log In” button to enter the app.

LOGIN INPUT FIELDS:

A. Username: Where you enter your email address.

B. Password: Where you enter your existing password.

C. Log In Button: The button to confirm your login attempt.

D. Forgot Password: A link to reset your password.

E. Sign Up: A link to instructions for creating a new account.

F. Contact Call Centre: A link that connects you with the call centre by phone.

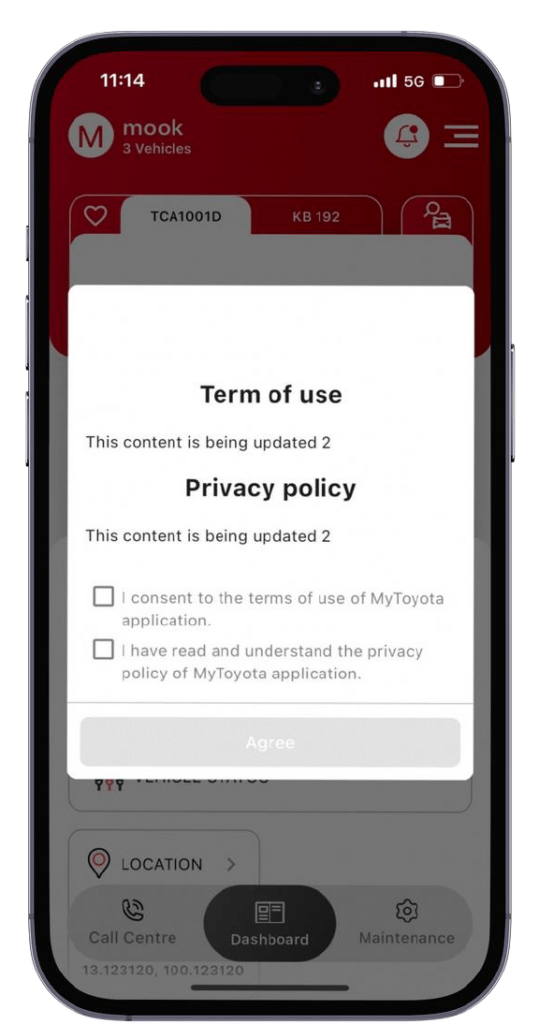
REVIEWING OUR TERMS & PRIVACY POLICY

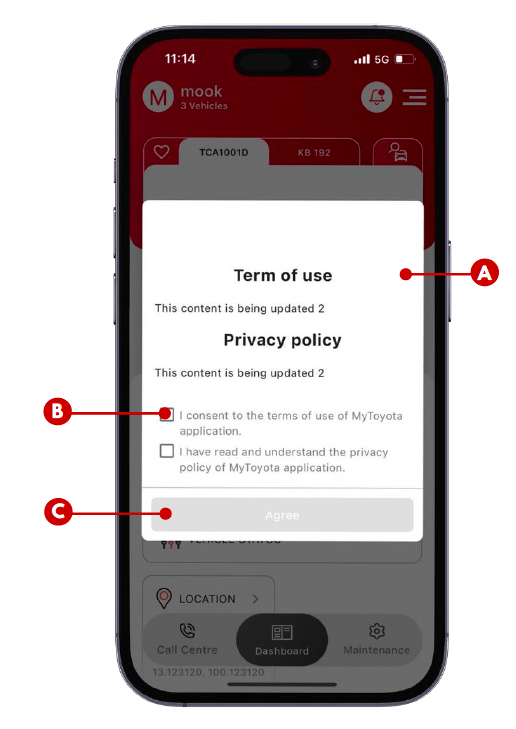
The first time you log in, you’ll see a pop-up about our Terms and Conditions and Privacy Policy. These documents explain how the app works and how we handle your information. We won’t make you read it every single time you log in. You’ll only see this pop-up again if we update the terms or policies.

HOW TO ACCEPT OUR POLICIES:

A. The pop-up will show you the details of both policies. To keep using the app, you’ll need to agree to the Terms and Conditions and acknowledge the Privacy Policy.

B. Checkbox: Once you’ve reviewed the details in our policies, tap the checkbox to agree.

C. The “Agree” button will be enabled (light up) once both checkboxs are checked. Tap “Agree” to continue entering the app.

REVIEWING OUR TERMS & PRIVACY POLICY

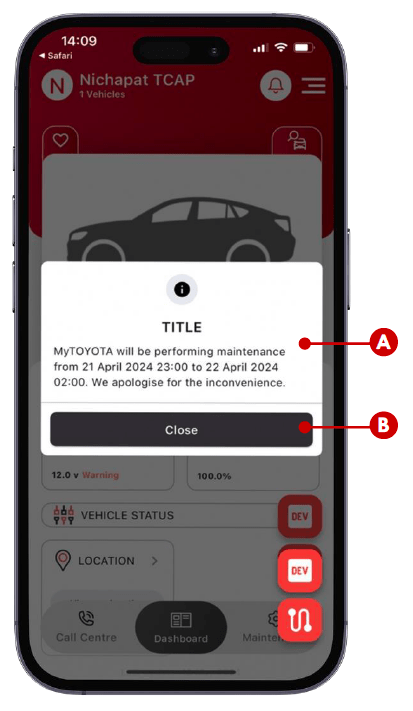
ACKNOWLEDGING APP UPDATES

After log in, you might see a pop-up with important information from the system, like upcoming maintenance. Don’t worry, these announcements only appear when there’s something you need to know!

ABOUT THE POP-UP:

A. Announcement Message: This is our main channel to update you on the app system.

B. Close Button: Once you’ve read the announcement, click the “Close Button” to make the pop-up disappear.

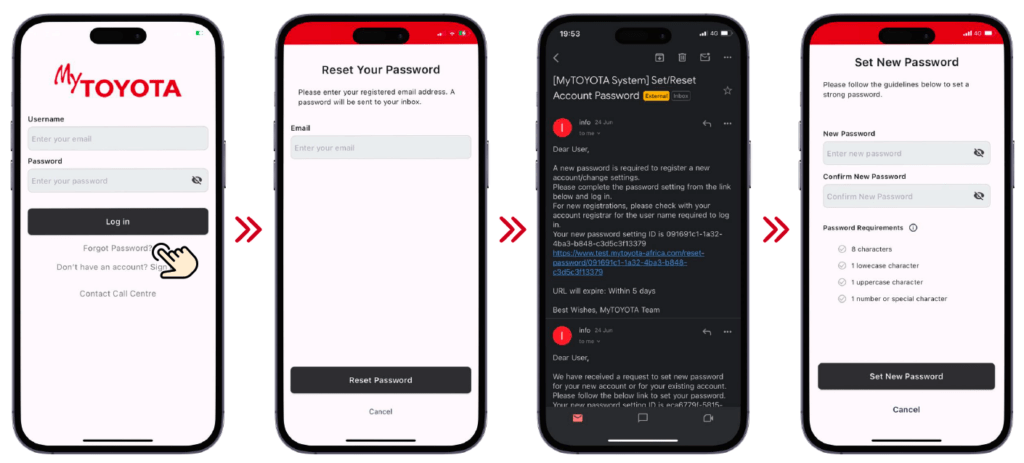
HOW TO CHANGE PASSWORD

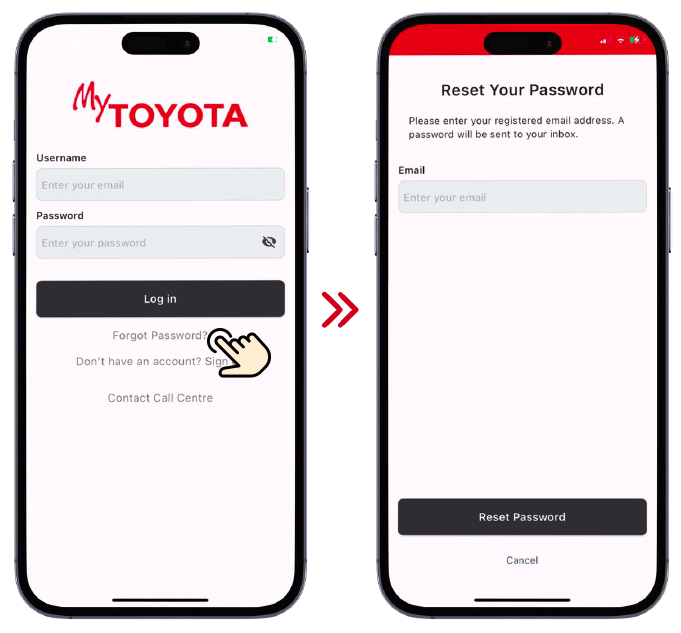
1. On the login screen, tap “Forgot My Password”, then input your email address. We’ll send a reset link straight to your inbox.

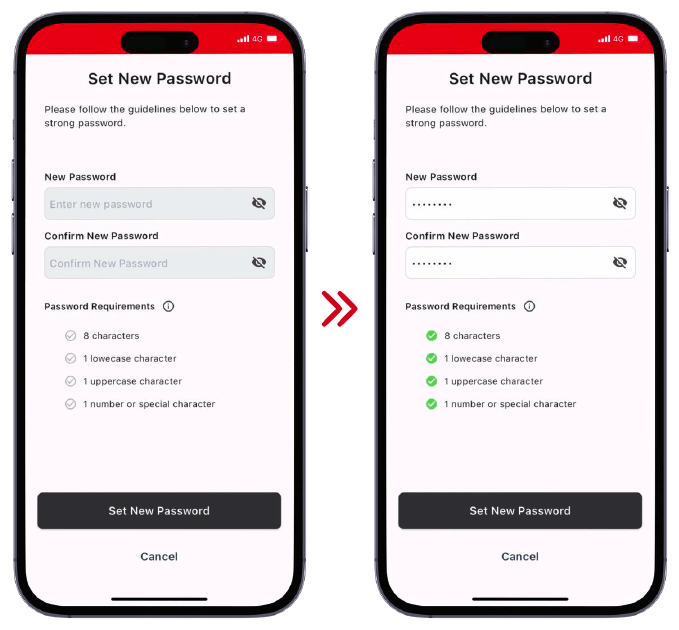
2. Click the link in the email and follow the steps to create your new, super-secure password (think at least 8 characters with a mix of letters, numbers, and symbols). No personal details – pet names or birthdays allowed – keep it secret.

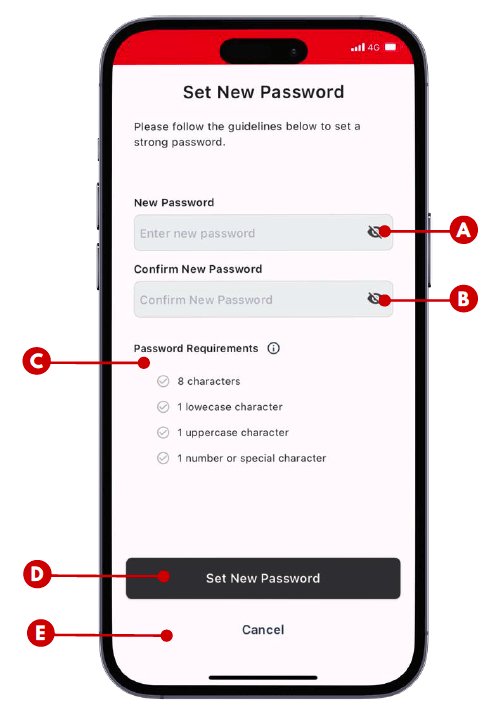
SETTING UP THE NEW PASSWORD:

A. New Password: This is where you craft your brand-new password

B. Confirm New Password: Type your new password again to make sure it matches perfectly

C. Password Requirements: This is where you will see the standard requirements for a strong password.

D. Set New Password Button: Once you’re happy with your password, tap this button to make it official.

E. Cancel Button: If you’ve changed your mind about resetting your password, tap this button to cancel.

HOW TO CHANGE PASSWORD

YOUR DASHBOARD

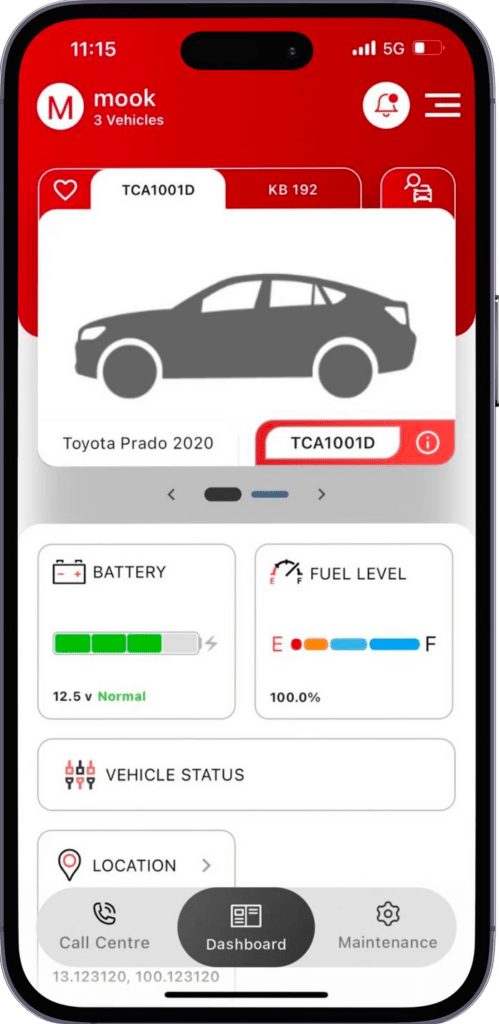
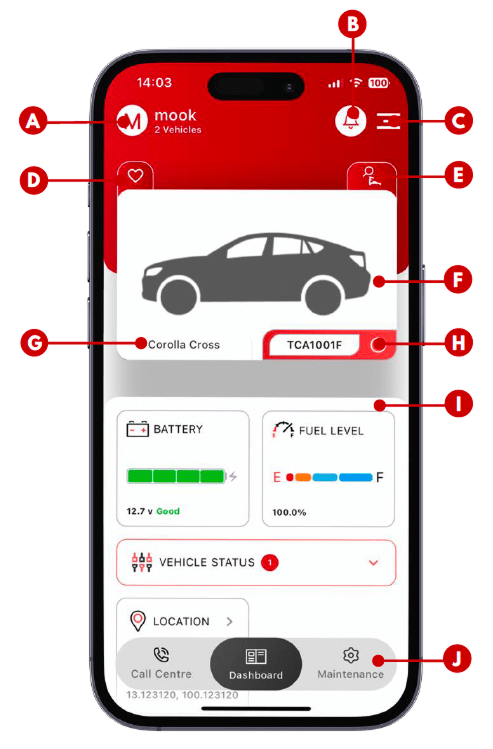
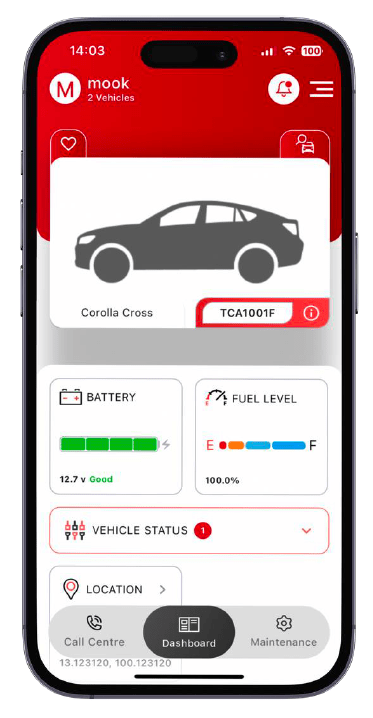
The dashboard is your one-stop shop for everything related to your vehicles. Below is a quick rundown of what you’ll find.

DASHBOARD FEATURES:

A. User Account: See your name and how many vehicles you own or have access to.

B. Notification/Message Inbox: This inbox keeps you updated with important messages about your vehicle’s status, service needs, and system alerts.

C. My Account Menu: Tap the menu (those three lines) to manage and navigate through the app

D. Favourite Car Tab: Pick your top 3 vehicles to display on the dashboard for quick access.

E. Vehicle Selecter/Switcher: Tap this button to switch between vehicles and choose the one you want to see details for.

G. Vehicle Model: See the vehicle model name.

H. Licence Plate Number: Tap to see vehicle details.

I. Widget Panel: These widgets give you a snapshot of your vehicle’s current health and status.

J. Bottom Menu Bar: Access our call centre number or switch between the dashboard and maintenance screens.

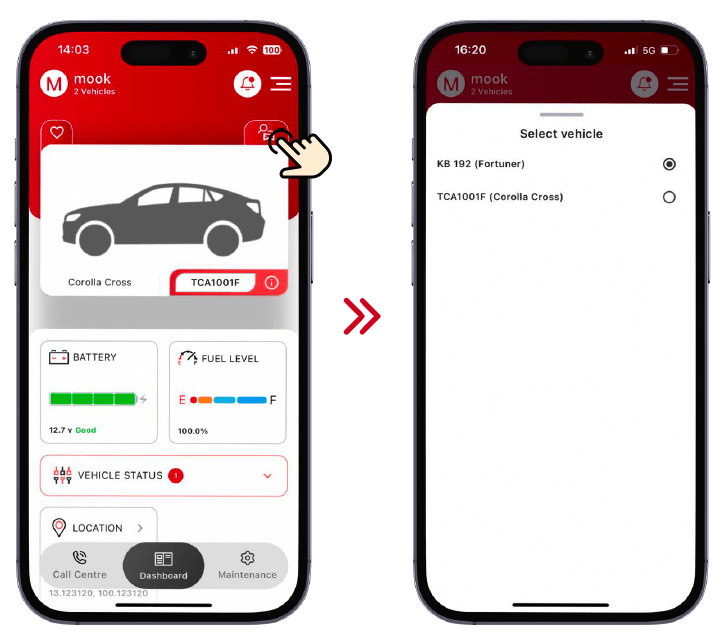
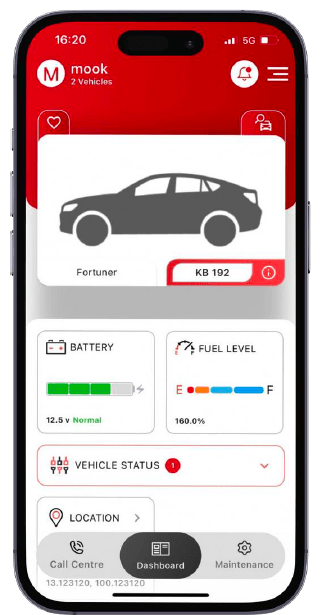
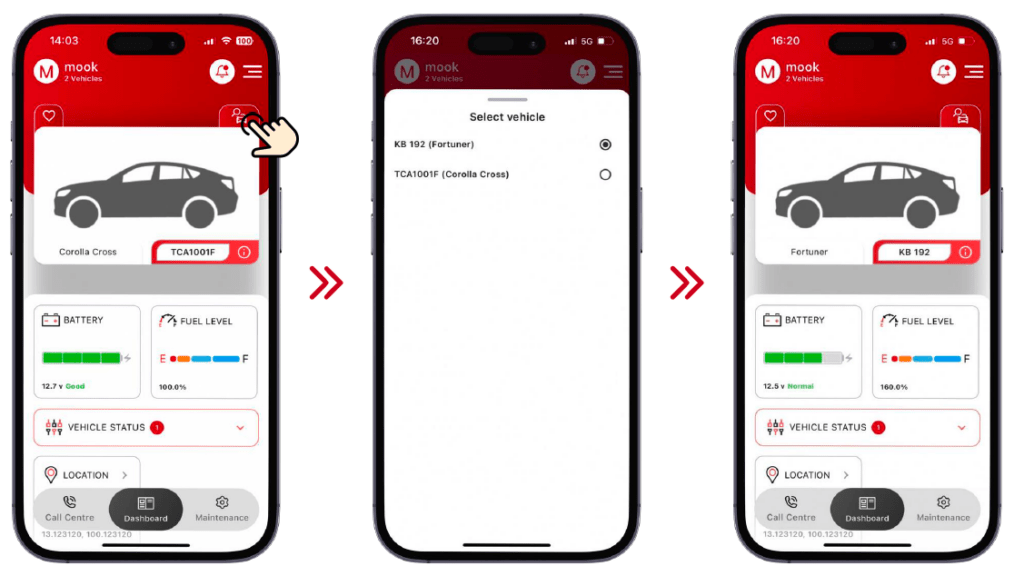
SWITCHING BETWEEN VEHICLES

If you’re a proud owner (or sharer) of multiple vehicles, you can easily switch between them on the dashboard to see information and status for each one. Here’s how:

1. Tap the “Select Vehicle” Icon: Look for this icon
(a car with a magnifying glass) above your vehicle image on the dashboard.

2. Selecting the Vehicle: A list of all your vehicles, both owned and shared, will appear. Simply tap the button next to the one you want to see details for.
SWITCHING BETWEEN VEHICLES

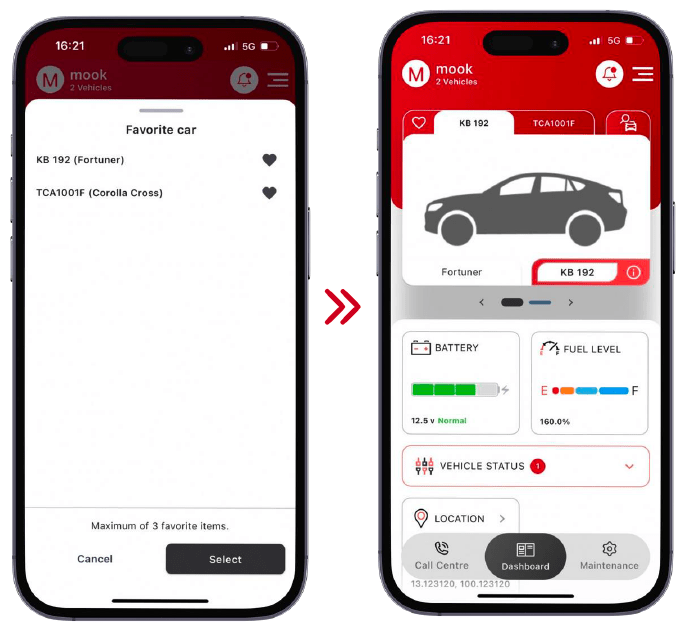
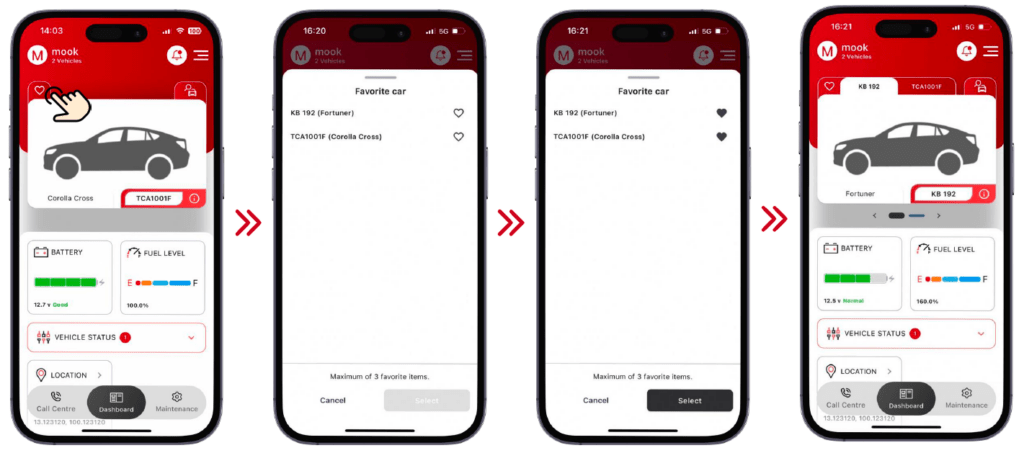
SELECTING YOUR FAVOURITE VEHICLE

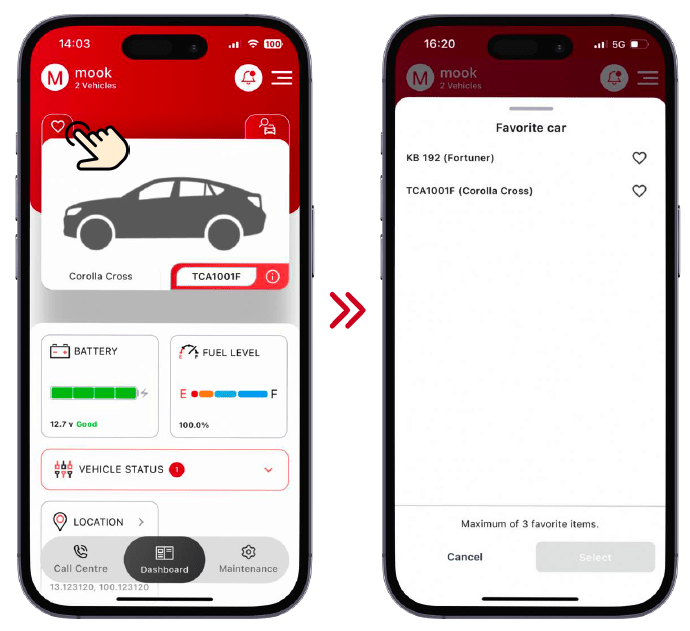
This feature lets you choose up to 3 favourite vehicles to display right on your dashboard. That way, their information and status are just a tap away! Here’s how to set it up:

1. Find the Favourite Car Icon: Look for the heart icon above your vehicle image on the dashboard. Tap it to open the full list of your vehicles.

2. Creating Your Tabs: From the list of vehicles, tap the heart icon next to your 3 favourite rides. These chosen vehicles will become your “Favourite Car Tabs” on the dashboard. Just swipe left or right to easily switch between them.
SELECTING YOUR FAVOURITE VEHICLE

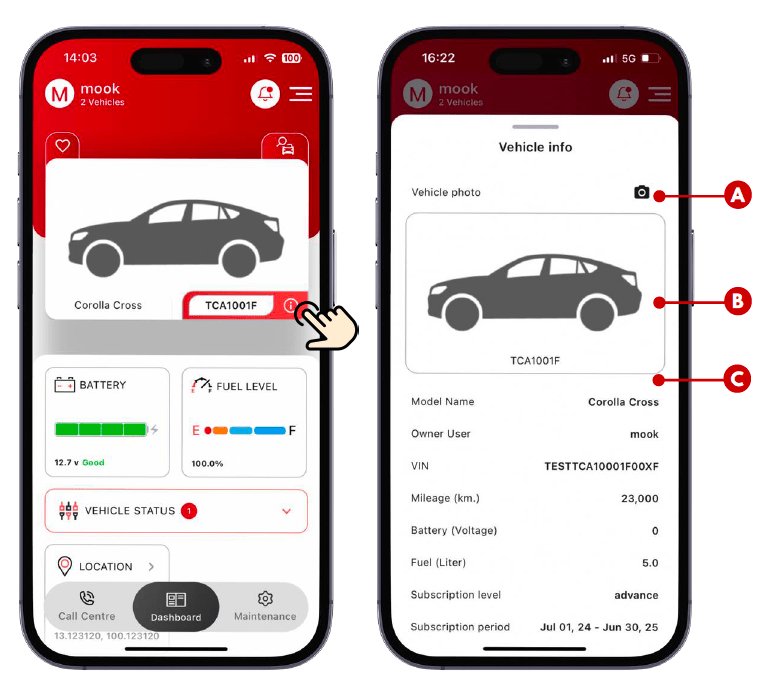
ACCESSING MY VEHICLE INFORMATION

If you want to access your car’s details, simply tap the licence plate number on your vehicle image in the dashboard. This will open a panel that shows all the relevant info.

Breakdown of what you’ll find:

A. Camera: Tap the camera icon to take a photo of your car or choose an existing one from your gallery.

B. Vehicle Image: This is where you car’s image is displayed (or a default icon if you haven’t added a pic).

C. Vehicle Details: This section display’s your car’s information, such as – VIN number, Model name, Mileage, etc.

RECEIVING MESSAGES & NOTIFICATIONS

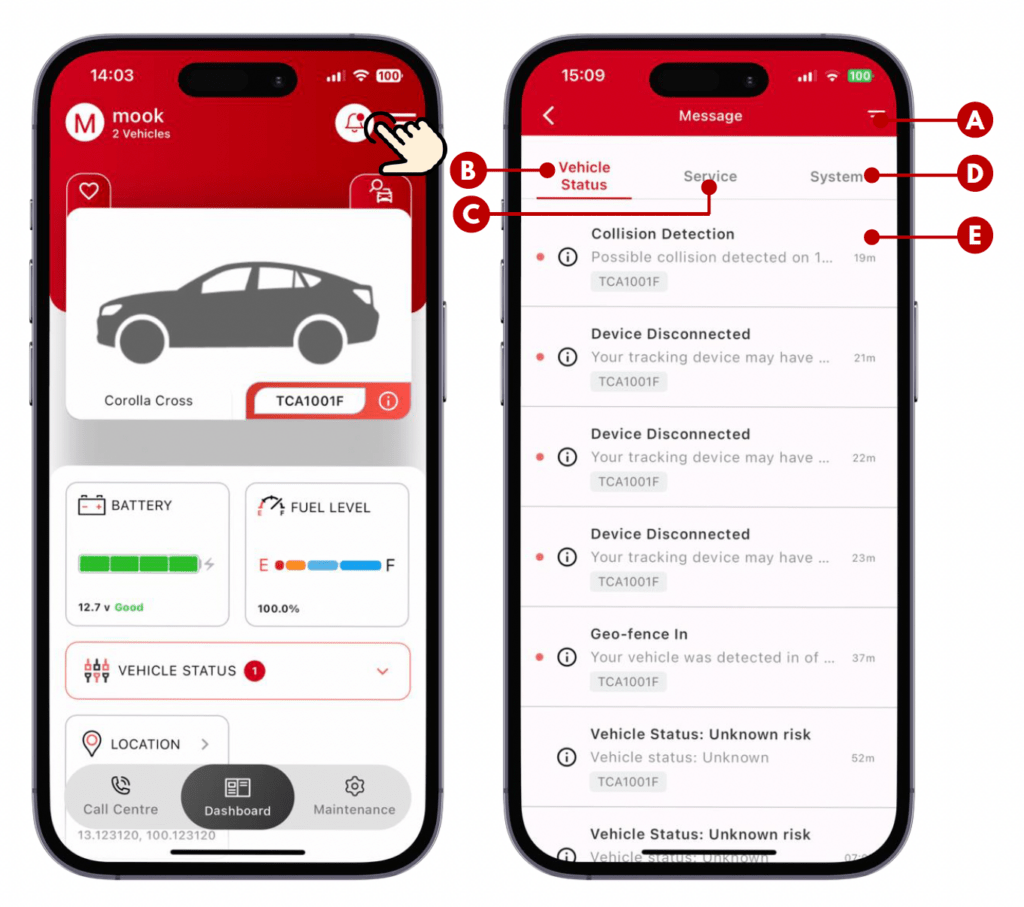
In this section you’ll find all the important notices from the app about your vehicles. There are three main types of messages:

Vehicle Status: Get alerts about things like low tire pressure or upcoming maintenance.

Service: See messages from your dealer about service appointments or recommendations.

System: Stay in the loop about any system updates or announcements.

Message Inbox Features:

A. Filter: Use the filter to sort your messages by type, date, or even specific vehicle.

B/C/D. Quick Tabs: Easily switch between different message types with dedicated tabs for Vehicle Status, Service, and System messages.

E. Message List: Once you’ve chosen a message type, you’ll see a list of all the relevant messages below.

USING THE MESSAGE INBOX FILTER

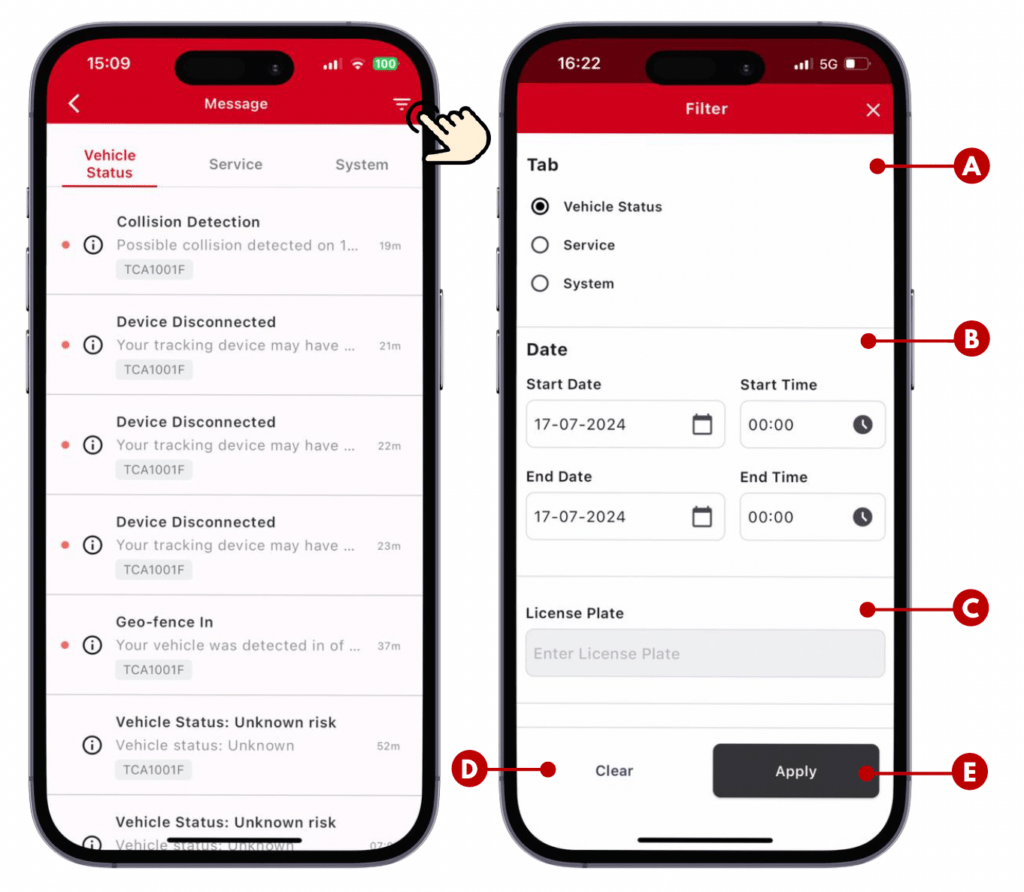
This functionality will help you filter and find specific messages quickly. Here’s how to use it:

A. Message Tabs & Types: See only the messages you care about by using the radio buttons to choose “Vehicle Status,” “Service,” or “System.”

B. Date & Time: Want to see messages from a specific date or time range? Just enter it in the “Date” field.

C. Lincence Plate: If you have multiple vehicles, you can filter messages to see only those for a specific licence plate.

D. Clear Button: Made a mistake or want to start over with the filter? Tap the “Clear Button” to start again.

E. Apply Button: Once you’ve set your filter criteria, tap “Apply” Button to see the messages that match your selections.

UNDERSTANDING THE DASHBOARD WIDGETS
(PART A)

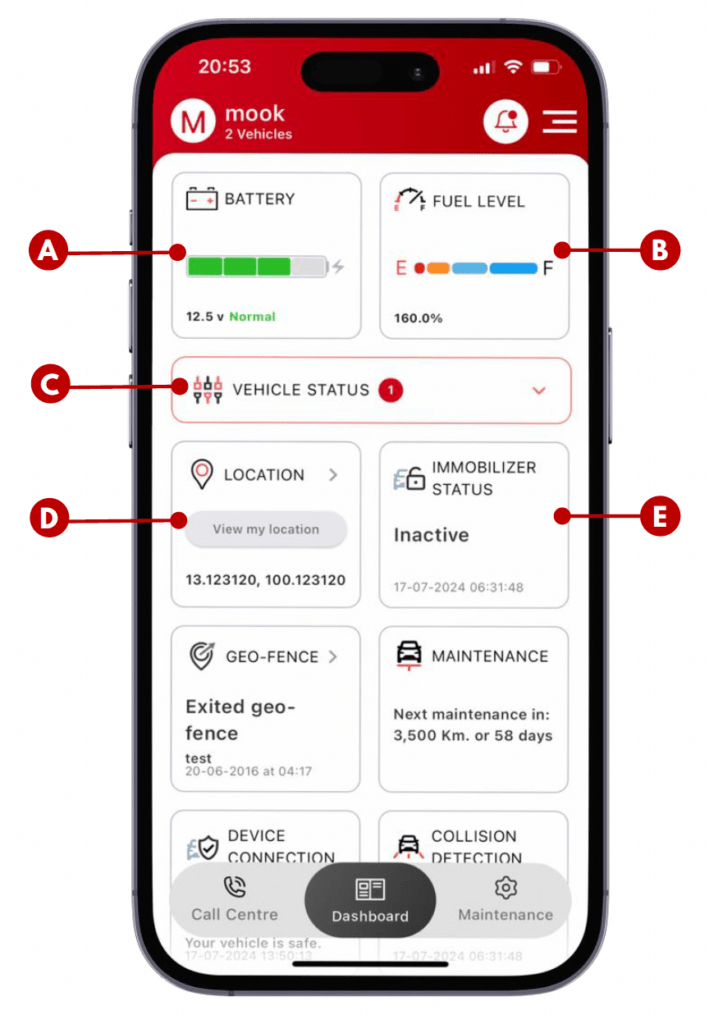
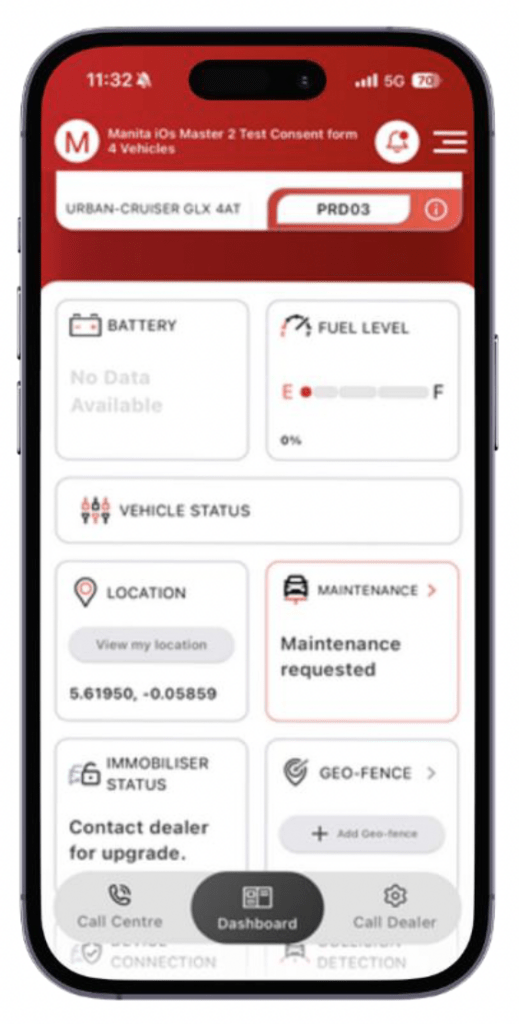
The widgets on your dashboard are like mini information booths, giving you quick updates on your vehicle’s health and status. Here’s a rundown of what each widget can tell you:

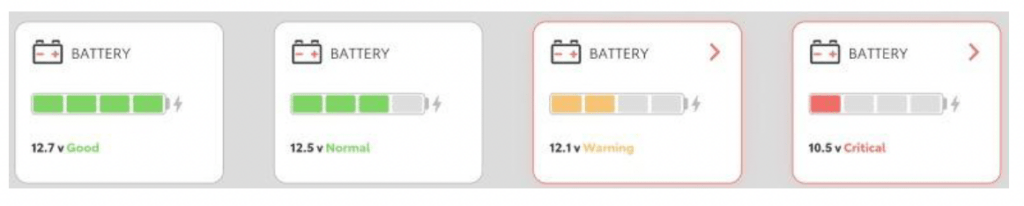
A. Battery Level: See how much battery power your vehicle has left.

B. Fuel Level: This widget updates you on how much fuel you have left in the tank.

C. Vehicle Status: If there’s an issue with your vehicle, this widget will let you know.

D. Location: See the current location of your vehicle directly on Google Maps.

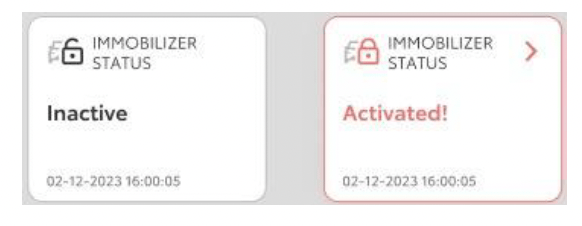
E. Immobiliser Status: This widget shows if your car’s immobiliser device is on or off.

UNDERSTANDING THE DASHBOARD WIDGETS
(PART B)

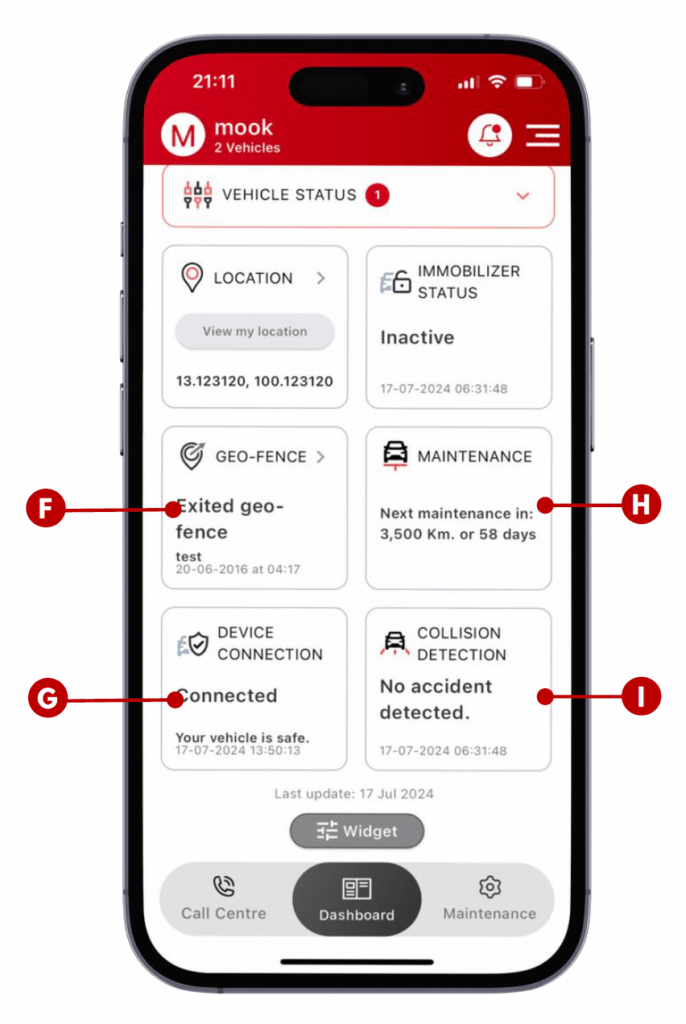
F. Geo-fence: Set up a geo-fence and this widget will alert you if your vehicle enters or leaves that zone.

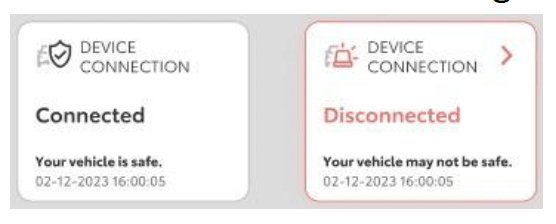
G. Device Connection: This widget checks if your vehicle’s connected and can even detect potential theft attempts.

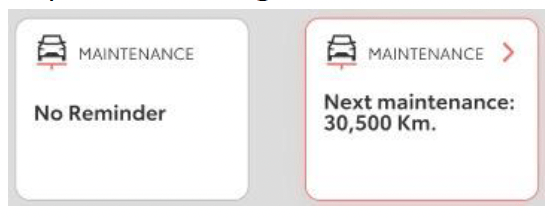
H. Maintenance Reminder: This widget will nudge you when it’s almost time for maintenance.

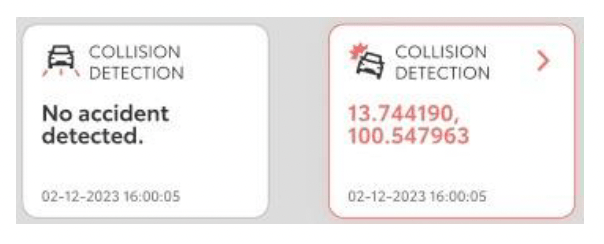
I. Collision Detection: This widget will warn you if a possible collision is detected.

WIDGETS STATUS & CUSTOMISATION

UNDERSTANDING STATUS OF WIDGETS (PART A)

Each widget type have different detail status. Widget with red frame and text means an alert status, and it needs your attention. Here’s a rundown of each widget’s possible statuses :

Battery Level:

There are 4 statues to let you know the situation of vehicle’s battery level; Good, Normal, Warning, and Critical.

Battery Level:

There are 4 statues to let you know the situation of vehicle’s battery level; Good, Normal, Warning, and Critical.

UNDERSTANDING STATUS OF WIDGETS (PART B)

Vehicle Status:

Number with red frame indicate that there’s issue with the vehicle. You can see the list of issue occurred with the vehicle by tapping on the widget.

Immobiliser Status:

There are 2 statuses of immobiliser; Inactive (immobiliser off) and Activated (immobiliser on).

Geo-fence:

You must add Geo-fence by creating Geo-fence first. Then you’ll be able to see the status. There are 2 statues of immobiliser; Entered Geo-fence and Exited Geo-fence. If there’s an alert status, you can tap on the widget to see detail notification message.

UNDERSTANDING STATUS OF WIDGETS (PART C)

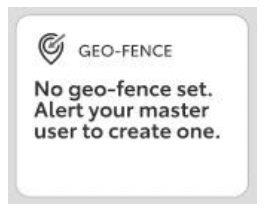
If there is no Geo-fence setting by Master user, Member user will see the status below.

Device Connection:

There are 2 statuses of device connection; Connected and Disconnected. If there’s an alert status, you can tap on the widget to see detail notification message.

Geo-fence:

You must add Geo-fence by creating Geo-fence first. Then you’ll be able to see the status. There are 2 statues of immobiliser; Entered Geo-fence and Exited Geo-fence. If there’s an alert status, you can tap on the widget to see detail notification message.

UNDERSTANDING STATUS OF WIDGETS (PART C)

Device Connection:

The status will display latitude and longitude of the location that collision is detected. If there’s an alert status, you can tap on the widget to see detail notification message.

CHECKING VEHICLE ISSUE

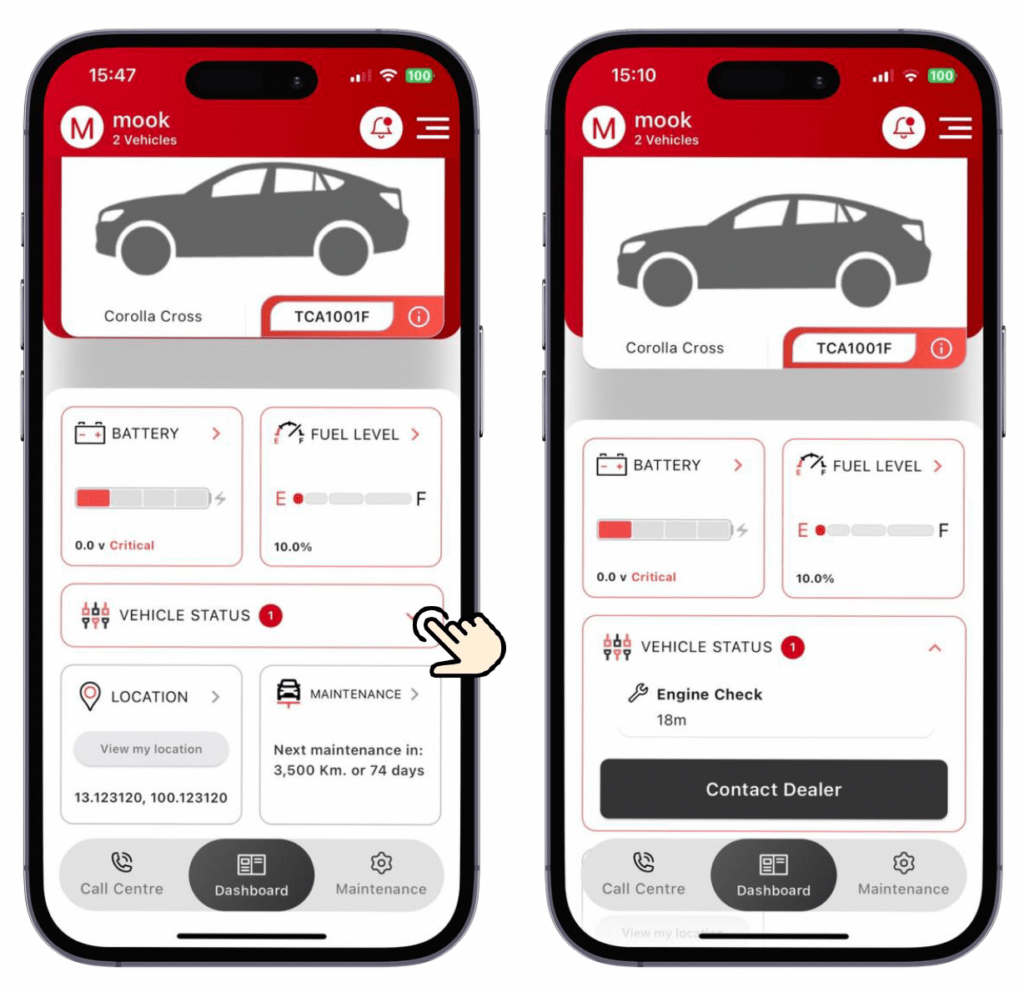
The Vehicle Status Widget will let you know if there’s something wrong with your vehicle.

1. Widget Alert: If the widget display in red frame with number. It means there’s issue with the vehicle. The number indicates how many issue occurred.

2. See List of Issue Occurred: Tap on the widget to see the dropdown of issue list. You can see what is wrong with your vehicle.

3. Contact Dealer: If you would like to promptly call to dealer to get help on your vehicle’s issue, tap on “Contact Dealer” button.

4. See Detail of Issue: You can check the detail of issue in notification message that delivers to your inbox. There you can read about the issue in more detail.

CHECKING VEHICLE LOCATION

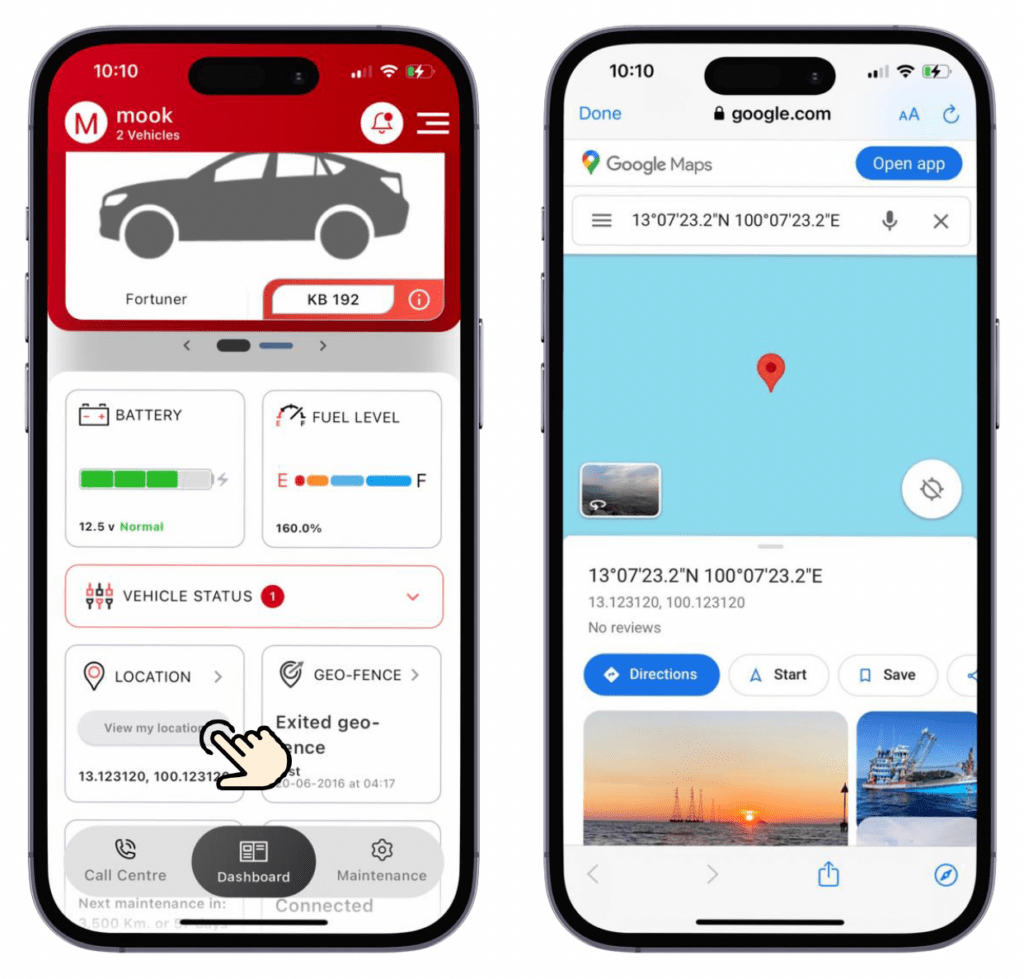
You can easily check current vehicle location from the Location Widget.

1. Location on Widget: The widget let you know latitude and longitude of the vehicle’s location.

2. Link to Google Map: Tap “View my location” on the widget, it will lead you directly to Google Map with current location of the vehicle.

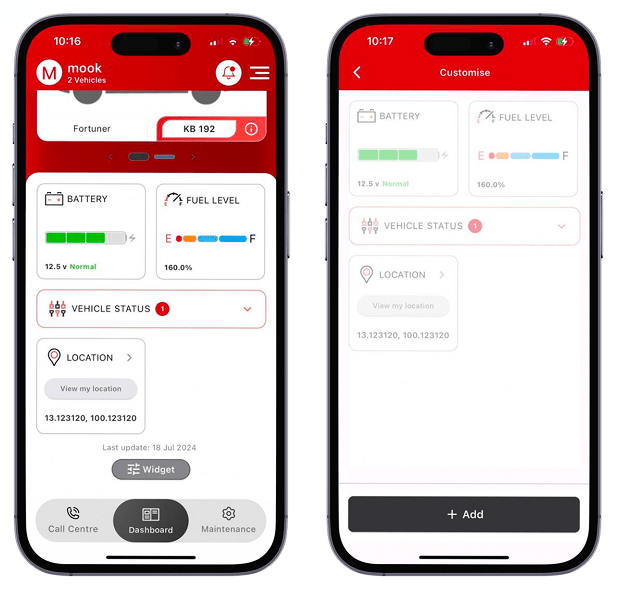
CUSTOMISING WIDGETS DISPLAY (PART A)

You can easily check current vehicle location from the Location Widget.

1. Location on Widget: The widget let you know latitude and longitude of the vehicle’s location.

2. Link to Google Map: Tap “View my location” on the widget, it will lead you directly to Google Map with current location of the vehicle.

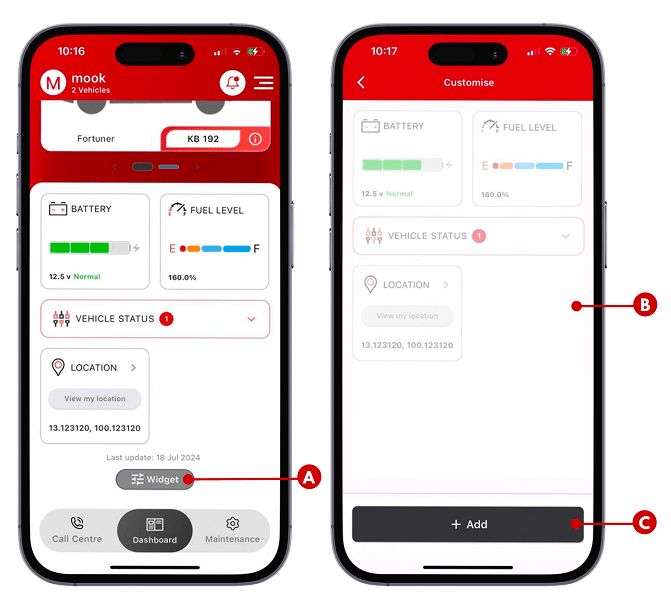
CUSTOMISING WIDGETS DISPLAY (PART B)

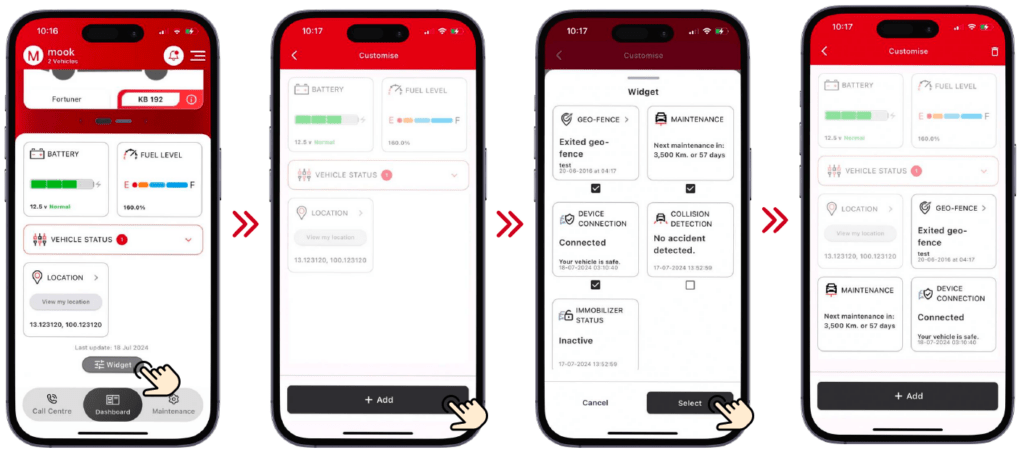
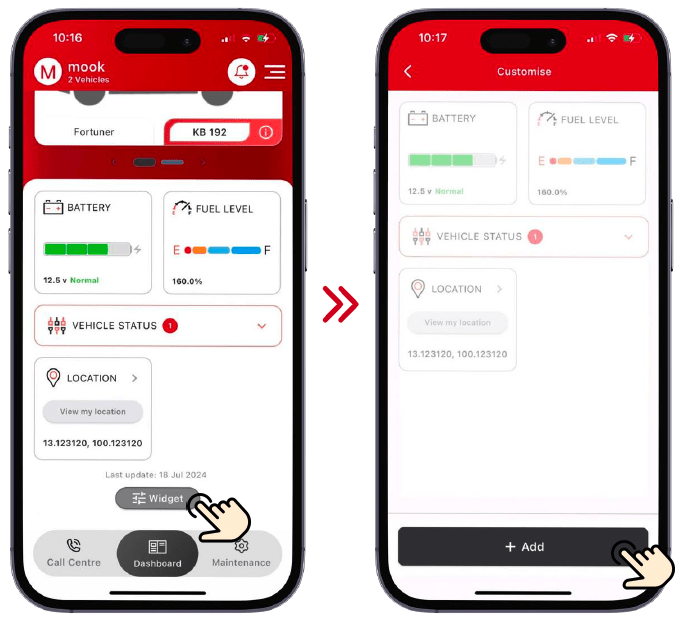
ABOUT WIDGET CUSTOMISING :

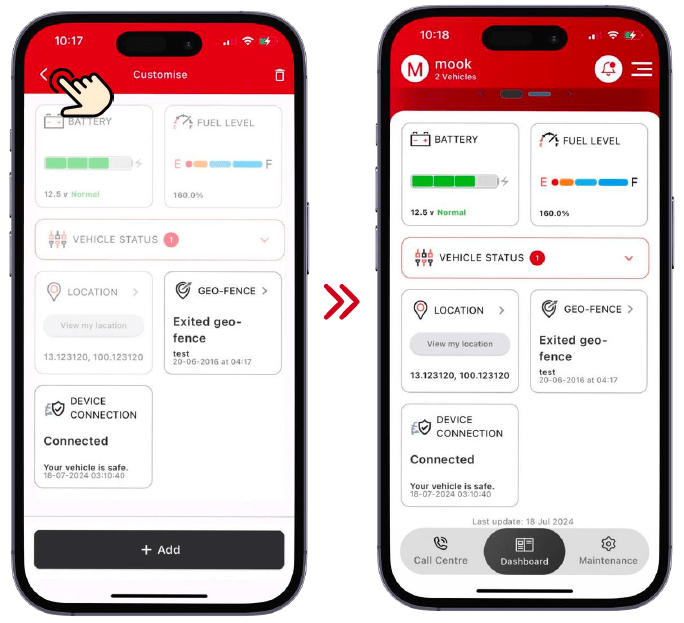
A. Customise Widget Button: This takes you to customise screen.

B. Current Widget Panel: This area shows your current dashboard widget. There are 4 default widgets that you cannot remove, which are Battery, Fuel Level, Vehicle Status, and Location. As these are highly important information and status for you and your vehicle safety.

C. Add button: Tap to start customsing widget panel to your need!

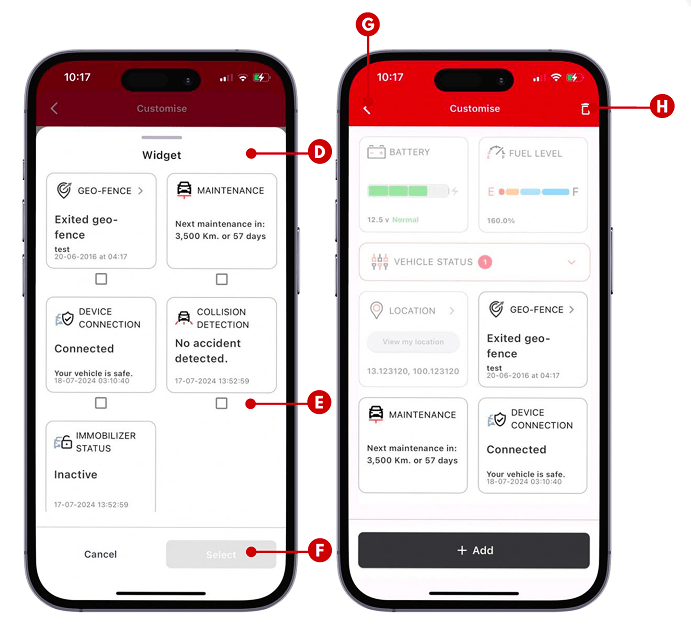
CUSTOMISING WIDGETS DISPLAY (PART C)

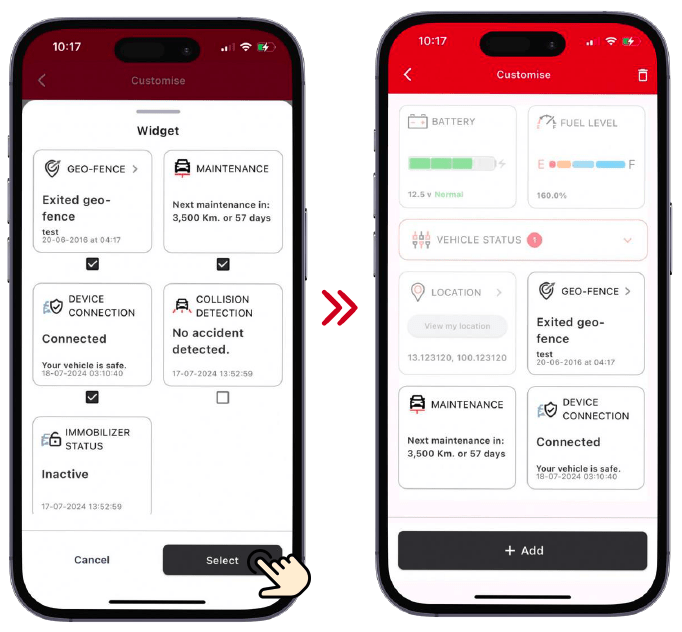
ABOUT WIDGET CUSTOMISING :

D. ADDABLE WIDGET: This is a list of widget that you can add to dashboard.

E. Checkbox to Select Widget: You can tap the box to select the widget you want.

F. Select Button: Button to confirm and add selected widget to dashboard. The button will enabled (light up) once at least one widget is selected.

G. Back to dashboard: You can tap this arrow to go back to dashboard once you’re satisfy with your customisation.

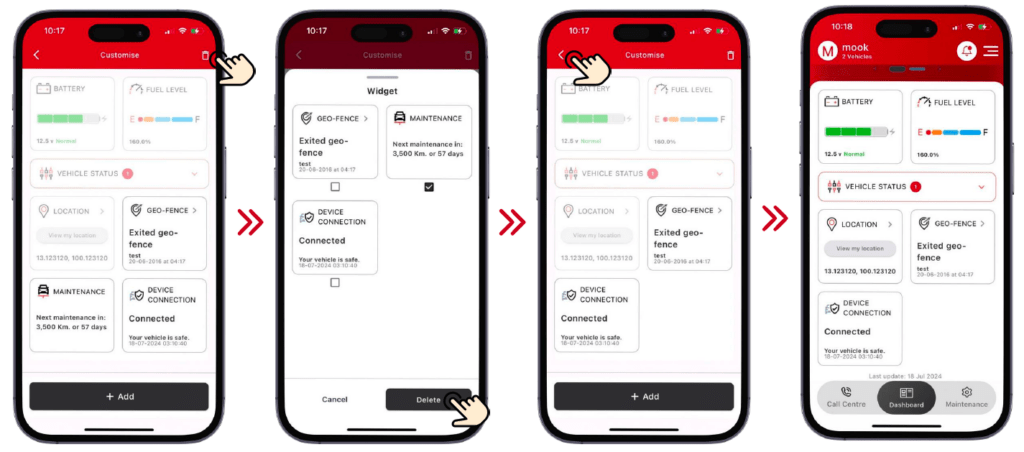
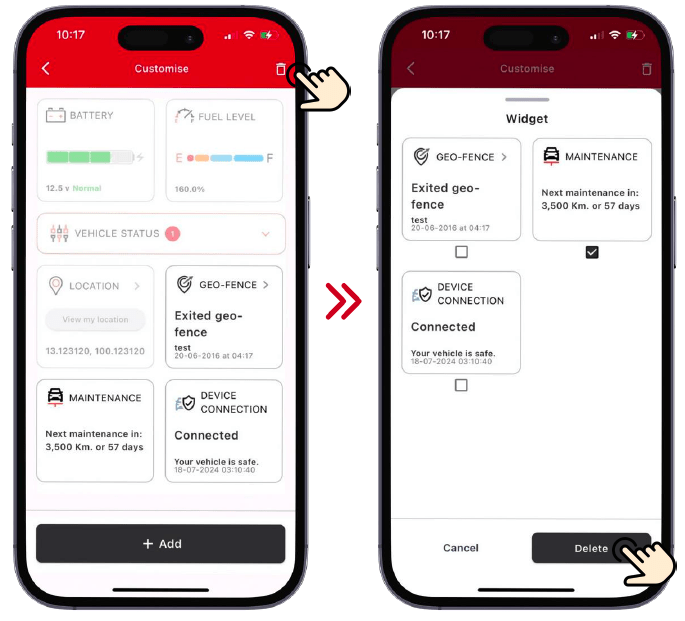
H. Bin Icon: This allow you to remove undesired widget out of your dashboard.

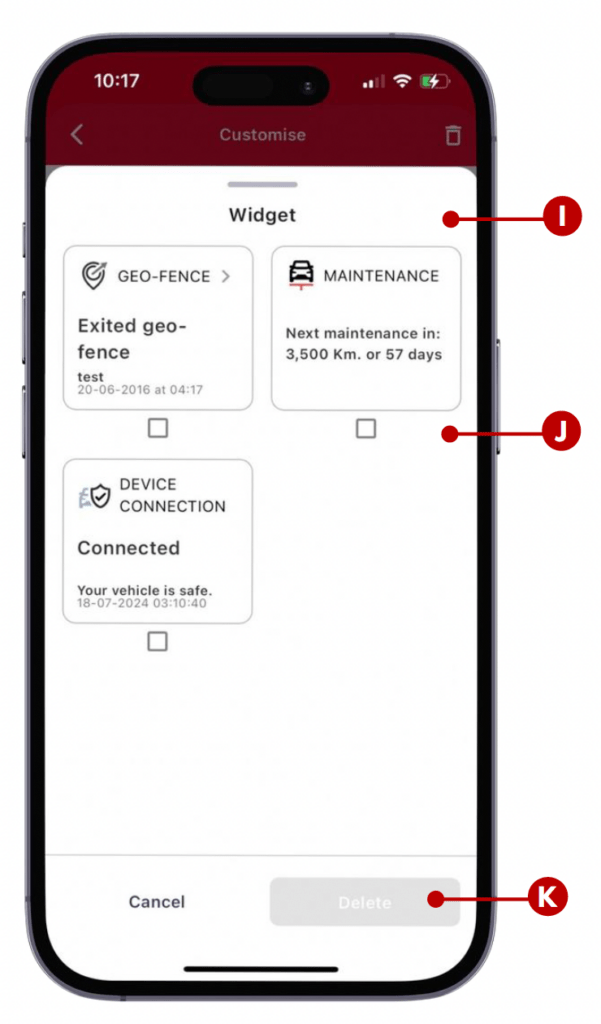
CUSTOMISING WIDGETS DISPLAY (PART D)

ABOUT WIDGET CUSTOMISING :

I. DELETABLE WIDGET: This is a list of widgets that you can remove from dashboard.

J. Checkbox to Select Widget: You can tap the box to select the widgets you want to remove.

K. Delete Button: Button to confirm and delete selected widgets from dashboard. The button will enabled (light up) once at least one widget is selected.

CUSTOMISING WIDGETS DISPLAY (ADD)

CUSTOMISING WIDGETS DISPLAY (DELETE)

HOW TO BOOK MAINTENANCE (PART A)

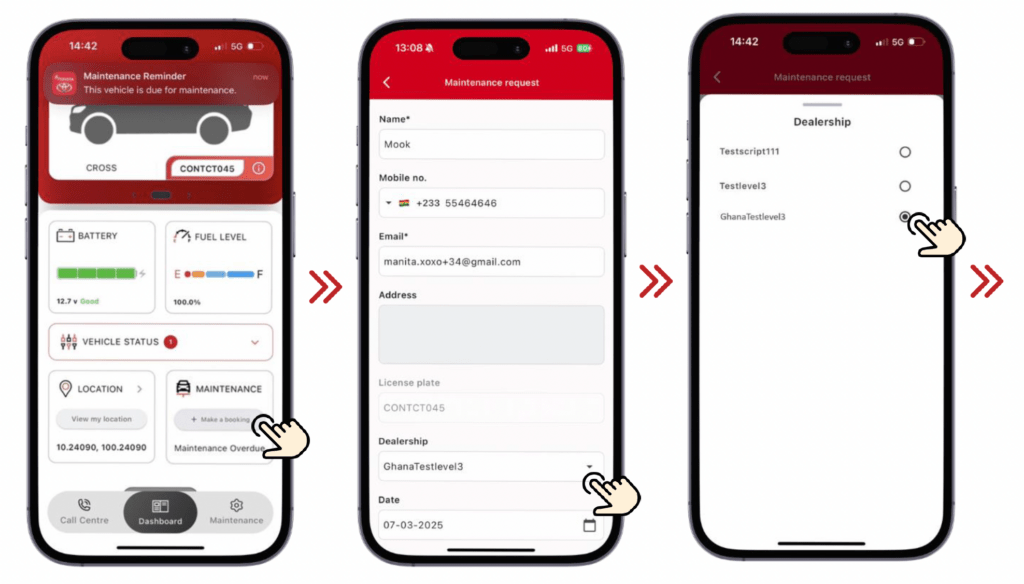
You can easily book maintenance at your preferred dealership anytime to ensure your vehicle remains safe and healthy. But the application will also send you reminders when your vehicle nears its service maintenance window.

Follow these steps:

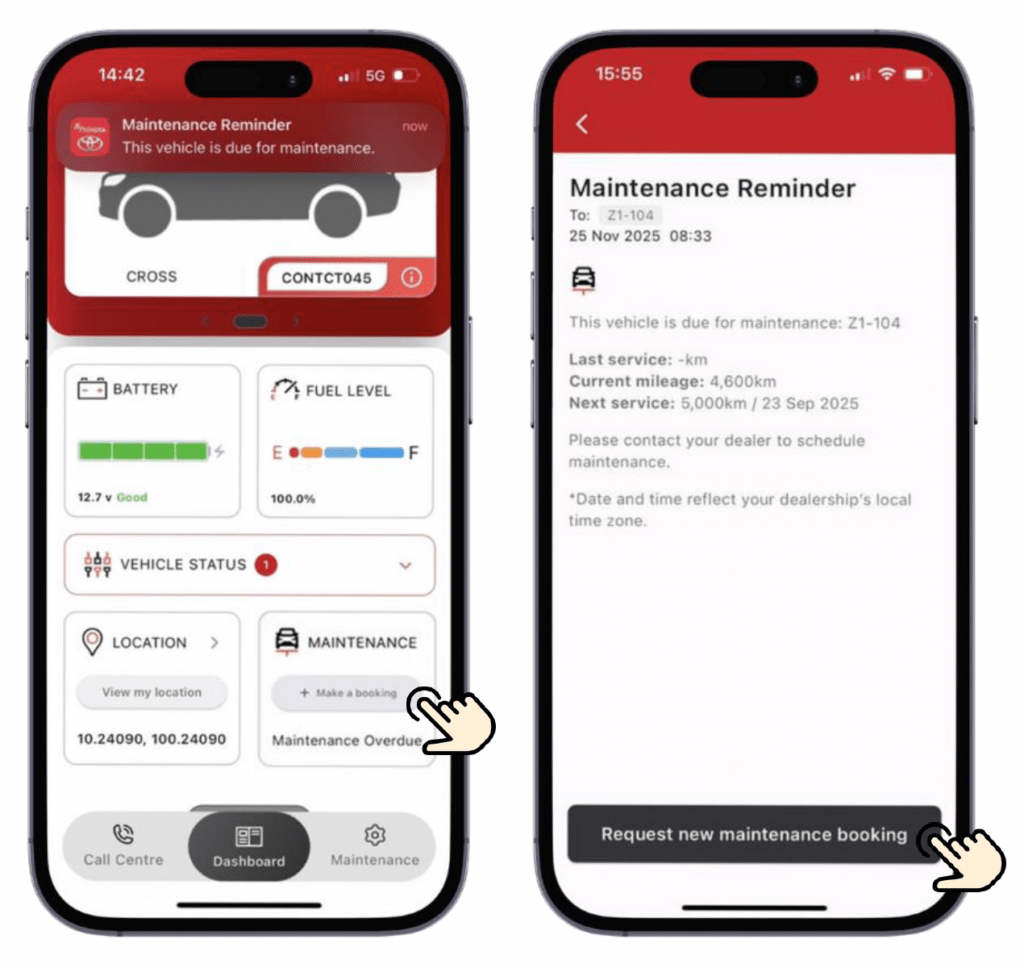
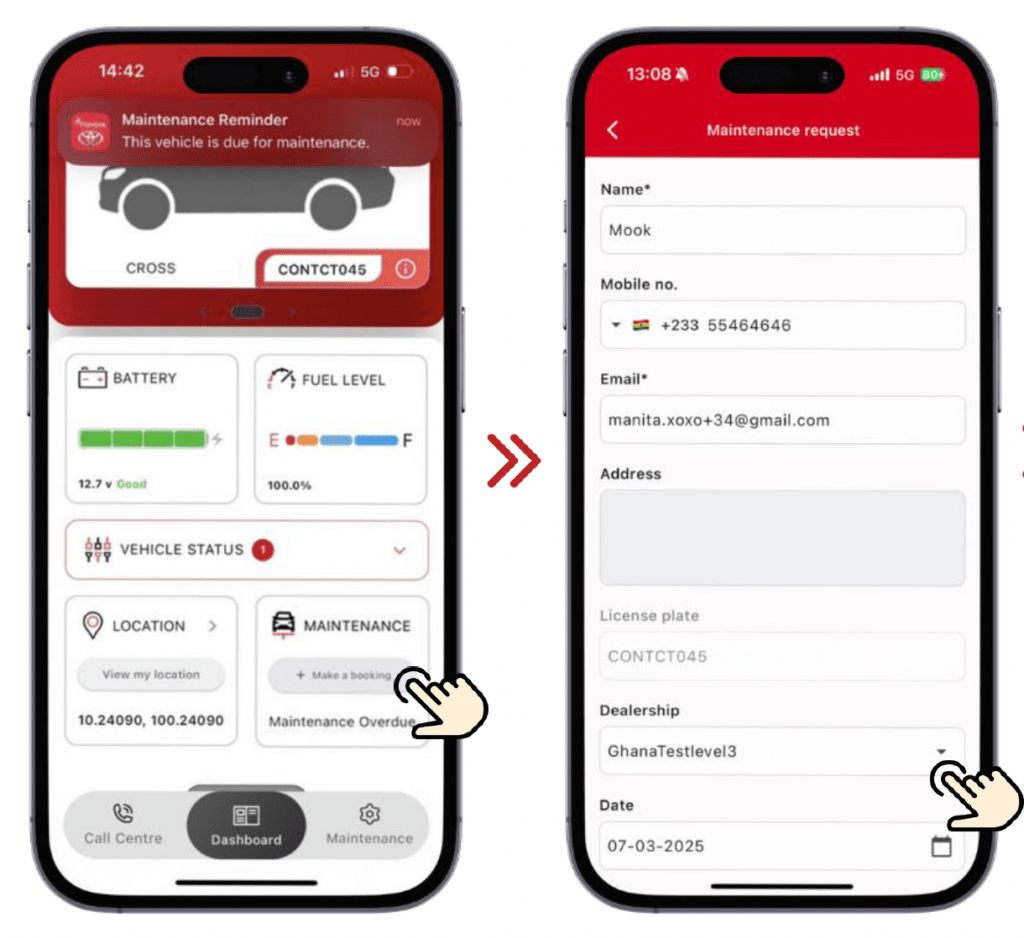
1. Make a booking: Tap ‘Make a booking’ button on the maintenance widget, it will lead you to the maintenance request screen.

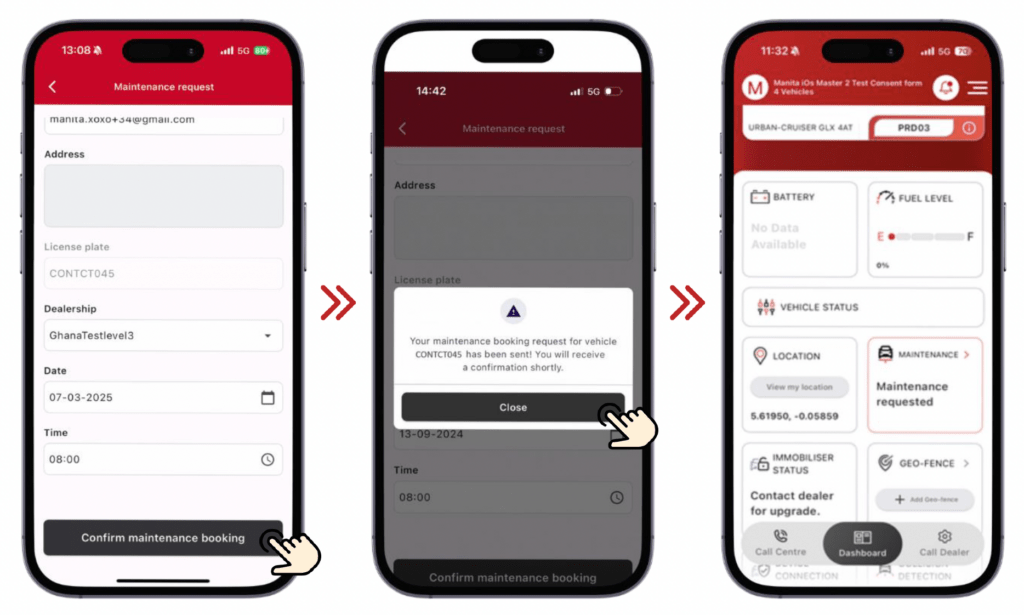
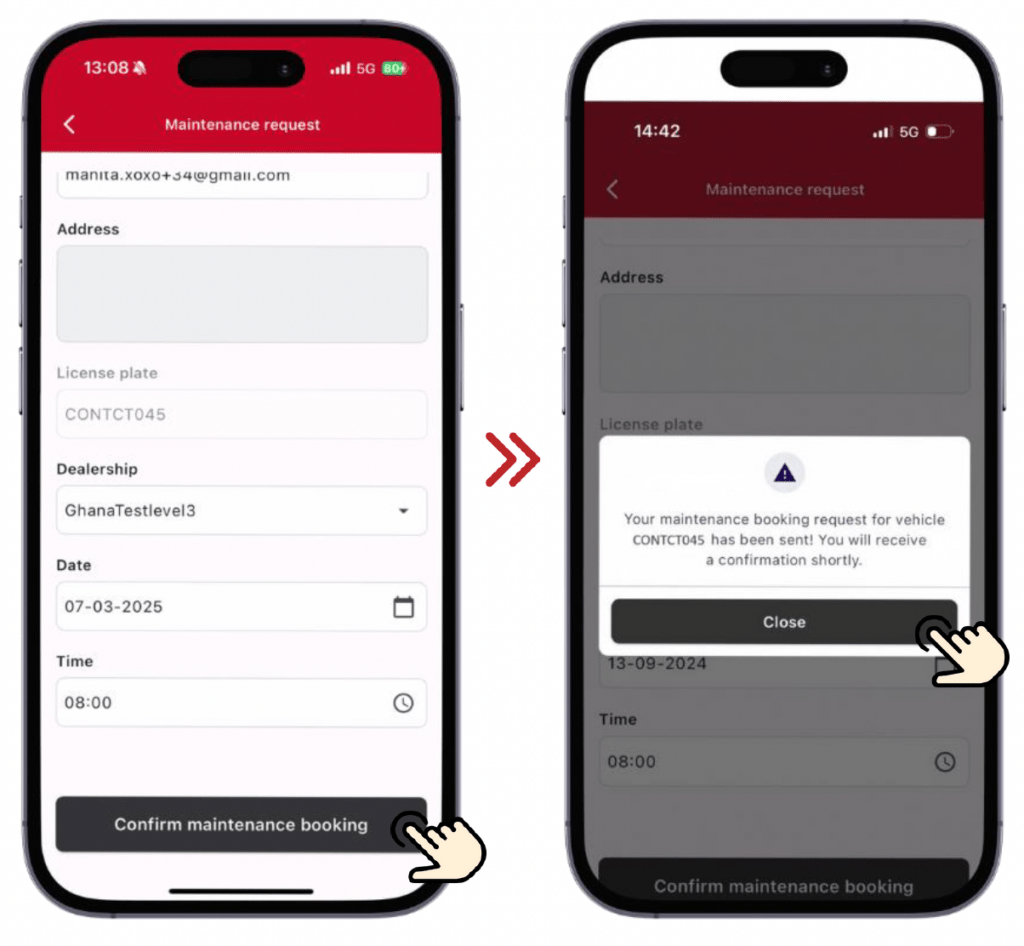
2. Input information for request: Enter your contact information, preferred dealership, date and time. Tap the “Confirm Maintenance Booking” button.

3. Wait for confirmation from dealer: You will receive a notification once your dealer has confirmed you’re booking. To cancel your booking, please contact your dealer.

Note: If the widget has an arrow at the top-right corner, you can tap on it, and it will lead you to the related notification message. There you can tap on the “Request new maintenance booking” button. This will lead you to the maintenance request screen as well.

HOW TO BOOK MAINTENANCE (PART B)

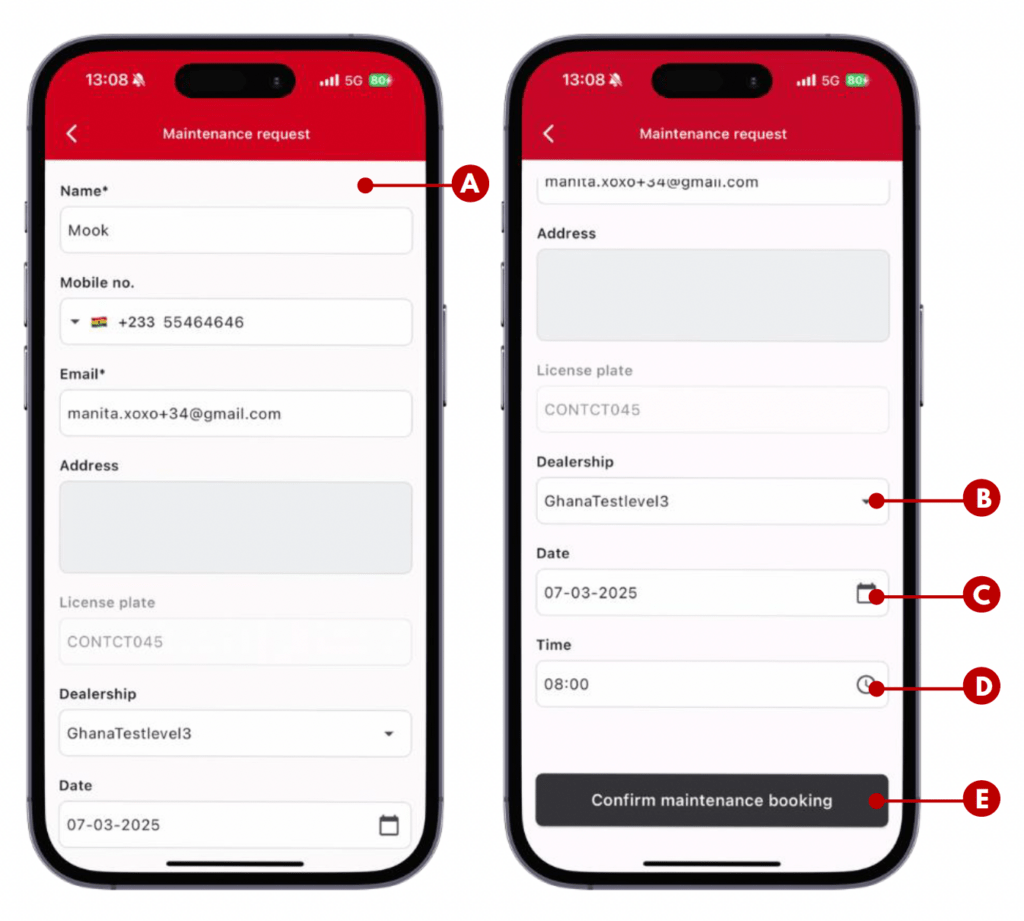
ABOUT MAINTENANCE REQUEST :

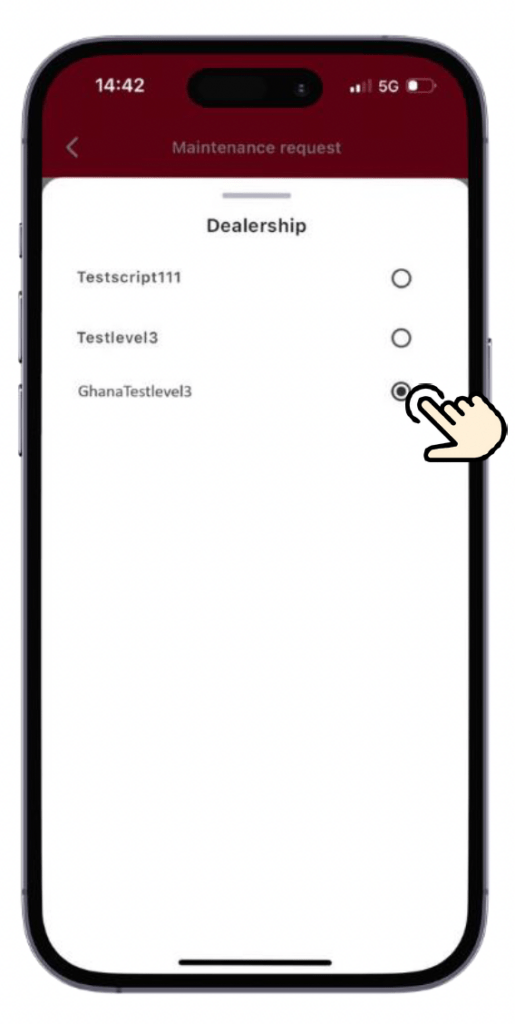
A. Contact Information: Fields to input your contact information. Name, phone number and email address will be automatically filled with your details. These fields are editable. If you wish to edit phone number, please select the country code. Then input your phone number without adding “+” or “0” as the first digit.

The address field is optional.

B. Dealership: You can select your preferred dealership. A list of dealerships is displayed when tapping the field.

C. Date: Field to input your desired date for maintenance.

D. Time: Field to input desired time for maintenance.

E. Confirm Maintenance Booking: Tap to confirm once your have completed all the required fields. The request will be sent to your dealer.

SWITCHING BETWEEN VEHICLES

SWITCHING BETWEEN VEHICLES

MAINTENANCE BOOKING STATUS (PART A)

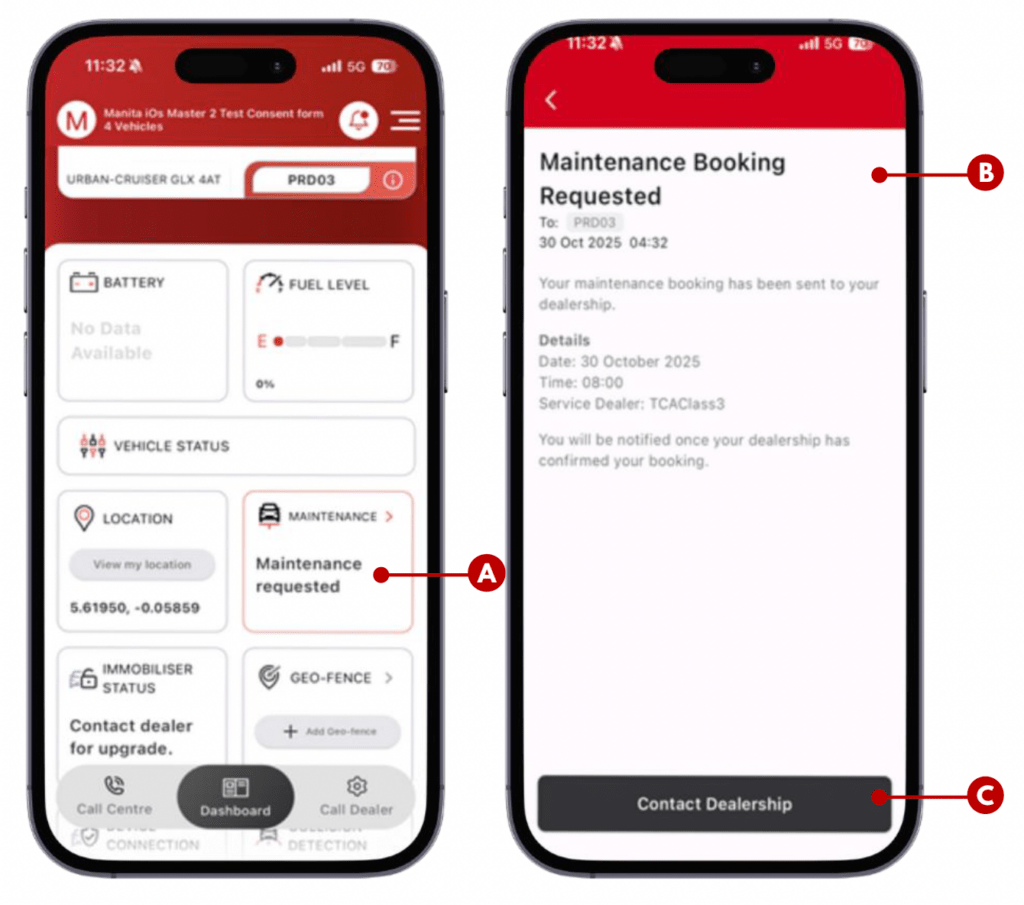
Status : Maintenance Booking Requested

This status shows that a booking request has been sent and is awaiting dealer confirmation.

A. Maintenance Requested Widget: The widget will display a status that the maintenance has been requested to dealership.

B. Booking Requested Notification: Notification inbox message to inform you that you have made the booking request and it has been sent to the dealer.

C. Contact Dealership Button: If you wish to edit the booking details or cancel your booking, contact your dealer by tapping this button.

Note: If your requested slot is unavailable, your dealer will contact you.

MAINTENANCE BOOKING STATUS (PART B)

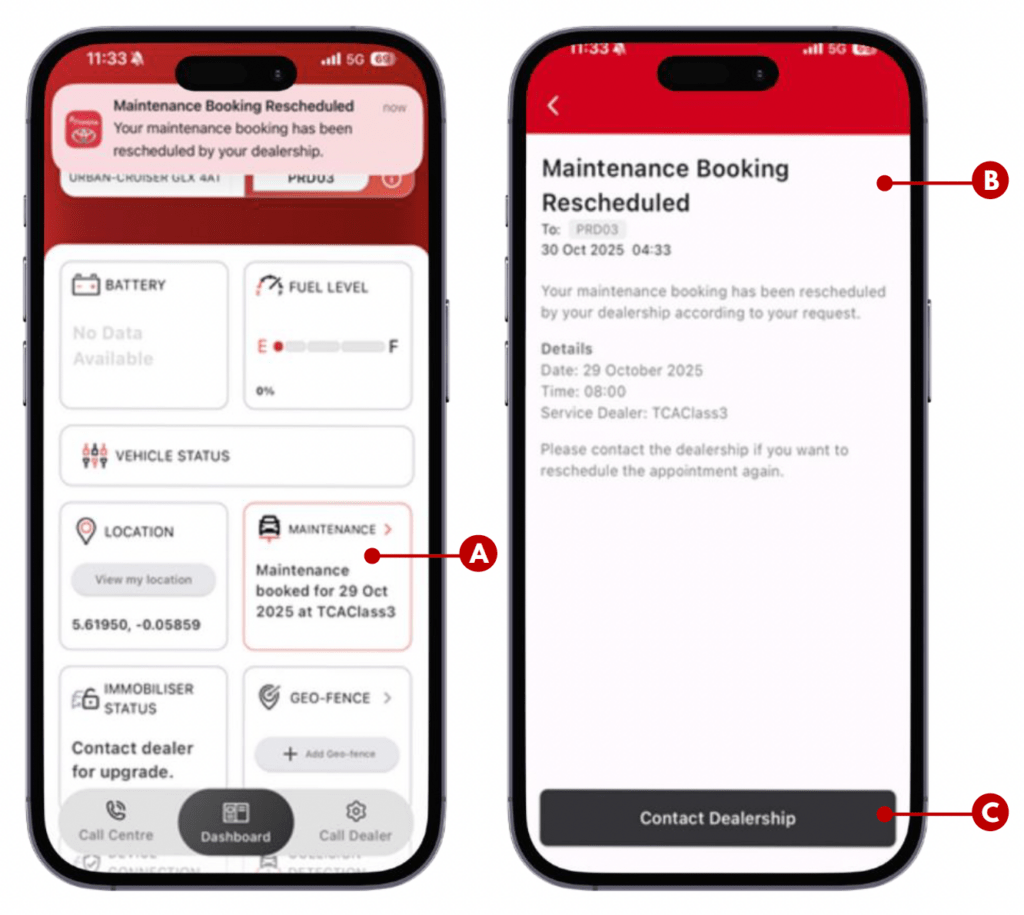
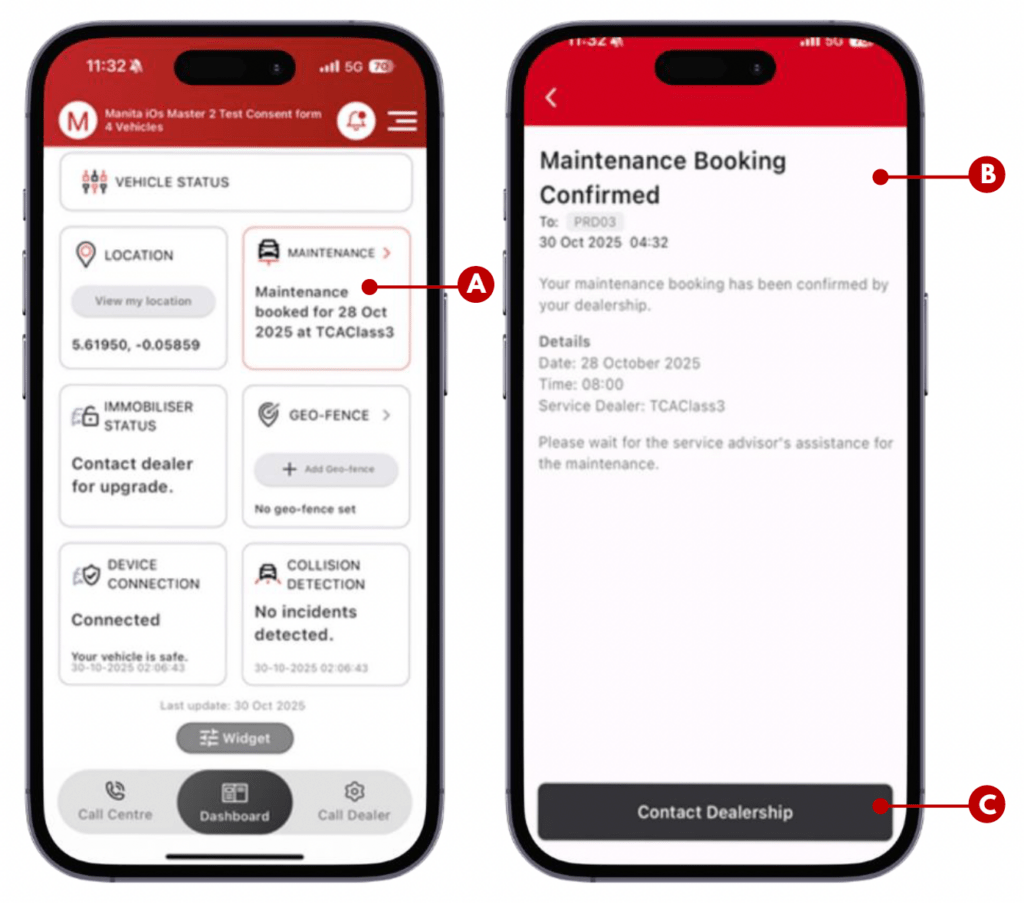
Status : Maintenance Booking Confirmed

This status shows that your maintenance booking has been confirmed by your dealer and your timeslot is secured.

A. Maintenance Confirmed Widget: The widget will display the date and dealer of your confirmed maintenance booking slot.

B. Booking Confirmed Notification: Notification inbox message to inform you that your booking request was confirmed by your dealer.

C. Contact Dealership Button: If you wish to edit the booking details or cancel your booking, contact your dealer by tapping this button.

MAINTENANCE BOOKING STATUS (PART C)

Status : Maintenance Booking Confirmed

This status shows that your maintenance booking has been confirmed by your dealer and your timeslot is secured.

A. Maintenance Confirmed Widget: The widget will display the date and dealer of your confirmed maintenance booking slot.

B. Booking Confirmed Notification: Notification inbox message to inform you that your booking request was confirmed by your dealer.

C. Contact Dealership Button: If you wish to edit the booking details or cancel your booking, contact your dealer by tapping this button.

MAINTENANCE BOOKING STATUS (PART D)

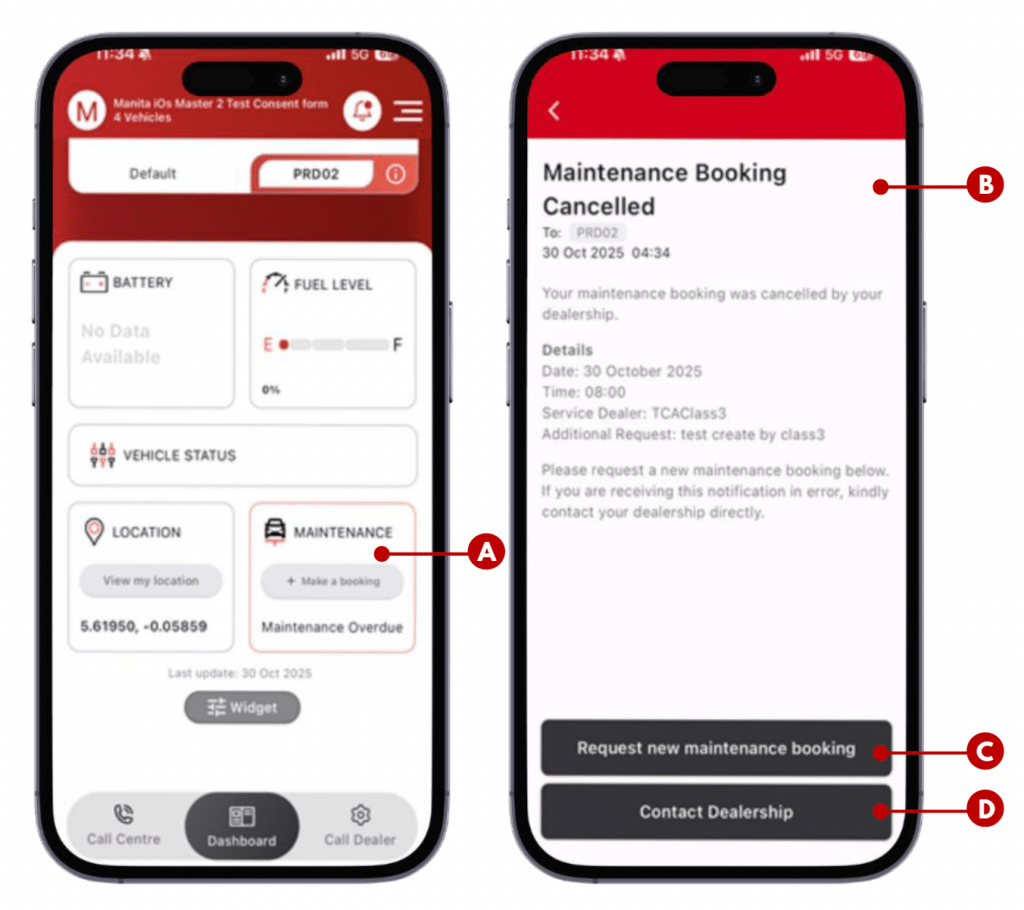
Status : Maintenance Booking Cancelled

This status shows that your maintenance booking has been cancelled by your dealer. You dealer should contact you to inform you that the selected timeslot is unavailable. In the event of a cancellation, please request a new booking.

A. Maintenance Booking Widget: Widget returns to normal state ( Next maintenance status with ‘Make a booking’ button) again after the booking was cancelled.

B. Booking Cancelled Notification: Notification inbox message to inform you that booking request was cancelled by dealer.

C. Request New Maintenance Booking Button: You can easily create and send a new maintenance booking request by tapping on the button.

D. Contact Dealership Button: You can contact your dealer by tapping this button.

MAINTENANCE BOOKING STATUS (PART E)

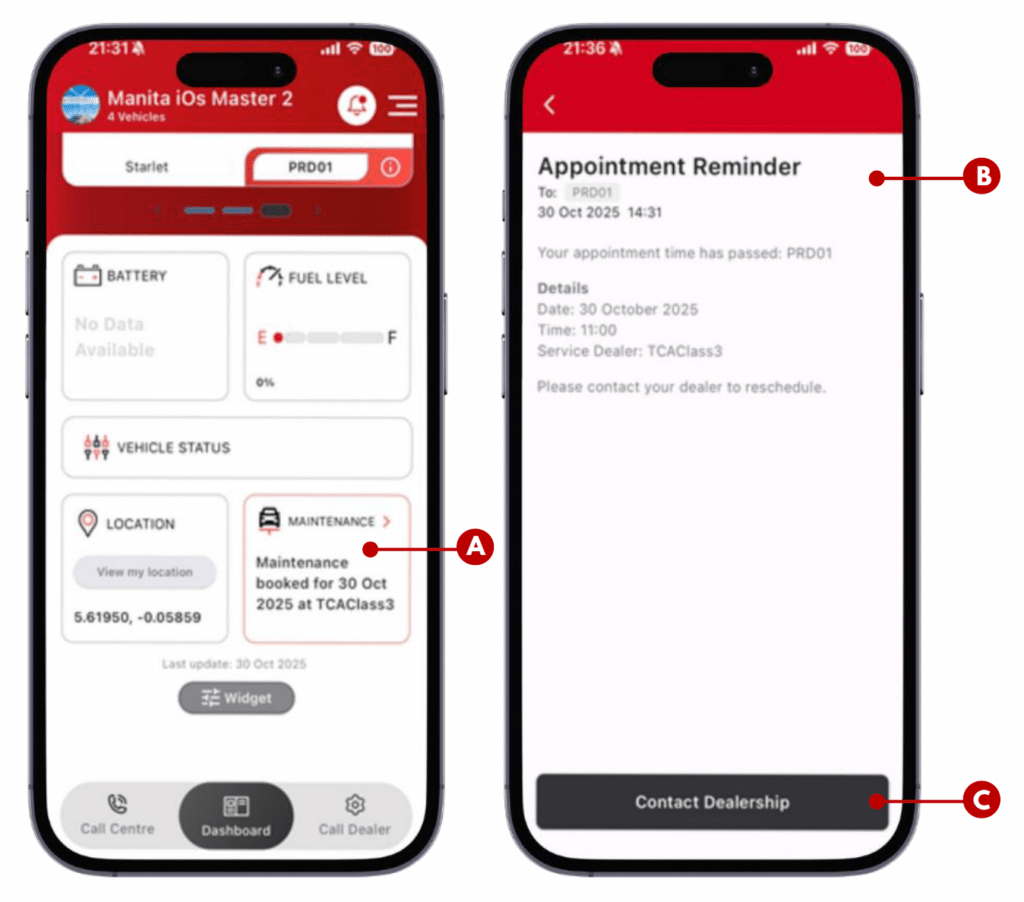
Status : Appointment Reminder

The application will send you an appointment reminder in case you have not arrived at the dealership 1 hour after your appointment time.

A. Maintenance Confirmed Widget: The widget will display the date and dealer of your confirmed maintenance booking slot.

B. Booking Confirmed Notification: Notification inbox message to inform you that your appointment time has passed

C. Contact Dealership Button: You can contact your dealer by tapping this button.

MAINTENANCE BOOKING STATUS (PART F)

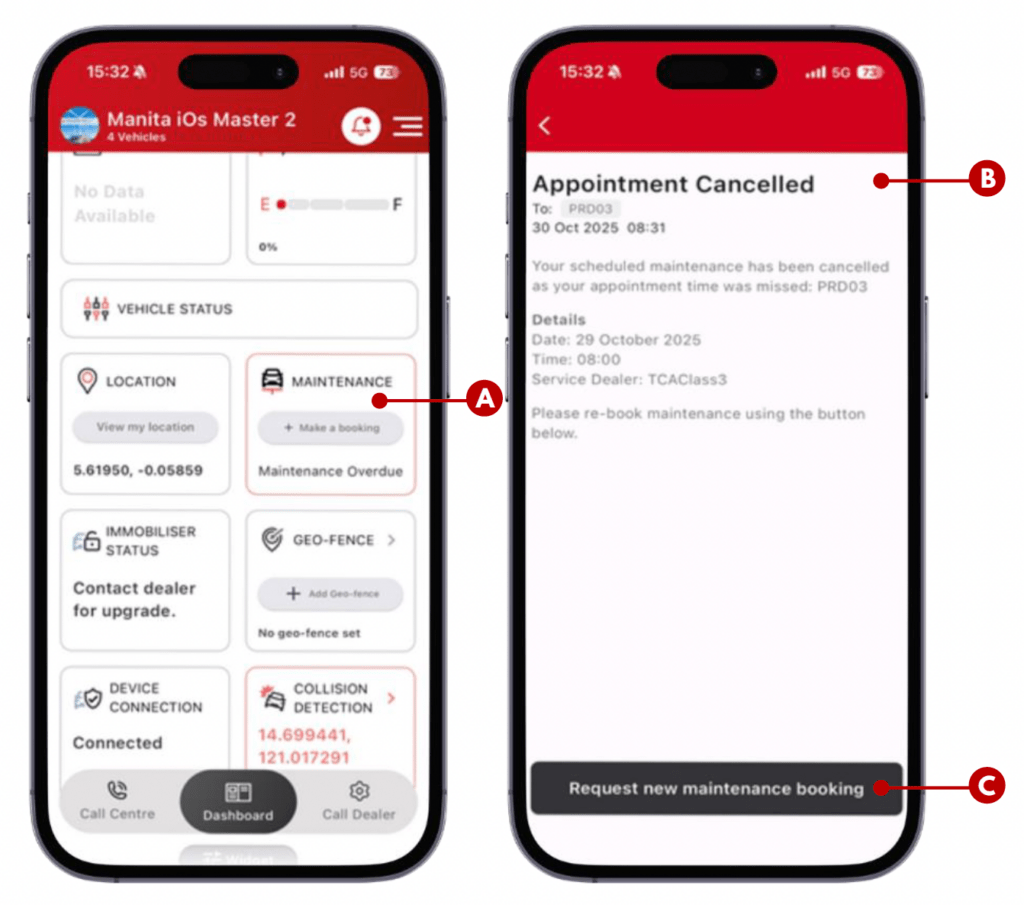
Status : Appointment Cancelled

This status shows that you have missed your appointment and your maintenance booking has been cancelled. In the event of a cancellation, please request a new booking.

A. Maintenance Booking Widget: Widget returns to normal state ( Next maintenance status with ‘Make a booking’ button) again after the booking was cancelled.

B. Booking Cancelled Notification: Notification inbox message to inform you that appointment was cancelled.

C. Request New Maintenance Booking Button: You can easily create and send a new maintenance booking request by tapping on the button.

MAINTENANCE BOOKING STATUS (PART G)

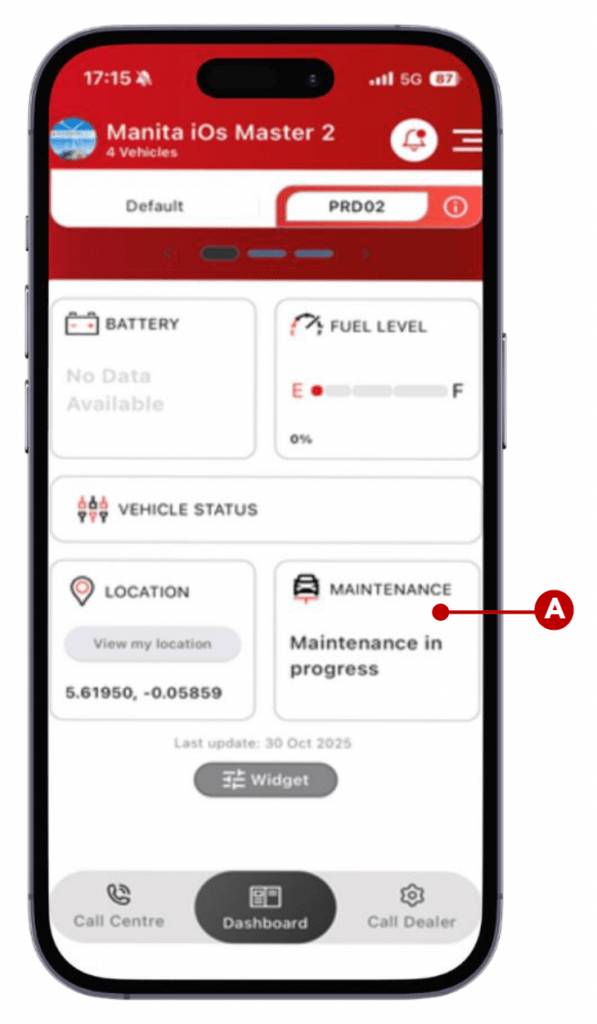
Status : Maintenance In Progress

This status shows that your vehicle maintenance has been started at the dealership and it is currently in progress.

A.Maintenance In Progress Widget:

Widget shows a status that the maintenance is in progress.

MAINTENANCE BOOKING STATUS (PART H)

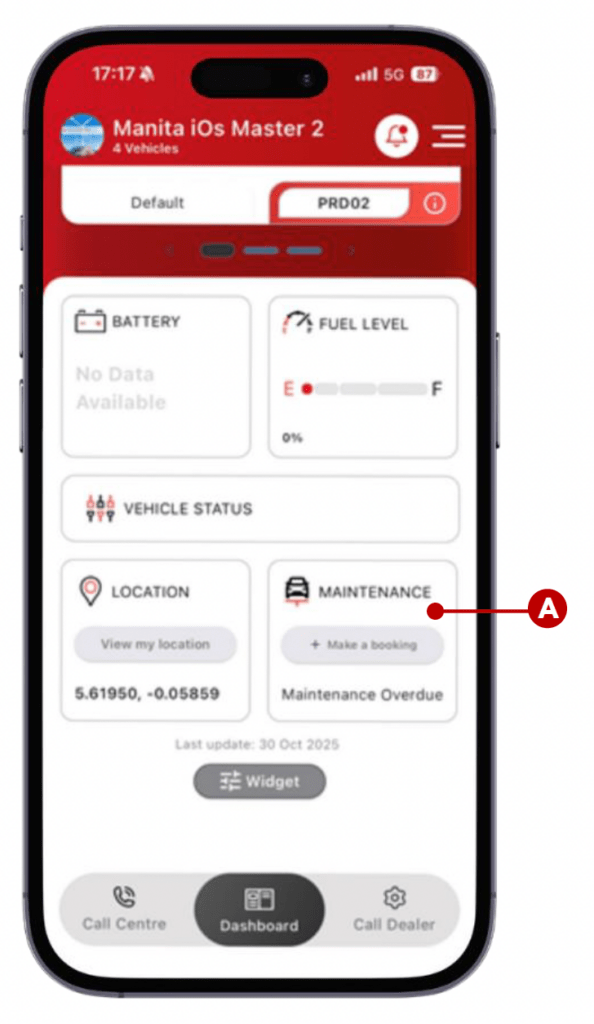
Status : Maintenance Completed

In the case that maintenance was completed, the maintenance widget will return to normal state.

A. Maintenance Booking Widget: Widget returns to normal state ( Next maintenance status with ‘Make a booking’ button) again after the maintenance was completed.

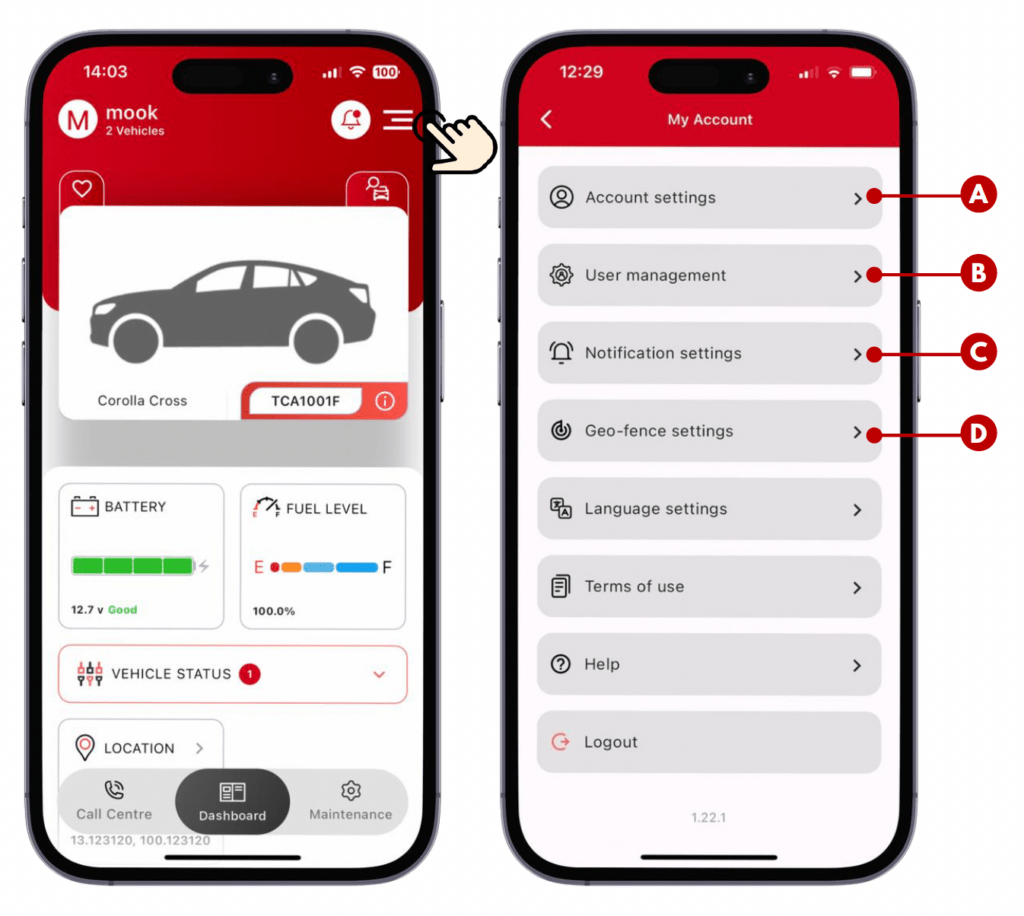
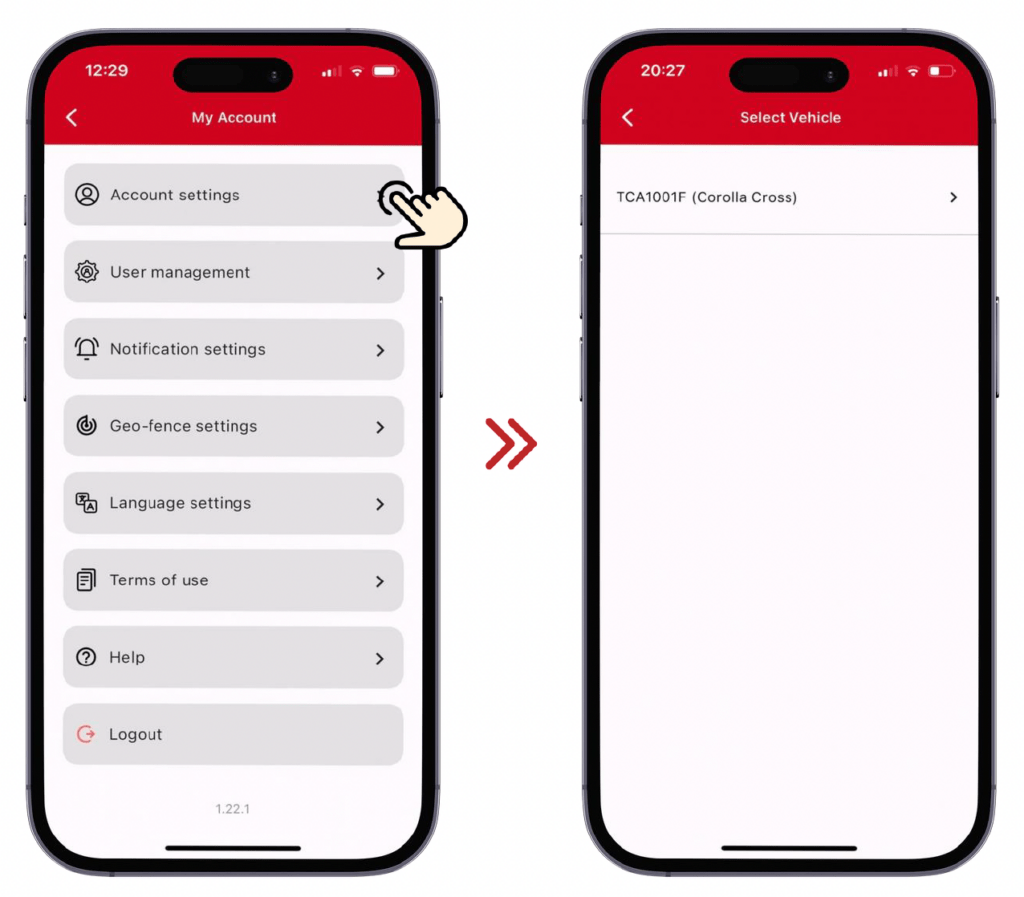
MY ACCOUNT MENU LIST (PART A)

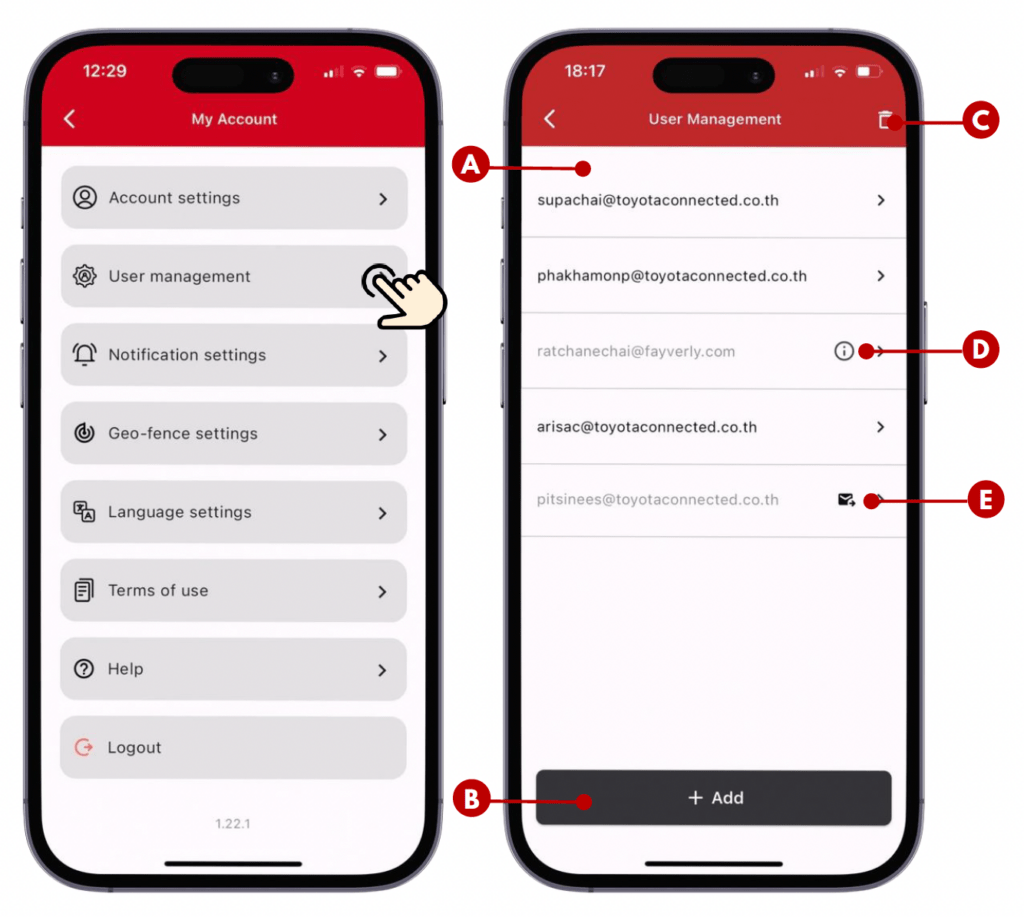
My Account menu can be accessed from dashboard hamburger menu icon. It lets you manage account and vehicle. Here’s a list of menus that allow you to do the setting for your account and vehicle:

A. Account Settings: You can add and edit your account information, such as profile picture, email, and passwords, here.

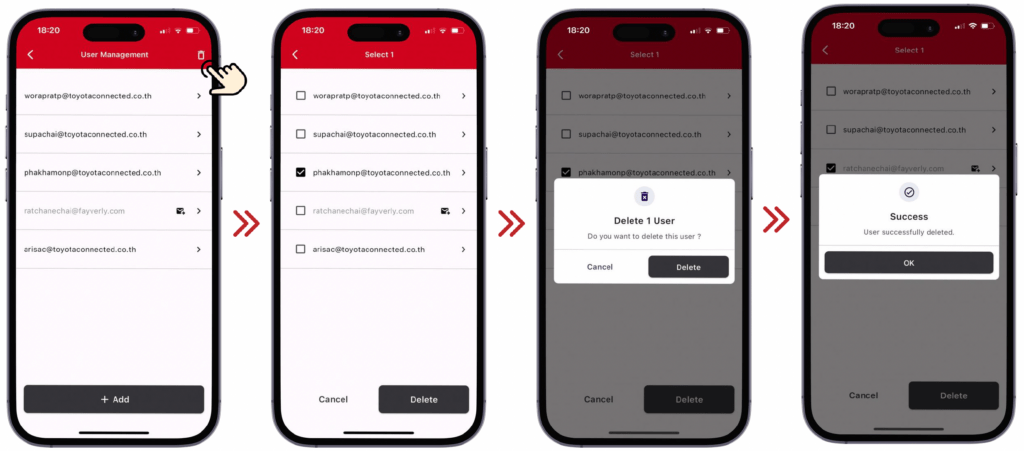
B. User Management: You can add a member user and share vehicle information with them by managing it here.

C. Notification Settings: Turn notification on-off as you desired.

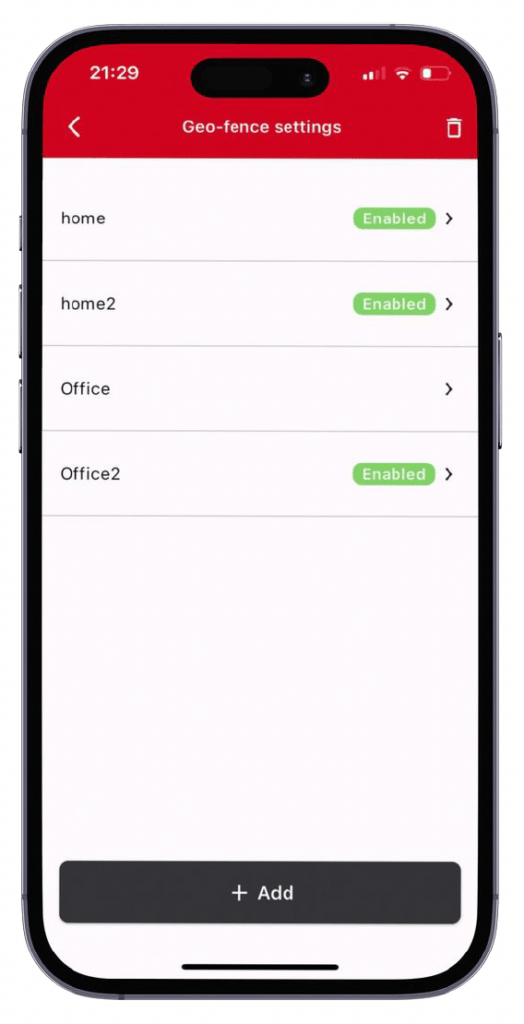
D. Geo-fence Settings: Create Geo-fence for your vehicle as necessary. So our application can notify you when the vehicle enter or exit Geo-fence area you have created.

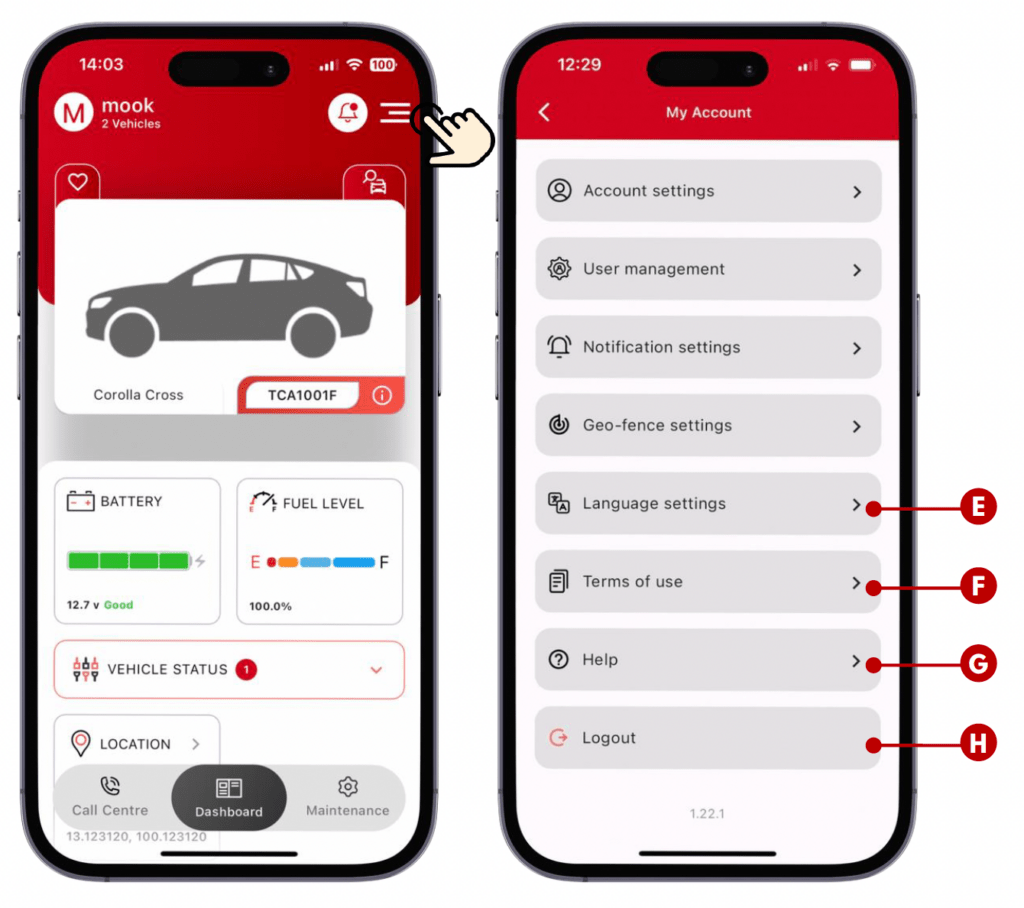
MY ACCOUNT MENU LIST (PART B)

E. Language Settings: Change application language to your preference. English and French are available.

F. Terms of Use: You can revisit our latest Terms & Privacy Policy anytime you want.

G. Help: If you need help in using the application, our help centre might have the information you are looking for.

H. Logout: You can logout from the application here.

Note: For member user, only A, E~H menu are available.

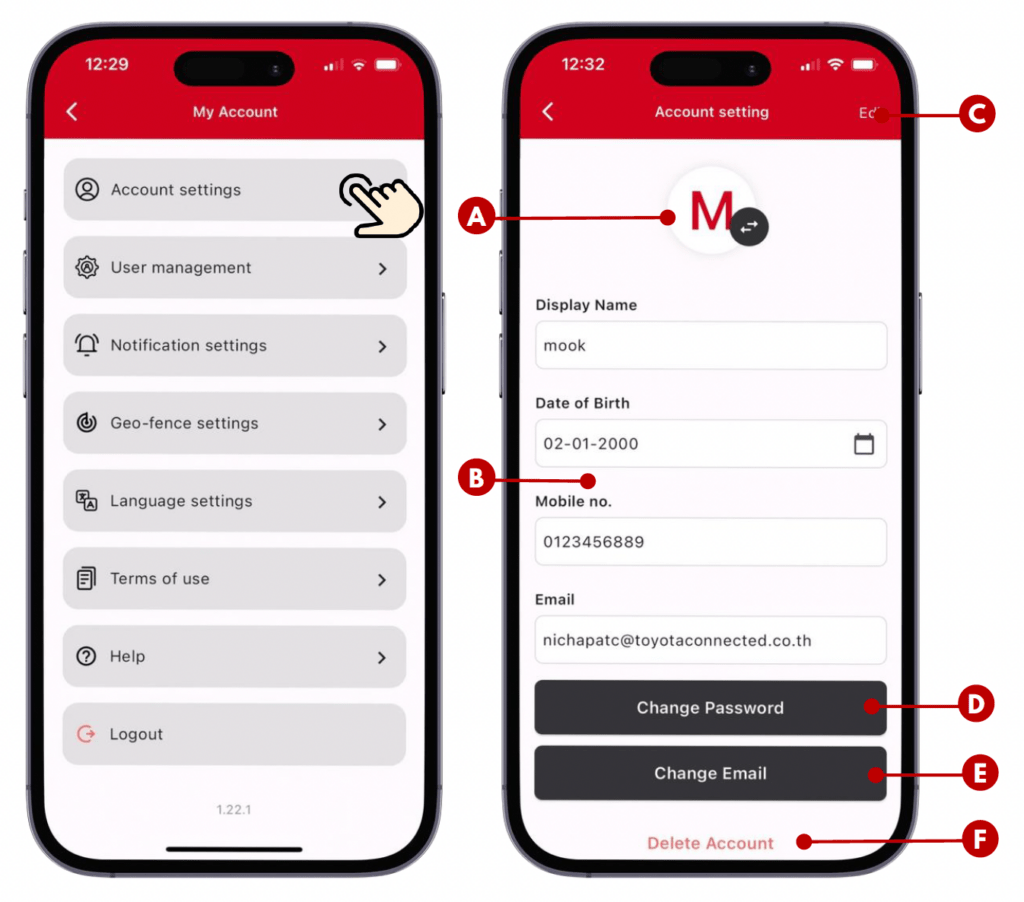
HOW TO SEE AND EDIT ACCOUNT INFO

You can see and update your account information here.

ABOUT ACCOUNT SETTINGS :

A. Profile Picture: You can change account profile picture by tapping on the black switching icon.

B. Account Information Field: Your account information display here.

C. Edit: You can edit Display Name, Date of Birth and Mobile no. by tapping here. And input your new information.

D. Change Password: The button allows you to set new password for your account.

E Change Email: You can change email register for your account by tapping this button and input new email.

F. Delete Account: You can delete the account if you no longer need to use the application. By entering password, you’ll confirm the deletion. But please take note that you won’t be able to access any vehicle information and application function again, unless you are reinvited by dealer or master user.

HOW TO SHARE VEHICLE WITH MEMBER USER (PART A)

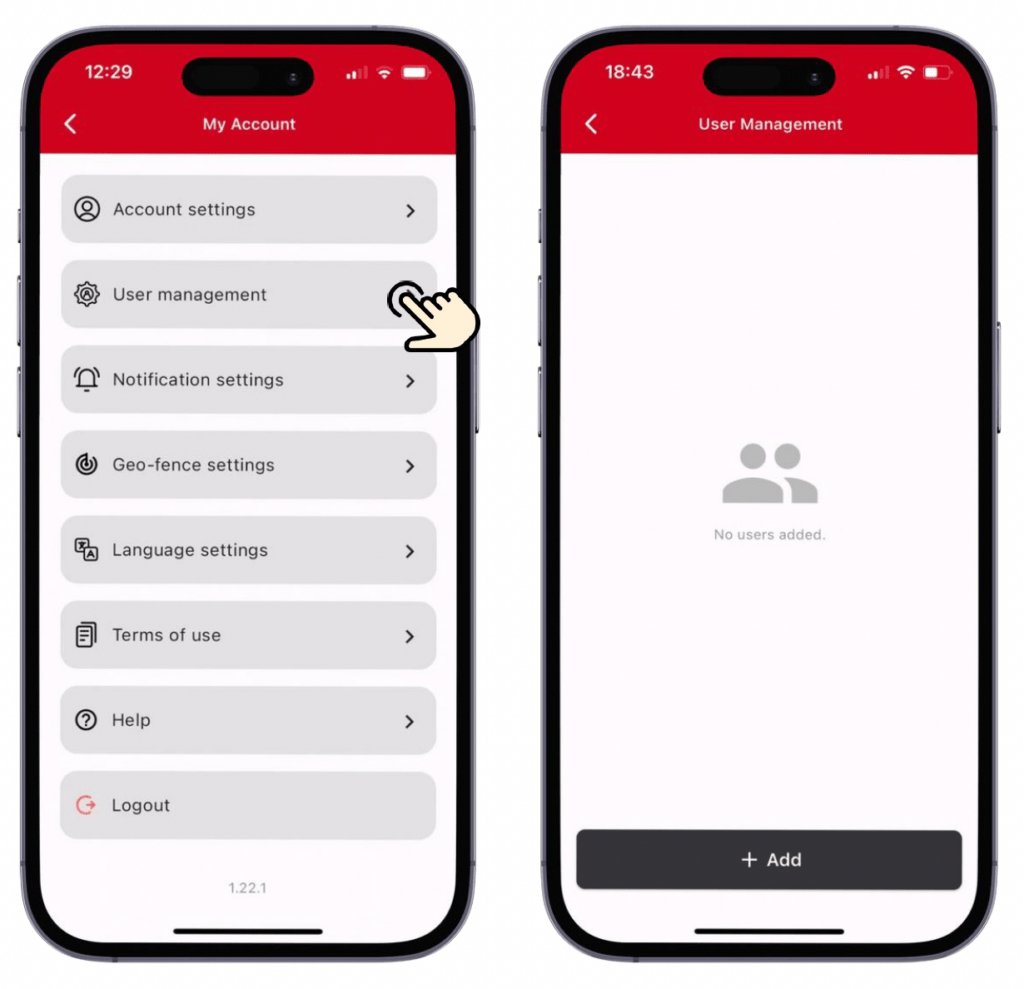
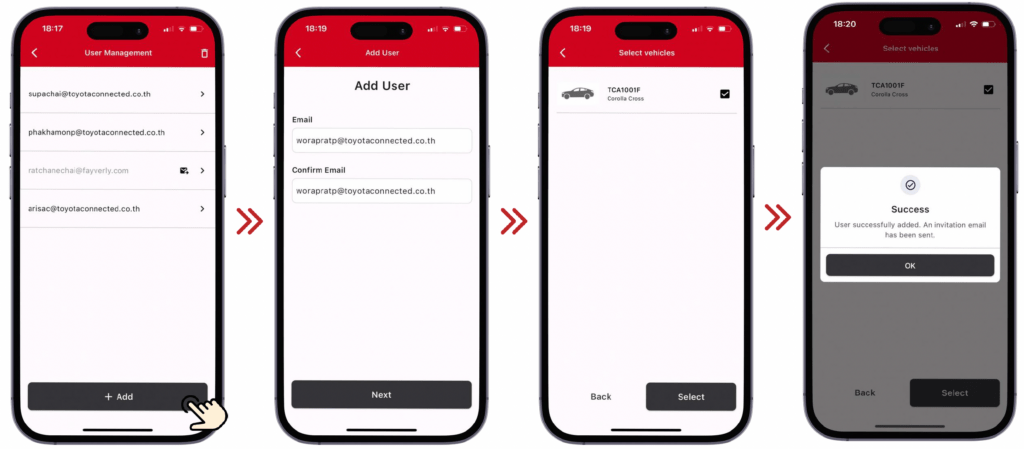
As an owner of the vehicle, you can share your vehicle information to others. By adding member to your account, those member users will receive invitation email to download the app and register to use the app. Then the member users can see the shared vehicle information. Here’s how to do it:

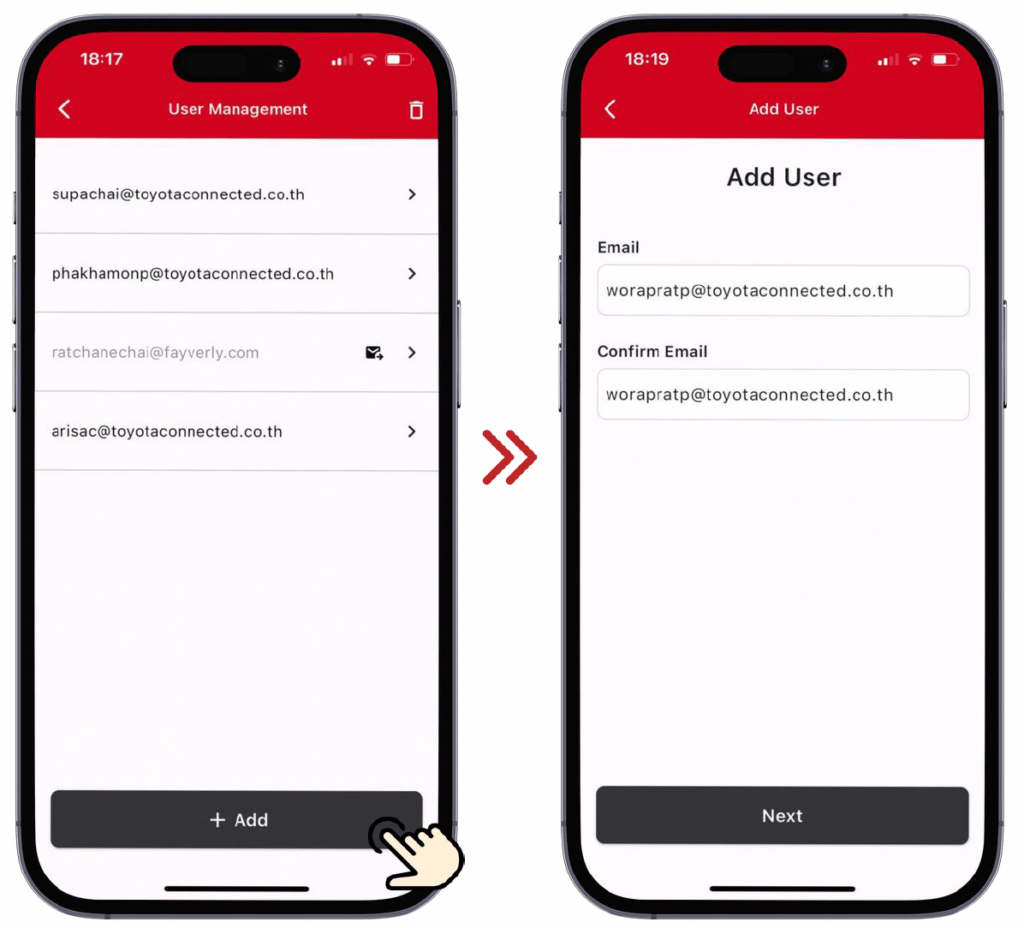
1. User Management Menu: Go to User Management on My Account menu.

2. Add Member User: Tap “Add” button to input your member’s email.

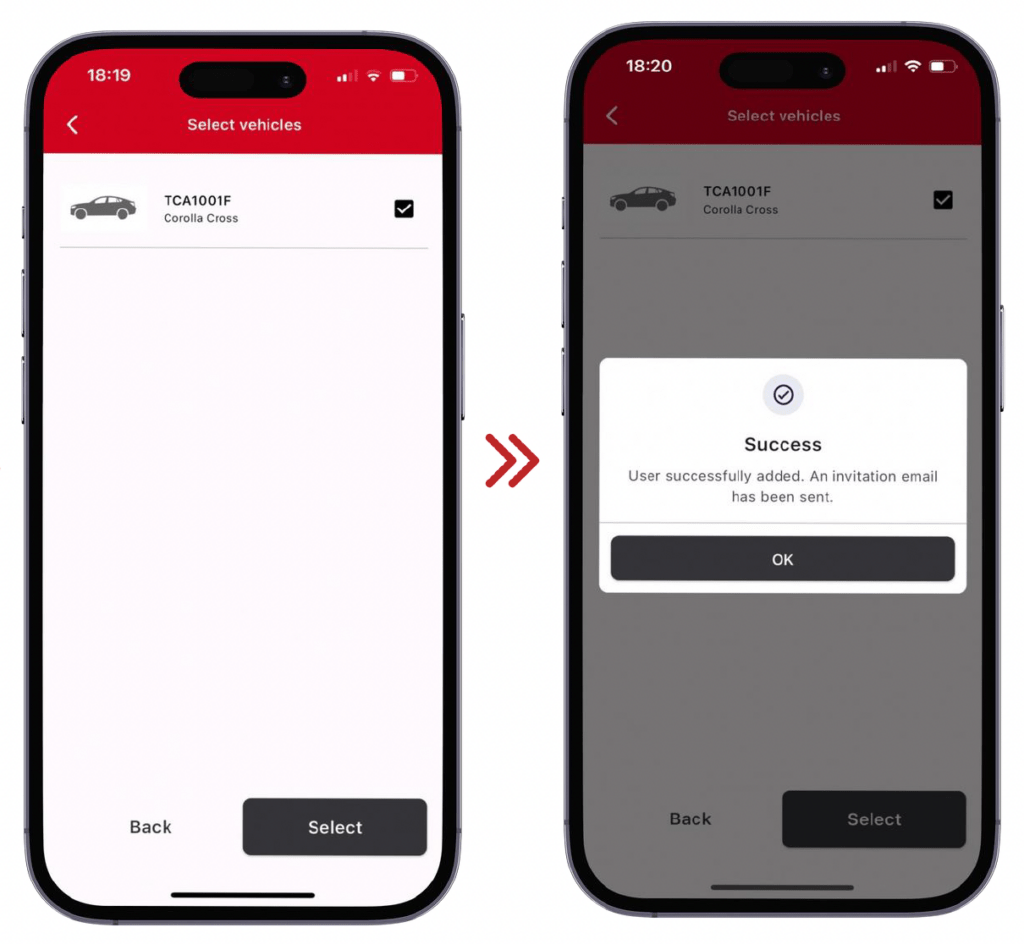
3. Select Vehicle to Share: Select at least 1 vehicle you want to share information with your member. Tap “Select” to confirm vehicle sharing.

4. Member Activate Their Account: Now wait for your member to check invitation email and activate their account. Then your vehicle information and staus are shared!

HOW TO SHARE VEHICLE WITH MEMBER USER (PART B)

ABOUT USER MANAGEMENT :

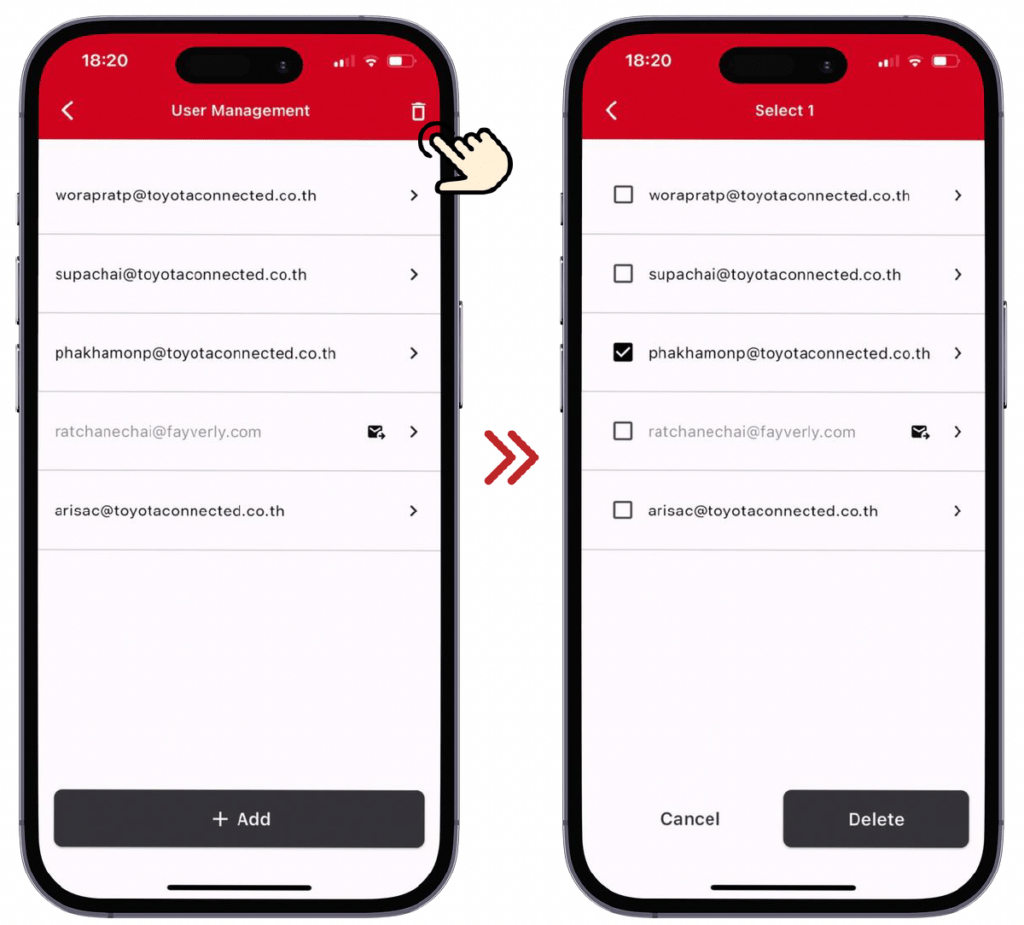
A. Member User List: Member users that you have added are listed here

B. Add button: Tap to start adding new member user. It will lead to a screen for you to input member’s email.

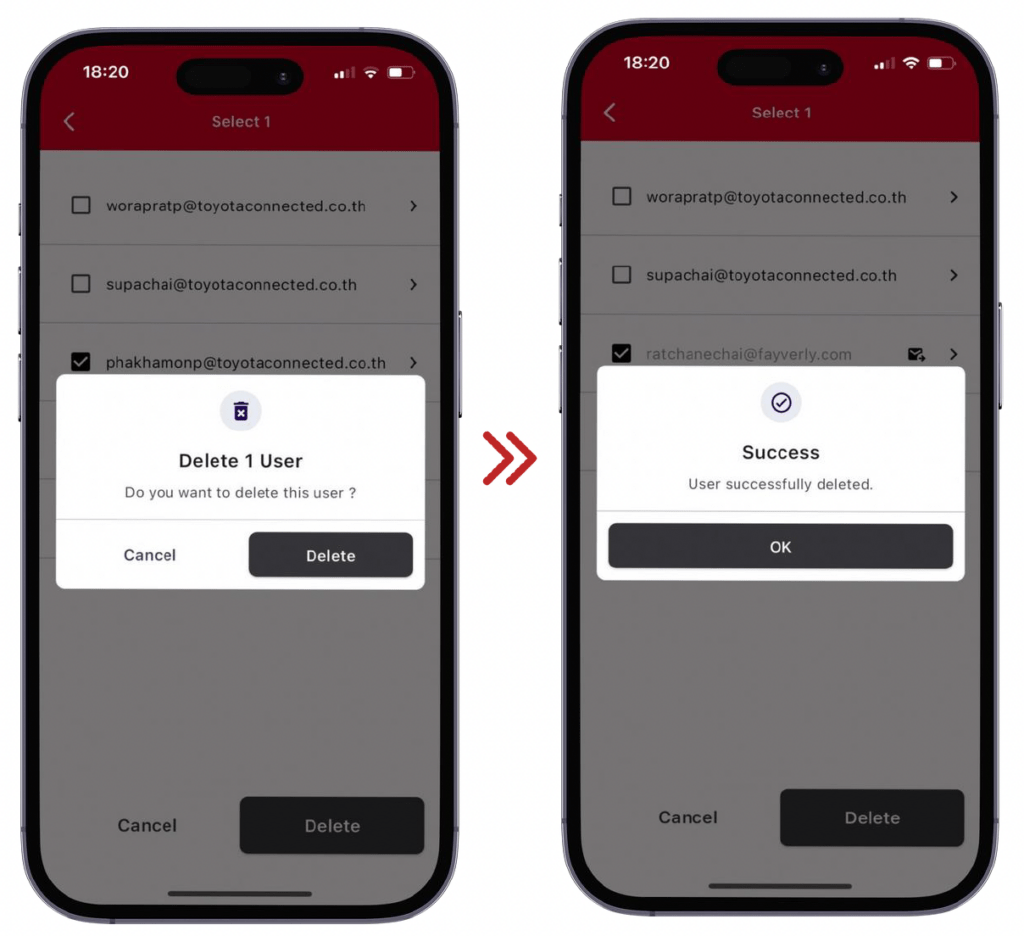
C. Bin: You can remove member users to stop sharing vehicle information with them.
D. Information Icon: It means this member user has not activate their account yet.
E. Invitation Resend Icon: If this member users haven’t active their account after some time has passed, you can re-send the invitation by tapping on the icon.

HOW TO SHARE VEHICLE WITH MEMBER USER (ADD)

HOW TO SHARE VEHICLE WITH MEMBER USER (DELETE)

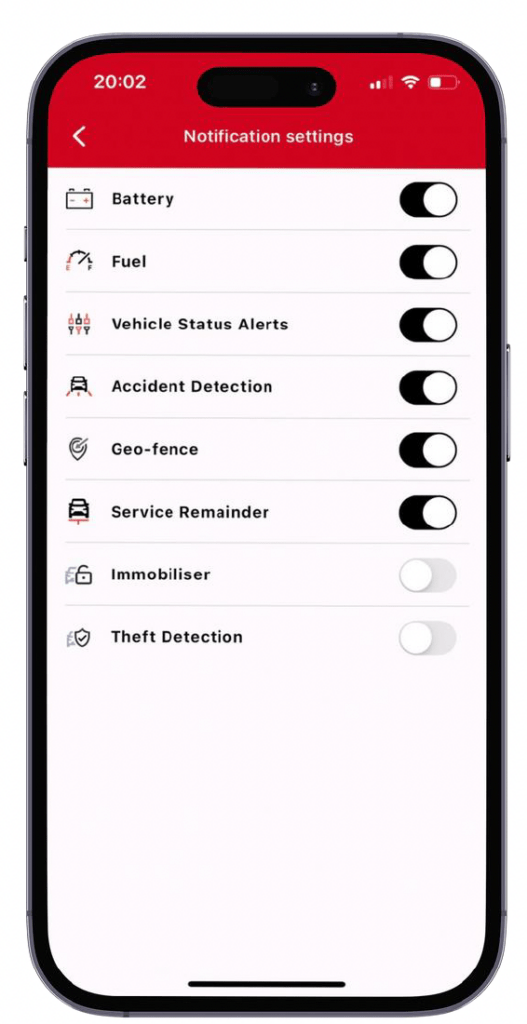
NOTIFICATION SETTINGS

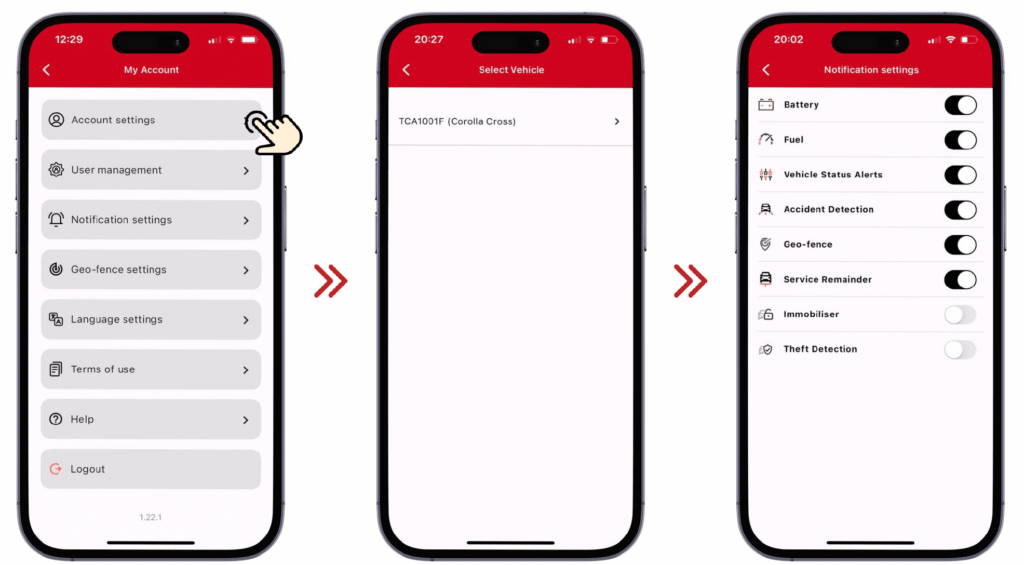
You can turn push notification on and off according to your preference.

1. Notification Settings Menu: Go to Notification settings on My Account menu.

2. Select Vehicle: List of your owned vehicles will display. You can select which vehicle the setting is for.

3. Turn Notification On-Off: The toggle next to each notification types allow you to easily turn notification on-off by tapping on it. The setting will automatically save when you turn the toggle on-off.

ABOUT NOTIFICATION SETTINGS :

A. Notification Type: All notification types are listed here.

B. On-Off Toggle : Tapping on the toggle to turn notification on and off.

Shows the turn off status

Shows the turn on status

NOTIFICATION SETTINGS

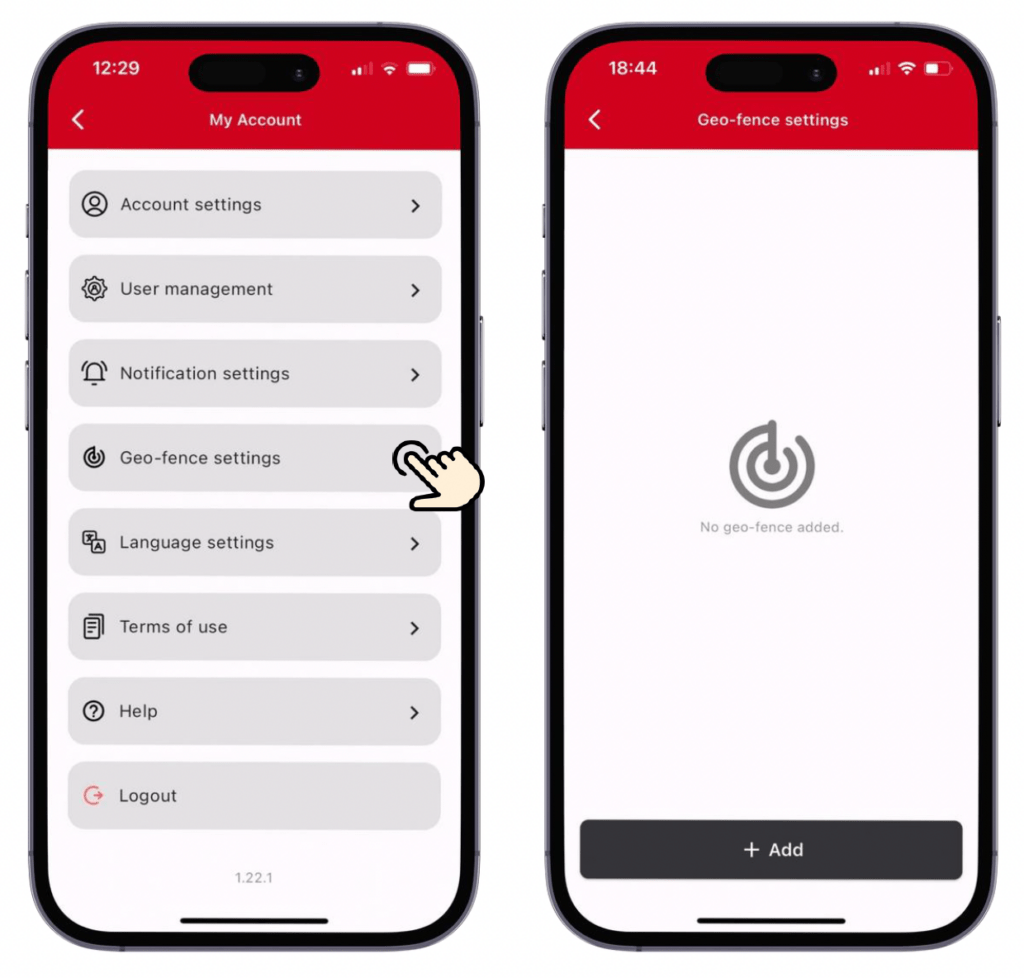
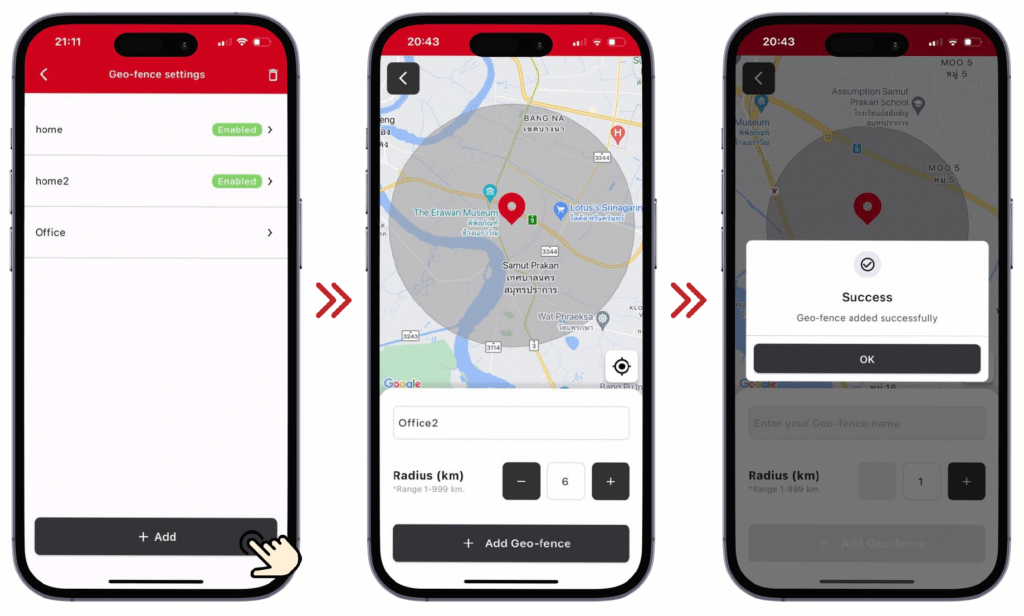
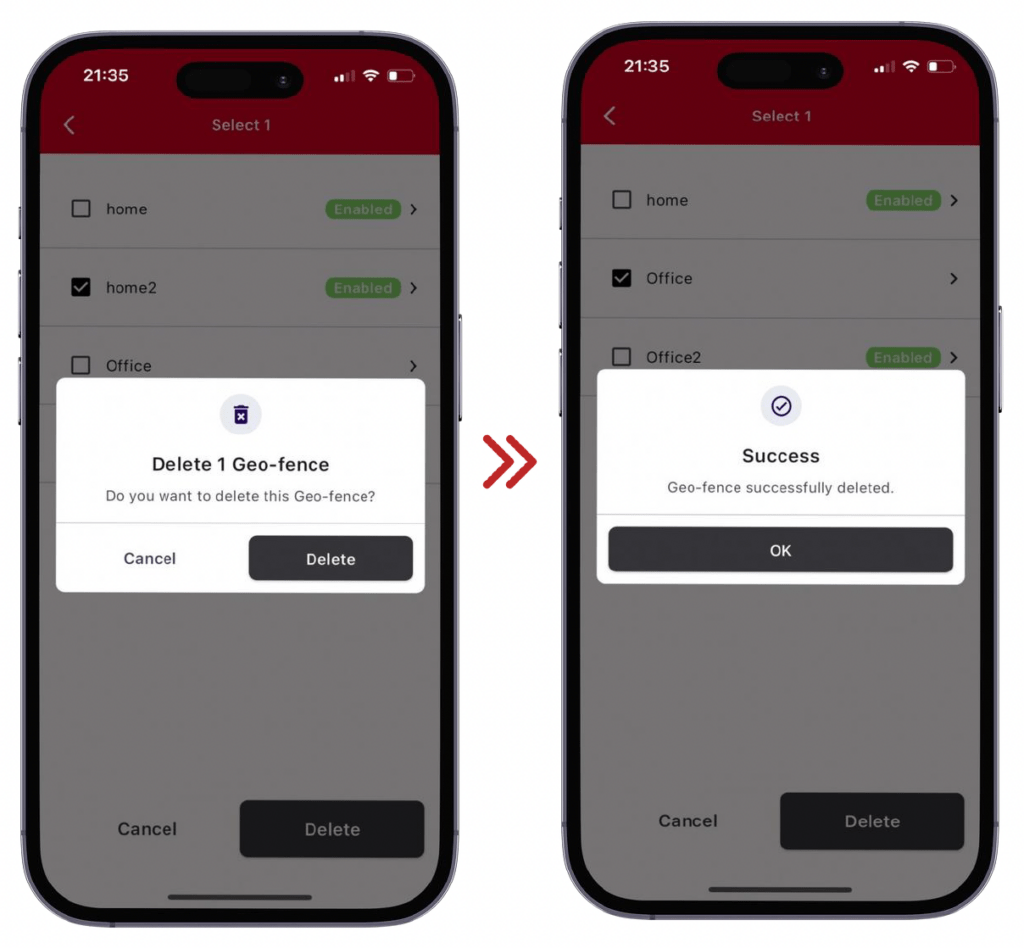
HOW TO SET UP GEO-FENCE FOR VEHICLE (PART A)

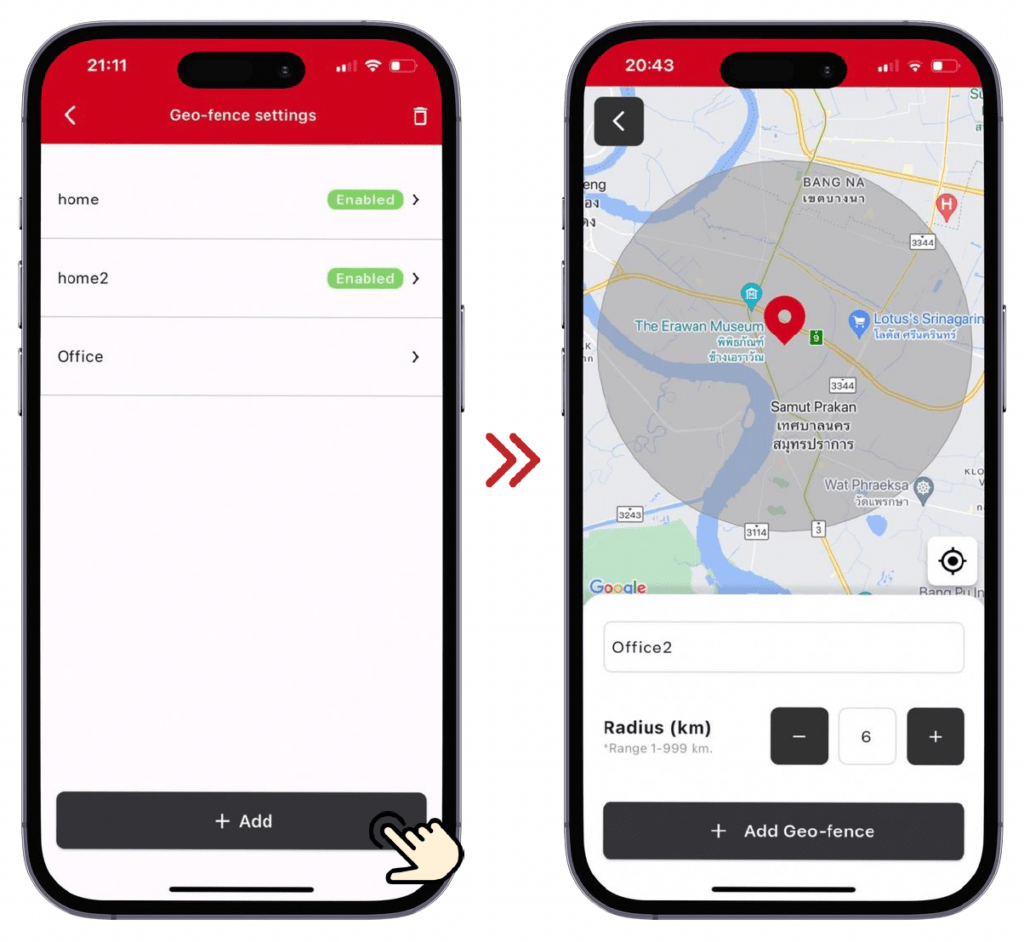
You can create Geo-fence area to get a notification once the vehicle enter or exit the area you have set. Here’s how to create Geo-fence:

1. Geo-fence Settings Menu: Go to Geo-fence settings on My Account menu.

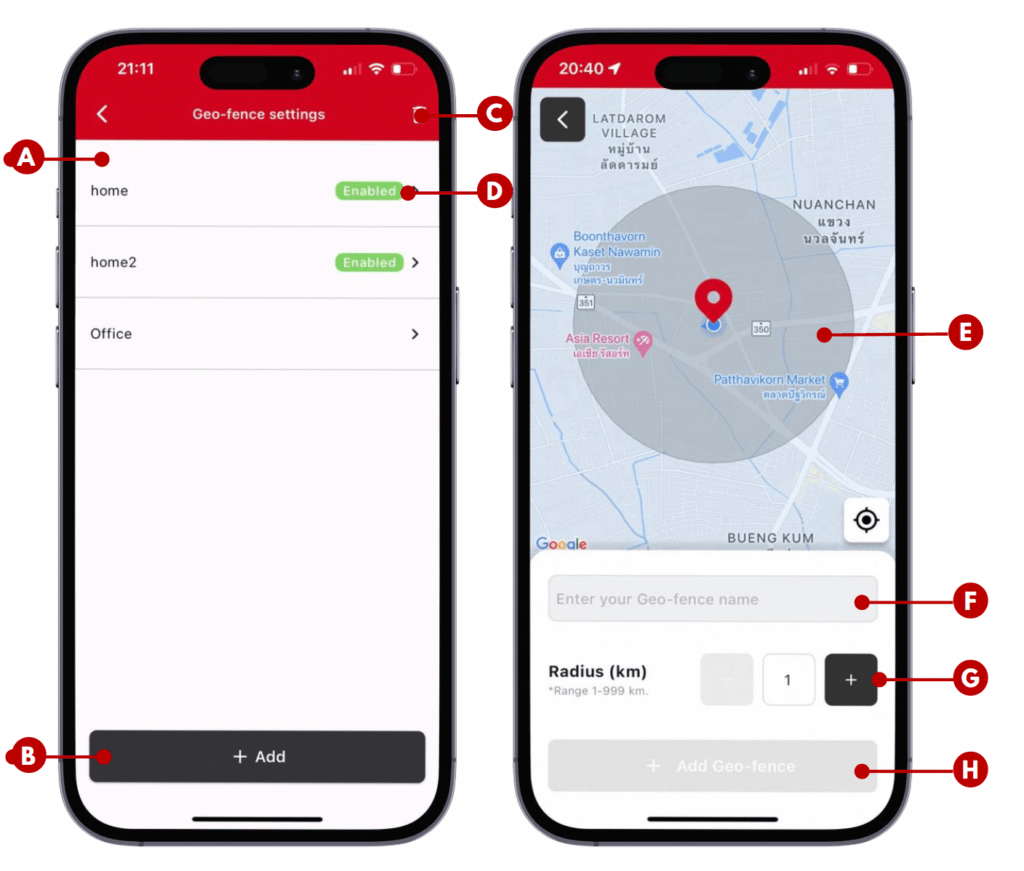
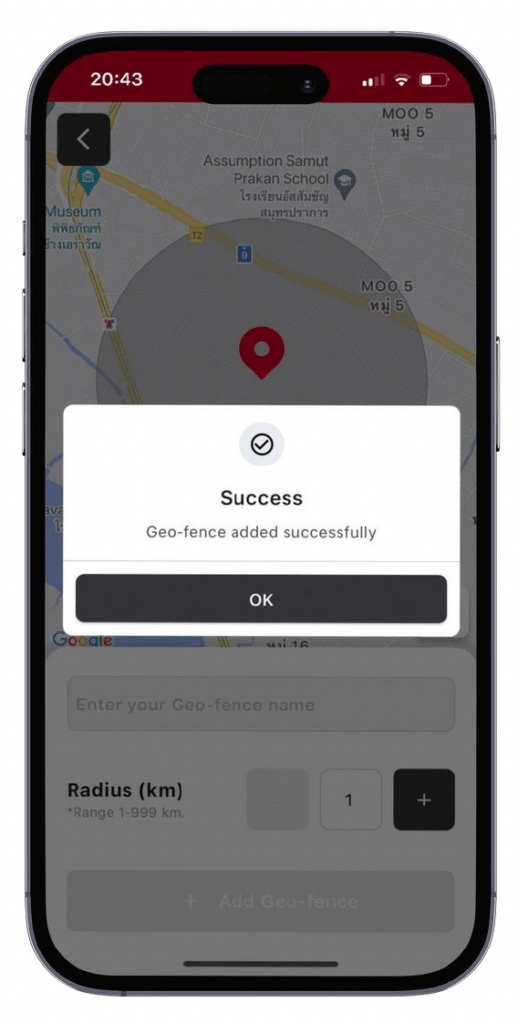
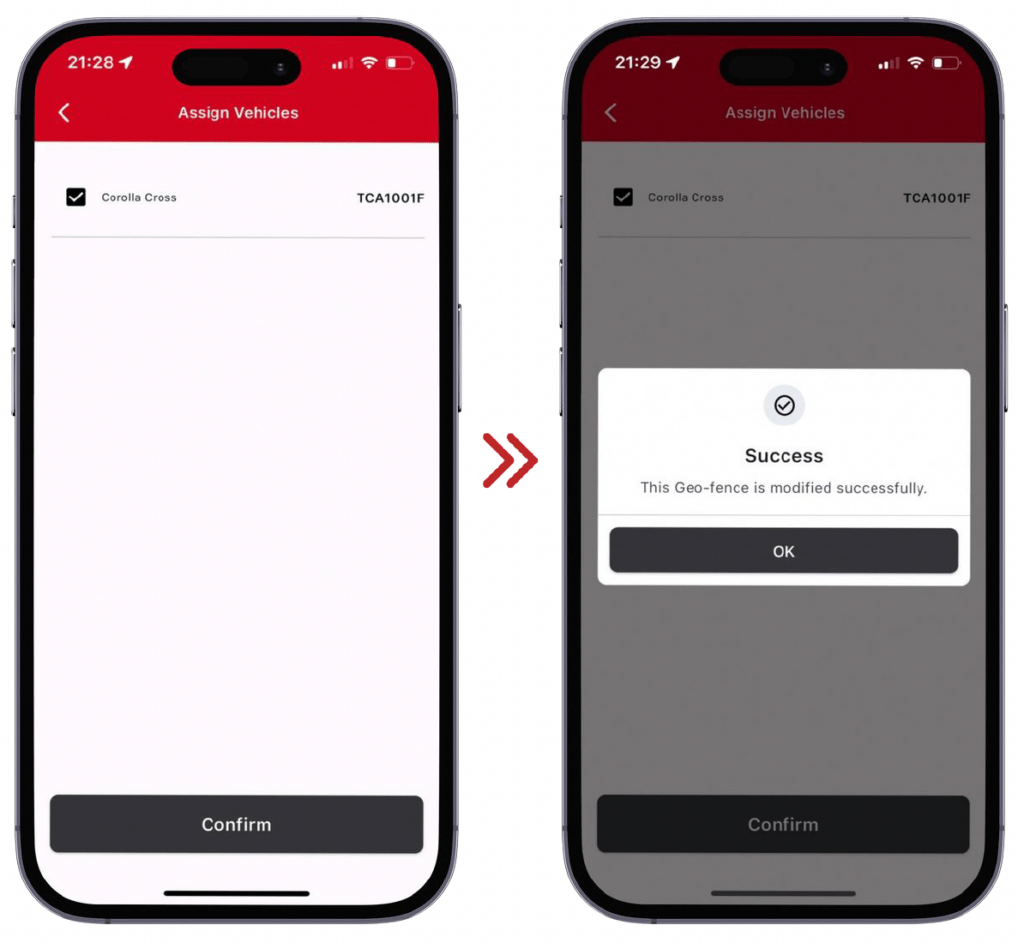
2. Create Geo-fence: Tap “Add” button; give a name to your Geo-fence. Then pin the location that you want to set Geo-fence and input the radius to specify distance of the Geo-fence.

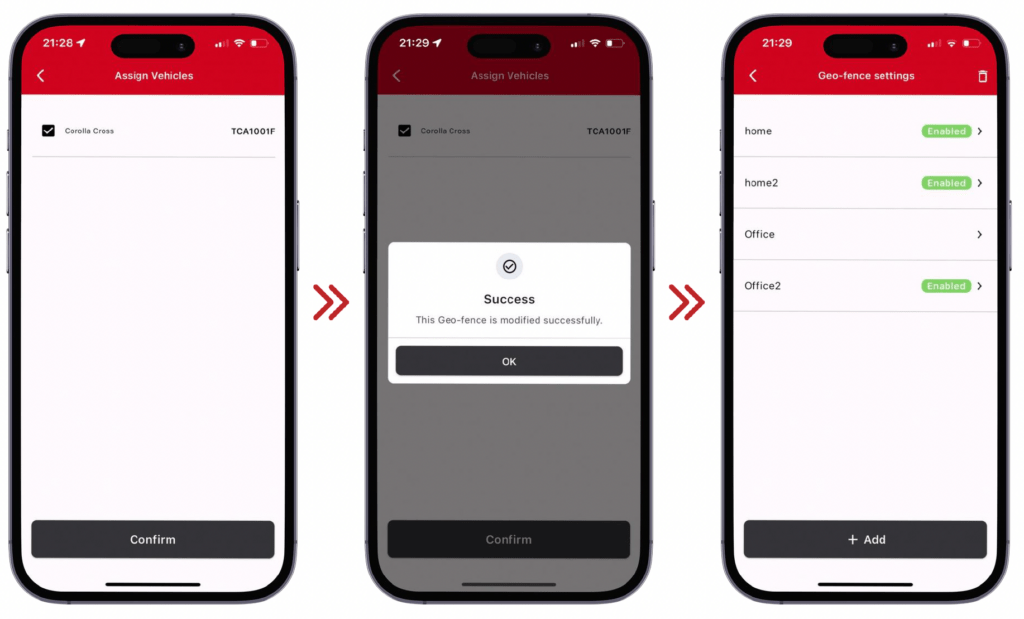
3. Assign Vehicle: Select vehicle that you want the Geo-fence to apply to. Then confirm the assignment. You can come back to assign the vehicle later. And vehicle unassigned is possible as well.

HOW TO SET UP GEO-FENCE FOR VEHICLE (PART B)

You can create Geo-fence area to get a notification once the vehicle enter or exit the area you have set. Here’s how to create Geo-fence:

1. Geo-fence Settings Menu: Go to Geo-fence settings on My Account menu.

2. Create Geo-fence: Tap “Add” button; give a name to your Geo-fence. Then pin the location that you want to set Geo-fence and input the radius to specify distance of the Geo-fence.

3. Assign Vehicle: Select vehicle that you want the Geo-fence to apply to. Then confirm the assignment. You can come back to assign the vehicle later. And vehicle unassigned is possible as well.

HOW TO SET UP GEO-FENCE FOR VEHICLE (ADD)

HOW TO SET UP GEO-FENCE FOR VEHICLE (ADD)

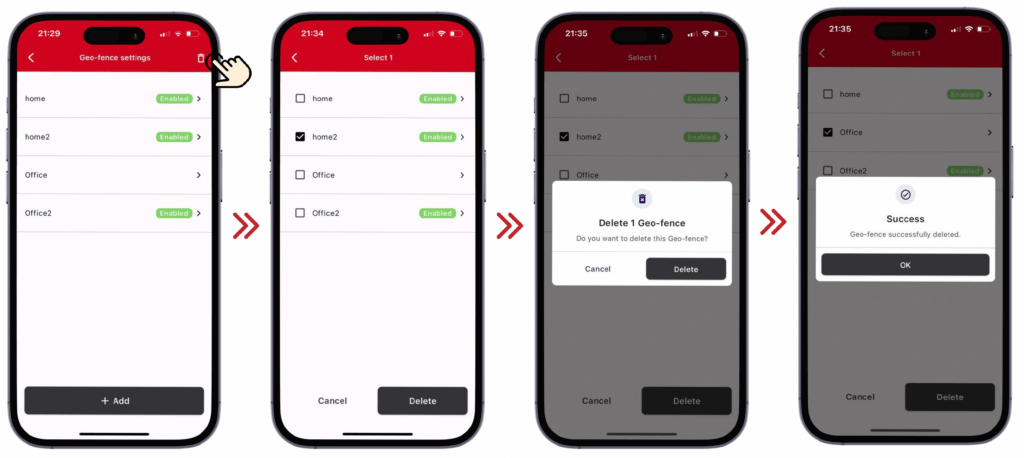
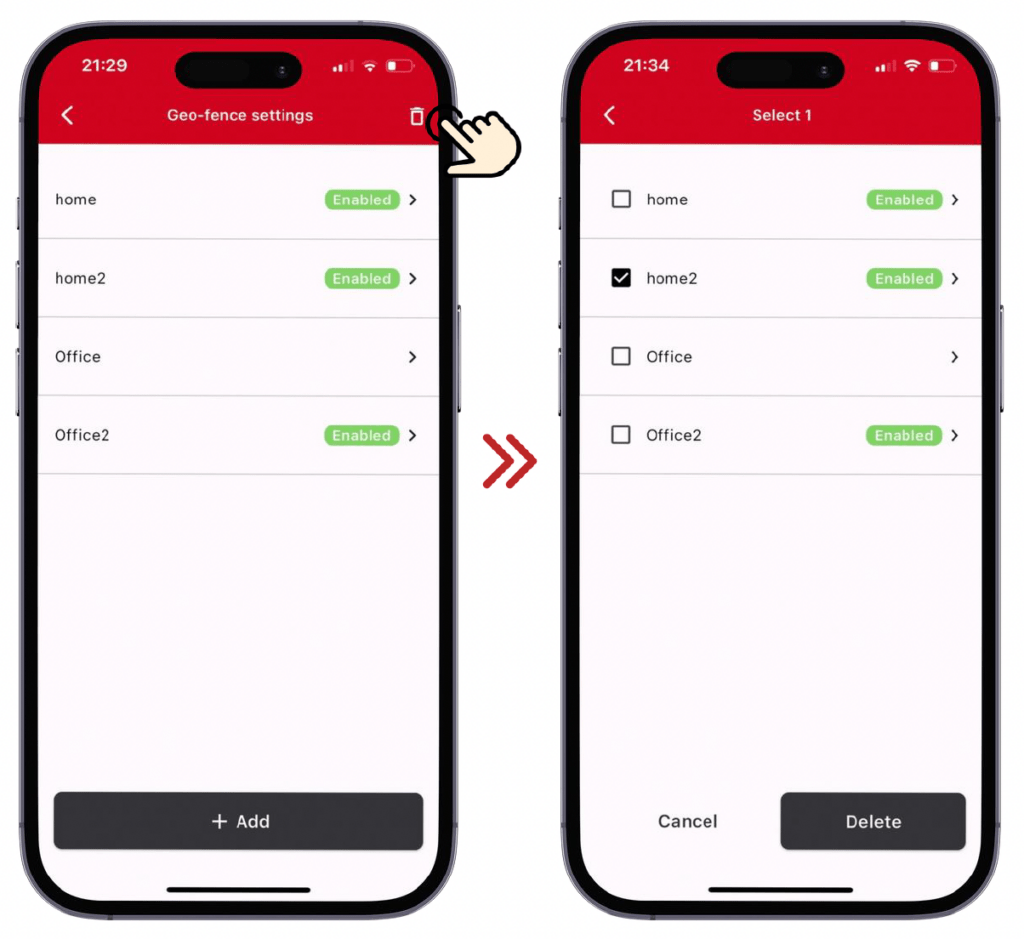
HOW TO SET UP GEO-FENCE FOR VEHICLE (DELETE)

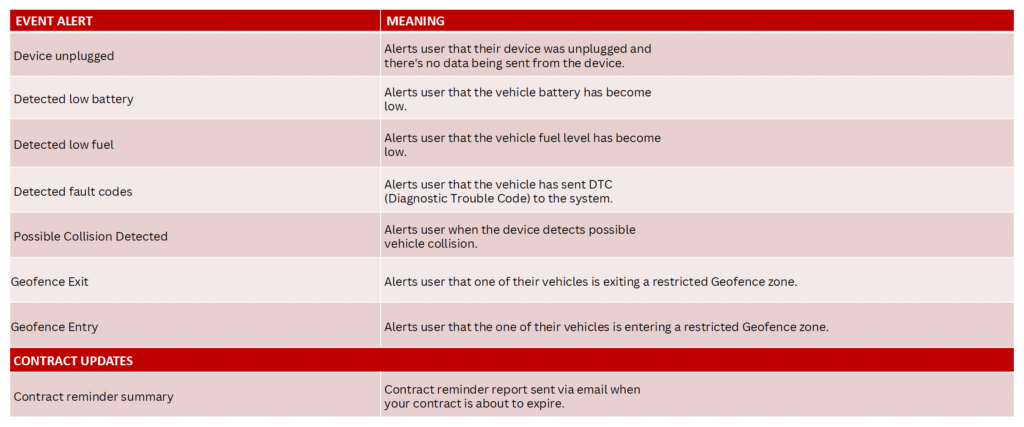
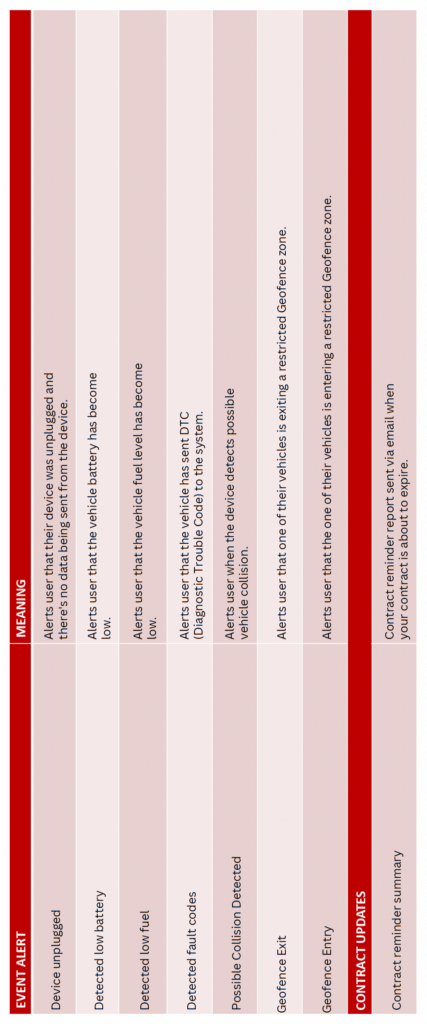
NOTIFICATIONS MEANINGS

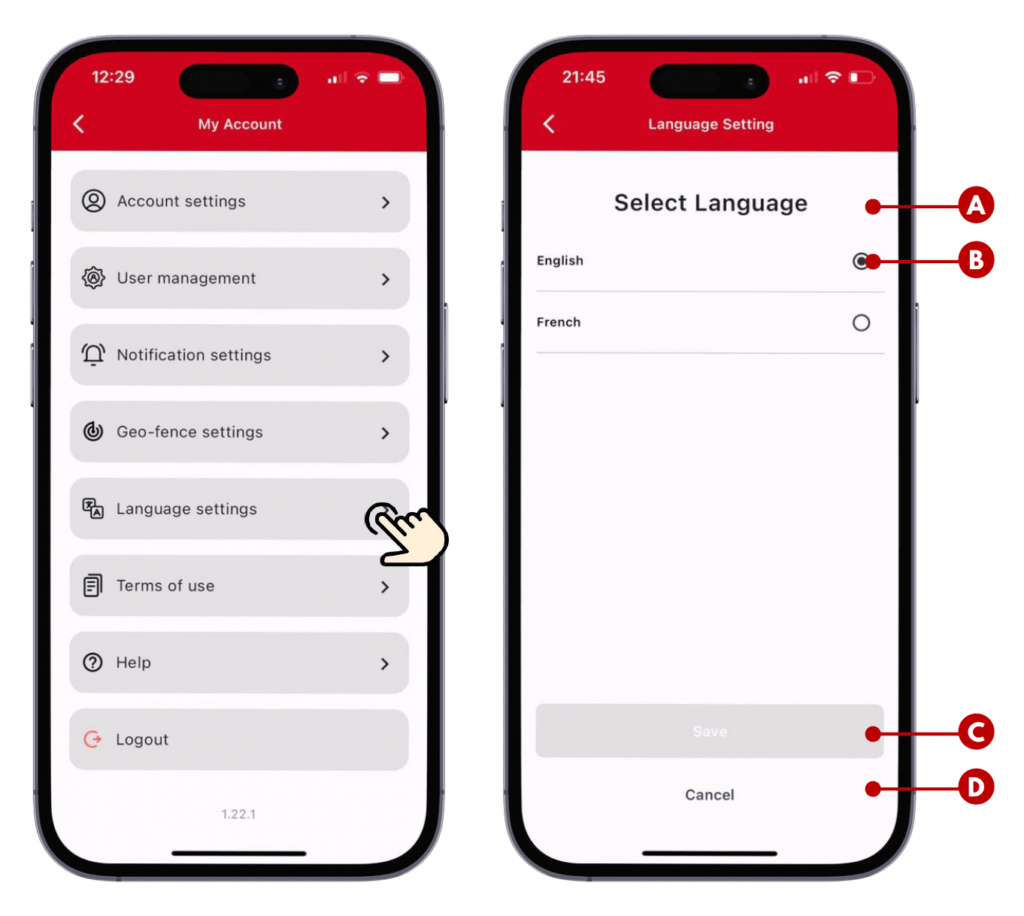
CHANGE APPLICATION LANGUAGE

The application language can be switching between English and French. You can select your preferred language.

ABOUT LANGUAGE :

A. Language List: Languages available are listed here. The application provides you with English and French.

B. Radio Button: You can tap the button next to the language you preferred.

C. Save: The button will enabled (light up) for you to save the setting if you’ve change the language.

D. Cancel: You can tap the button if you do not wish to continue with language change.

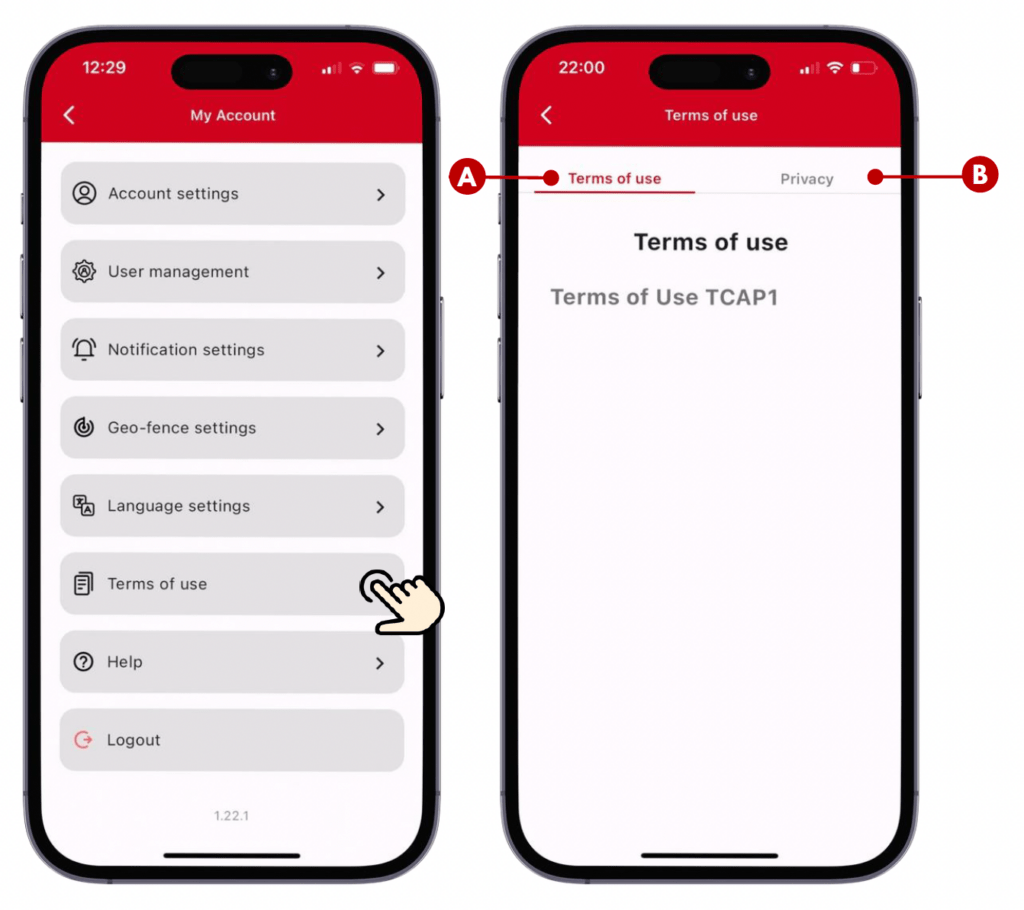
REVISIT OUR TERMS
& PRIVACY POLICY

You can revisit our Terms & Privacy policy if you wish to read it in detail once again.

ABOUT TERMS OF USE :

A. Terms of Use Tab: Tap to see full content of our latest Terms of Use.

B. Privacy Policy Tab: Tap to see full content of our latest Privacy Policy.

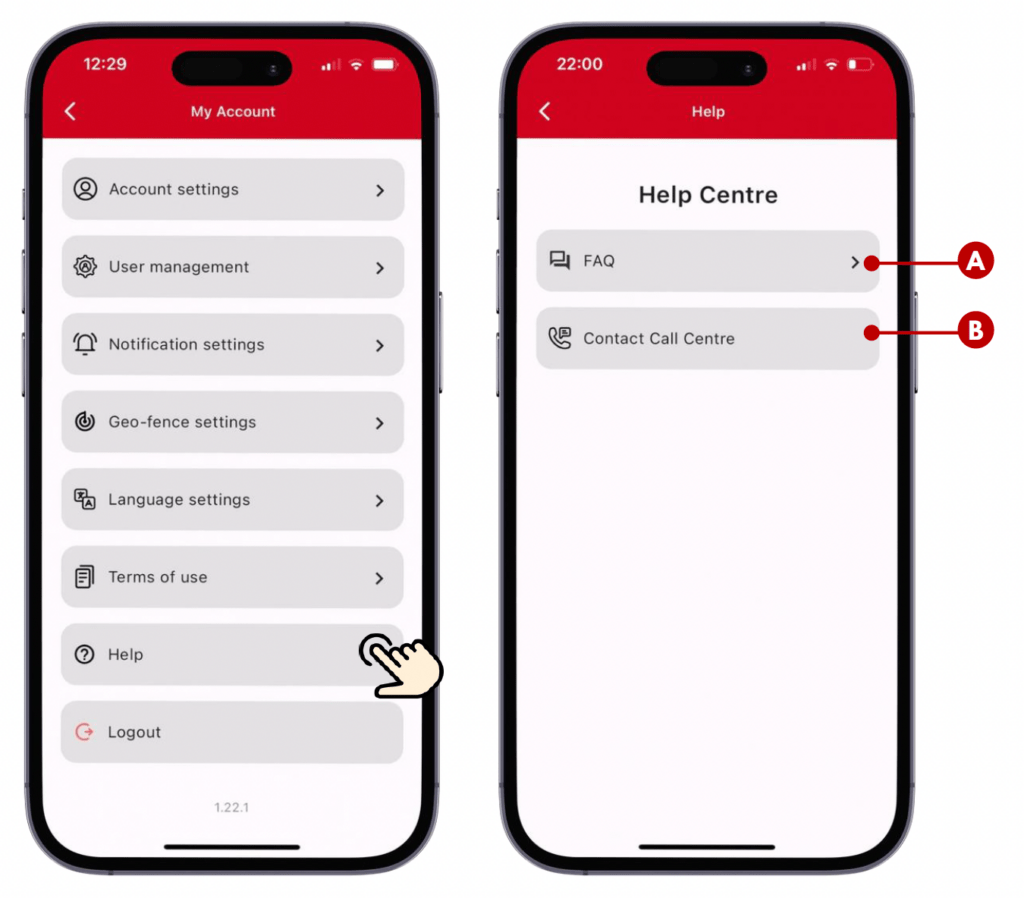
ACCESS HELP CENTRE (PART A)

If you face any difficulties in using the application, you can a list of FAQ and call centre contact here.

ABOUT HELP CENTRE :

A. FAQ: Frequently asked questions regarding the application are summarized here. You can refer to these questions and answers as a primary assistance to use the application.

B. Contact Call Centre: You can access our call centre telephone number and tap to make a call from your mobile phone.

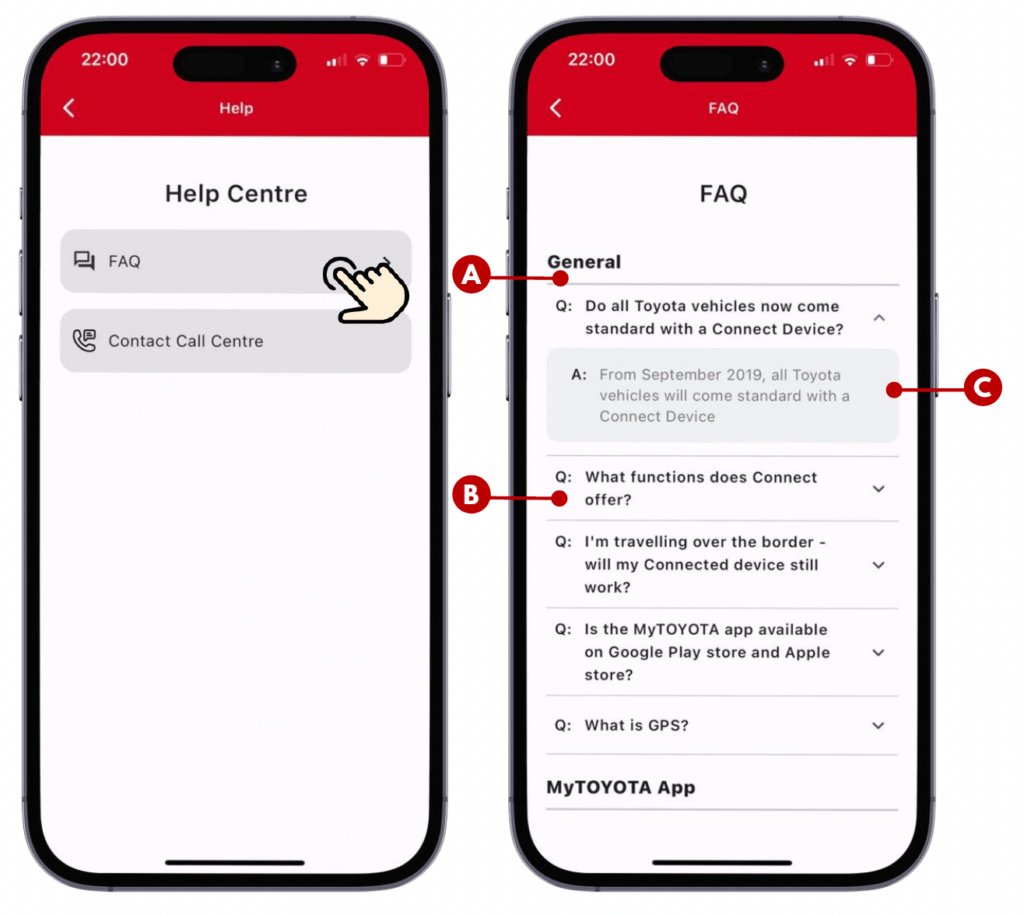
ACCESS HELP CENTRE (PART B)

If you face any difficulties in using the application, you can a list of FAQ and call centre contact here.

ABOUT HELP CENTRE :

A. FAQ Category: Questions and answers are arranged into section according to category. You can scroll down to find the question category you’re looking for.

B. FAQ List: Frequently asked questions are listed down here.

C. Answer: You can find answer to the question by tapping on the question. The answer will display right below that question.

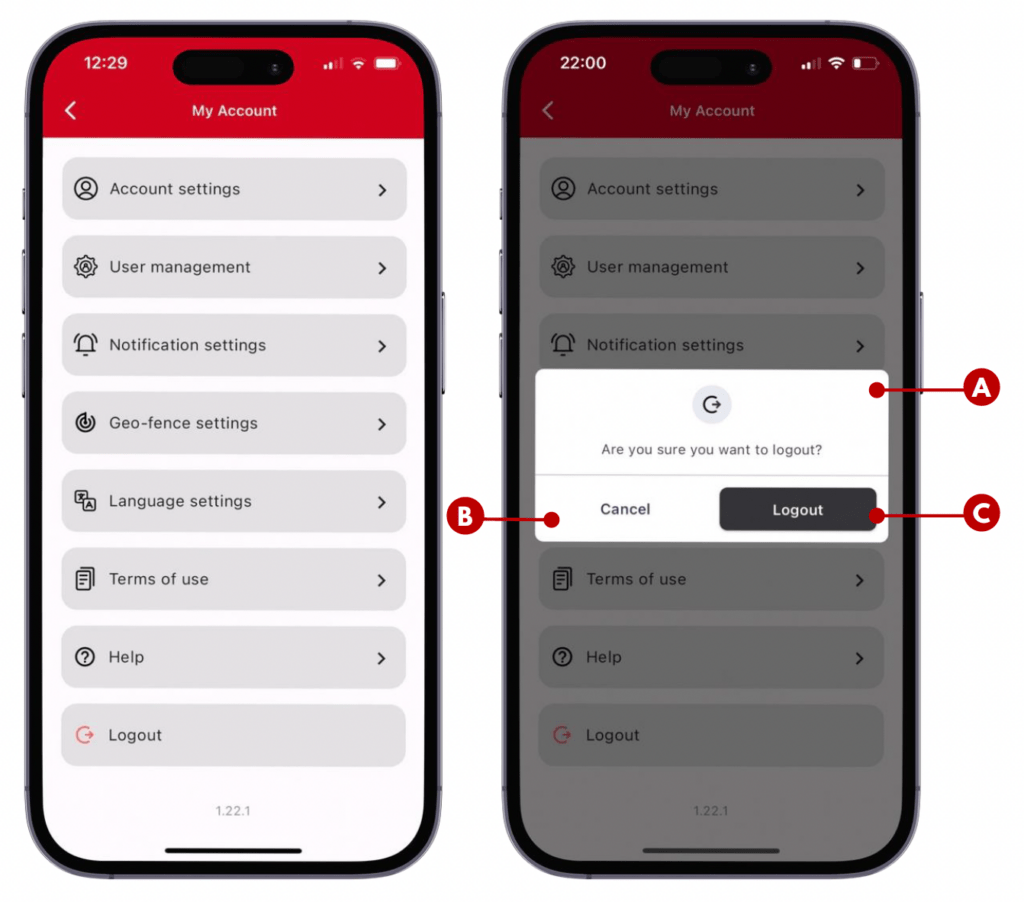
LOGOUT

You can logout from the application by accessing to My Account menu. Once you confirm to logout, the application will lead you back to login screen.

ABOUT LOGOUT :

A. Logout Confirmation Pop-up: The application will ask you to confirm whether you would like to logout, or not.

B. Cancel Button: You can cancel the logout if you wish to continue using the application with current user account.

C. Logout Button: Tap to confirm and proceed with logging out.

Head Office

Stand1 - Wesco Park, Old Pretoria Road
Sandton, Gauteng, 2146
PO Box 481 Bergvlei, 2012, Gauteng, South Africa